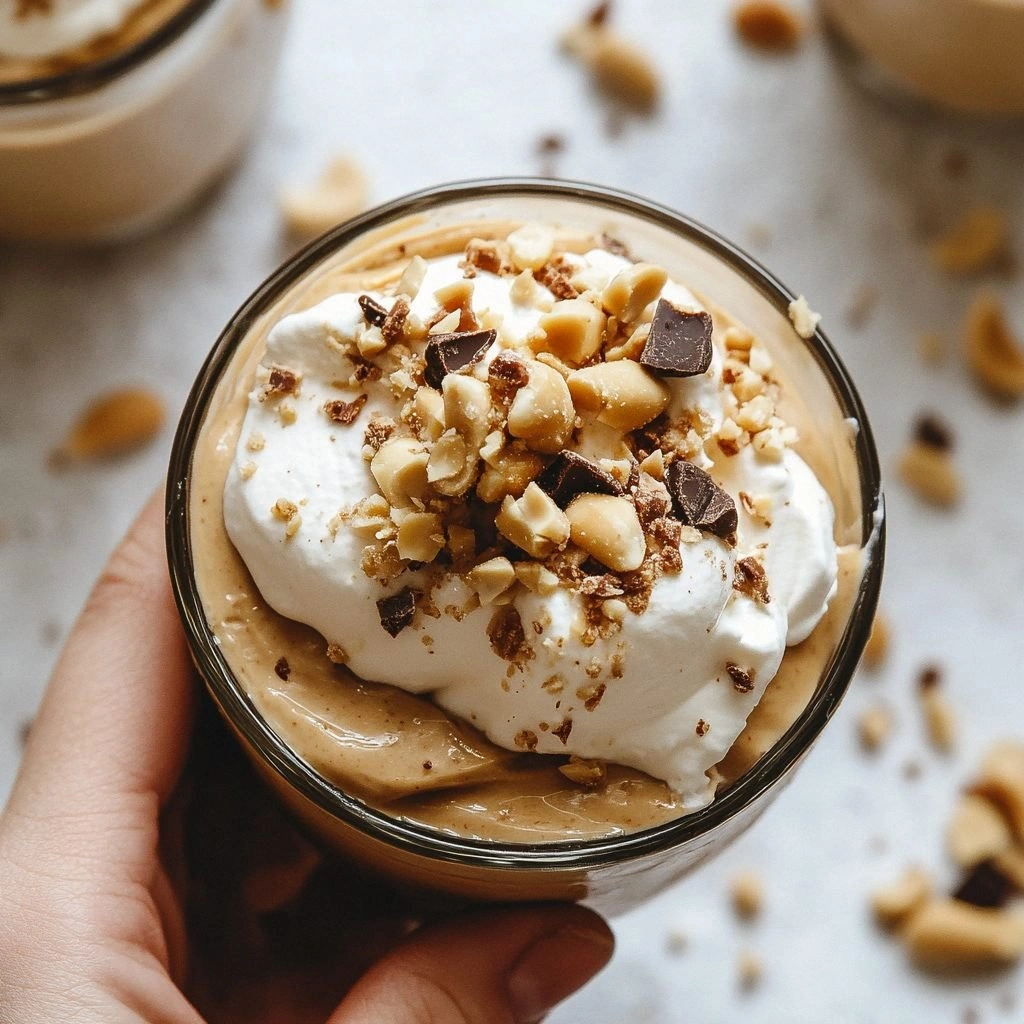
I was standing in a cramped kitchen, staring at a jar of peanut butter that had been sitting in the back of the fridge for weeks, and suddenly the idea hit me like a bolt of lightning: what if I could turn that humble jar into something that feels like dessert, but only takes five minutes? The air was thick with the nutty aroma of peanut butter, a hint of vanilla drifting from the pantry, and the faint sweetness of honey already mingling in the air. I imagined a silky, chocolatey cloud that would make even the most stubborn sweet tooth swoon. I dared myself to whip this up, and the result was a mousse that coats the tongue like velvet, leaving a lingering, buttery finish that makes you want to taste again and again.
Picture this: the moment you scoop a spoonful onto your tongue, the chocolate flavor explodes, followed by the rich, nutty undertone of peanut butter, and then a whisper of honey sweetness that lingers like a secret. The texture is light yet dense, with a glossy sheen that catches the light. It feels like a secret indulgence you can enjoy in a flash, yet it’s so satisfying that you’ll be tempted to double the portion. And the best part? It takes less time than it takes to decide what to eat for dinner.
This version stands out from every other recipe because it’s not just about speed; it’s about flavor intensity, texture precision, and a touch of culinary daring. I’ve experimented with different ratios, and the final blend is a harmonious balance that’s both creamy and airy. The secret sauce? A touch of heavy cream to lift the density, a dash of cocoa to deepen the chocolate profile, and a splash of honey to round off the palate. The result is a mousse that feels indulgent without the guilt, and it’s so simple that even a novice can master it.
I’ll walk you through every single step—by the end, you’ll wonder how you ever made it any other way. And trust me, this is hands down the best version you’ll ever make at home. If you’ve ever struggled with achieving a silky mousse, you’re not alone—I've got the fix. Let’s dive in.
What Makes This Version Stand Out
- Taste: The combination of peanut butter, cocoa, and honey creates a layered flavor profile that feels both familiar and surprising. The chocolate undertone is rich, while the peanut butter provides a nutty depth that lingers. It’s a flavor duet that sings on the tongue.
- Texture: The mousse is airy yet substantial, thanks to the whipping of heavy cream. It melts in your mouth like a dream, leaving behind a silky trail that invites a second spoonful. The finish is smooth, with no gritty peanut bits.
- Speed: The entire process takes less than five minutes, from mixing to serving. You can go from pantry to plate in a flash, making it perfect for last-minute dessert cravings.
- Simplicity: Only six ingredients, no fancy equipment, and no complicated steps. Even a kitchen novice can master this with a whisk or a hand mixer.
- Versatility: It can be served over fruit, layered in parfaits, or topped with fresh berries. The mousse adapts to any dessert framework you desire.
- Ingredient Quality: Using natural, high-quality peanut butter and honey elevates the flavor beyond the ordinary. The fewer the ingredients, the more each one shines.
- Make-Ahead Potential: Store it in the fridge for up to 48 hours, and it stays perfectly smooth. It’s a great prep-ahead treat for busy evenings.
- Visual Appeal: The glossy finish and the contrast of dark chocolate against a light peanut base make it Instagram-worthy. A quick drizzle of chocolate ganache can add an extra wow factor.
Alright, let's break down exactly what goes into this masterpiece...
Inside the Ingredient List
The Flavor Base
Peanut butter is the star of the show. Its creamy, buttery texture forms the backbone of the mousse, providing a rich flavor that’s unmistakably nutty. If you skip it, you lose that deep, comforting taste that anchors the dessert. For a different twist, try using natural almond butter or cashew butter for a subtler nut profile.
Honey is the sweetener that balances the bitterness of cocoa. It adds a floral nuance and a subtle caramel undertone that brightens the overall flavor. Without honey, the mousse would taste too heavy and one-dimensional. If you’re vegan or prefer a lower-sugar option, maple syrup or agave nectar can replace honey while maintaining the same sweetness level.
The Texture Crew
Heavy cream is the secret to the mousse’s airy consistency. When whipped, it incorporates air pockets that give the dessert a light, cloud-like feel. Skipping the cream would result in a thick, dense spread that doesn’t melt on the tongue. If you’re lactose intolerant, coconut cream or a dairy-free whipping cream works well, though the flavor will shift slightly.
Unsweetened cocoa powder adds depth and a touch of bitterness that counterbalances the sweetness. It also contributes to the glossy sheen, giving the mousse a professional finish. If you don’t have cocoa, you can use melted dark chocolate instead, but the texture may become slightly heavier.
The Unexpected Star
Vanilla extract is the unsung hero that ties the flavors together. It brings a subtle warmth that enhances both the peanut and chocolate notes. A pinch of sea salt also amplifies the sweetness and balances the richness. If you prefer a more intense vanilla flavor, try vanilla bean paste or a few drops of almond extract.
Everything's prepped? Good. Let's get into the real action...
The Method — Step by Step
-
Start by warming the heavy cream in a small saucepan over low heat until it just begins to steam. The goal is to soften the cream so it mixes smoothly with the peanut butter. Don’t let it boil—watch the surface for tiny bubbles. This step is the foundation for a silky texture.
-
In a mixing bowl, combine the peanut butter and honey. Use a spatula to stir until the mixture is smooth and uniform. The honey dissolves the peanut butter, creating a glossy base. I dare you to taste this and not go back for seconds.
-
Slowly pour the warmed cream into the peanut butter mixture while whisking vigorously. The key is to incorporate air and avoid lumps. If the mixture thickens too quickly, add a splash of cold water to keep it flowing. This is where the mousse gains its airy lift.
-
Add the unsweetened cocoa powder and vanilla extract to the bowl. Whisk until the cocoa is fully blended and the mixture is smooth. The cocoa should give the mousse a deep, chocolatey hue that contrasts beautifully with the peanut base.
-
Season with a pinch of sea salt. This small addition elevates the sweetness and brings out the depth of the peanut and chocolate flavors. Salt is a flavor enhancer—don’t skip it.
-
Use a hand mixer or a stand mixer on low speed to whip the mixture until it doubles in volume and holds soft peaks. This step takes about 2 minutes. The mousse should look glossy and feel light. If you’re using a hand mixer, keep the beaters angled to avoid splattering.
-
Transfer the mousse into serving glasses or a bowl. For a polished presentation, drizzle a thin line of melted dark chocolate on top. The chocolate will set slightly, creating a delightful contrast when you bite into the mousse.
-
Refrigerate for at least 30 minutes to allow the flavors to meld and the mousse to set. While it chills, you can prepare any additional toppings or garnish. The mousse will firm up, making it easier to spoon or pipe.
-
Serve chilled, garnished with fresh berries, crushed nuts, or a dusting of cocoa powder. The contrast of textures—soft mousse with crunchy nuts or juicy berries—adds a satisfying dimension. Enjoy immediately, or keep it in the fridge for up to 48 hours.
That's it—you did it. But hold on, I've got a few more tricks that'll take this to another level. Keep reading for insider tips that will elevate your mousse from good to unforgettable.
Insider Tricks for Flawless Results
The Temperature Rule Nobody Follows
Mixing ingredients at the right temperature is crucial for a smooth mousse. If the peanut butter is too cold, it will clump; if the cream is too hot, it can scorch the mixture. Aim for a warm but not hot cream, and let the peanut butter sit at room temperature for a few minutes before mixing.
Why Your Nose Knows Best
Before you whisk, give the mixture a quick sniff. The aroma of cocoa and honey should be unmistakable. If it smells flat, the ingredients may have lost potency—use fresh items for the best flavor.
The 5-Minute Rest That Changes Everything
After whipping, let the mousse rest for 5 minutes before plating. This short pause allows the air bubbles to settle, giving the mousse a more even texture. It also lets the flavors meld, creating a harmonious taste.
Garnish with a Twist
Instead of plain berries, try a drizzle of salted caramel sauce or a sprinkle of toasted coconut flakes. These additions add crunch and a new flavor dimension, turning the mousse into a multi-sensory experience.
Use a Silicone Mould for a Fancy Presentation
If you want a more elegant look, pour the mousse into a silicone mould and chill until firm. Then pop it out and serve on a plate with a dusting of cocoa powder. The mould creates clean edges and a professional finish.
Creative Twists and Variations
This recipe is a playground. Here are some of my favorite ways to switch things up:
Nutty Banana Layer
Add mashed ripe banana to the base mixture for a fruitier flavor. The banana complements the peanut butter and adds natural sweetness. Layer the mousse with banana slices for a fun, layered dessert.
Minty Freshness
Stir in a few drops of peppermint extract. The mint cuts through the richness and gives the mousse a refreshing bite. It’s perfect for a summer treat.
Chocolate Chip Surprise
Fold in mini chocolate chips just before serving. The chips melt slightly, creating pockets of molten chocolate that burst in your mouth. This adds a delightful texture contrast.
Spiced Up
Add a pinch of cayenne pepper or a dash of cinnamon. The spice adds depth and a subtle heat that pairs wonderfully with the sweetness. It’s a great way to elevate a simple mousse.
Coffee Kick
Stir in a tablespoon of instant espresso powder. The coffee flavor deepens the chocolate notes and gives the mousse an adult edge. This version is ideal for a cozy night in.
Berry Burst
Top the mousse with a spoonful of fresh mixed berries and a drizzle of balsamic reduction. The acidity of the berries cuts through the richness and adds a tangy contrast.
Storing and Bringing It Back to Life
Fridge Storage
Keep the mousse in an airtight container in the refrigerator for up to 48 hours. The mousse will remain smooth and creamy. If the mousse thickens, give it a quick stir before serving.
Freezer Friendly
For longer storage, freeze the mousse in a freezer-safe container for up to 3 months. Thaw overnight in the fridge before serving. The texture remains silky, though it may separate slightly; a quick whisk will restore its smoothness.
Best Reheating Method
To refresh a chilled mousse, add a splash of warm water and whisk gently. This steams the mousse back to perfection, restoring its airy texture. Avoid microwaving, as it can alter the flavor profile.