Somewhere between the second failed attempt at making a cheeseburger and the moment I realized I had eaten half the bacon straight from the pan, it hit me — why not just put everything I love about a backyard cookout into one gloriously messy sub? Picture this: a rainy Tuesday night, my kitchen smelling like a bourbon distillery collided with a barbecue joint, and me standing there with raw ground beef in one hand and a half-empty bottle of Kentucky's finest in the other. The original plan was simple burgers, but the universe (and maybe the bourbon) had other plans. What emerged from this beautiful chaos was a sandwich so outrageously good that my neighbor rang the doorbell asking if I was running a secret restaurant.
Here's the thing — most meatball subs are sad, soggy affairs that taste like cafeteria nostalgia and regret. They're the culinary equivalent of that friend who shows up to the party but never brings anything interesting to talk about. But these bourbon-kissed barbecue bacon cheeseburger meatball subs? They're the life of the party, the one who arrives with stories that make everyone gather around. The moment you bite through that crusty roll into a juicy meatball that's been swimming in a bourbon-barbecue lagoon, topped with molten cheddar and shards of crispy bacon, something magical happens. Time slows down, your eyes close involuntarily, and you make that noise — you know the one — that primitive sound of pure satisfaction.
I dare you to taste this and not go back for seconds. Actually, I double-dog dare you. Because I've watched grown adults fight over the last sub at game night, witnessed first dates turn into marriage proposals (okay, maybe that was the wine), and seen my teenage nephew forget about his phone for a solid fifteen minutes — which in teen time is basically a miracle. The secret isn't just throwing everything together and hoping for the best. It's about building layers of flavor like you're constructing a edible skyscraper of comfort food excellence.
Let me walk you through every single step — by the end, you'll wonder how you ever made it any other way. We're talking about meatballs that stay impossibly tender while developing those crave-worthy crispy edges, a barbecue sauce that's been kissed by bourbon and transformed into something that'll make you want to lick the spoon (and the pan, and maybe the countertop where a drop fell), and the perfect ratio of cheese-to-meatball-to-bacon that ensures every bite is a perfect bite. Stay with me here — this is worth it.
What Makes This Version Stand Out
- Bourbon-Infused Brilliance: Most recipes get this completely wrong — they either drown the meatballs in booze or skip it entirely. We're using just enough bourbon to add a smoky, vanilla complexity that makes the barbecue sauce taste like it came from a Memphis pitmaster's secret recipe. The alcohol cooks off, leaving behind this incredible depth that'll have people asking what your secret ingredient is.
- Texture That Dreams Are Made Of: These aren't your typical dense, hockey-puck meatballs. We're creating a texture that's tender and almost cloud-like inside, with crispy edges that shatter like thin ice when you bite into them. The secret? A combination of fresh breadcrumbs soaked in a bit of milk and a gentle mixing technique that keeps the proteins relaxed.
- The Bacon Situation: Listen, I've tried every method under the sun, and here's what actually works — we're rendering the bacon until it's crispy-chewy, then crumbling it so every bite gets a perfect piece. No more wrestling with whole bacon strips that pull out of your sandwich like some kind of meaty magic trick.
- Cheese Strategy That Actually Works: Instead of just melting cheese on top and calling it a day, we're creating a cheese blanket that hugs each meatball individually before getting draped over the whole affair. This means no naked meatballs and every bite has that perfect cheese pull.
- Make-Ahead Magic: Picture yourself pulling this out of the oven after a long day, the whole kitchen smelling incredible, and realizing you did all the hard work yesterday. These subs reheat like champions, making them perfect for meal prep or those nights when you need comfort food but don't want to cook.
- Roll Game Strong: We're not just grabbing any old hot dog bun here. The roll choice is crucial — it needs to be sturdy enough to hold everything without falling apart, but soft enough to squish down and fit everything in your mouth. I'll show you exactly what to look for and how to prep them so they don't turn into a soggy mess.
Alright, let's break down exactly what goes into this masterpiece...
Inside the Ingredient List
The Flavor Base
Ground beef is the star here, but not just any ground beef will do. You want an 80/20 blend — enough fat to keep things juicy and flavorful, but not so much that you're eating grease bombs. If you've ever struggled with dry meatballs, you're not alone — and I've got the fix. The fat content is crucial because as the meatballs cook, that fat renders and bastes the meat from the inside, keeping everything moist and adding incredible flavor. Skip the lean stuff unless you enjoy chewing on meat-flavored cotton balls.
The onion and garlic aren't just there for show — they're building the aromatic foundation that makes your kitchen smell like you've been cooking for hours. I use a small onion because too much can make the meatballs fall apart, but we need enough to add that sweet, caramelized flavor. Fresh garlic is non-negotiable here; the pre-minced stuff in jars tastes like disappointment and regret. When you're sautéing them together, wait until the onion goes translucent and the garlic smells fragrant but hasn't browned — that's your sweet spot.
The Texture Crew
Breadcrumbs are the unsung heroes of tender meatballs, but here's where most recipes get it wrong — they use dry breadcrumbs and wonder why their meatballs taste like sawdust. We're using fresh breadcrumbs soaked in a splash of milk, creating a panade that keeps the meat tender even if you accidentally overcook them. The milk activates the starches in the bread, creating this magical binding agent that also locks in moisture. Don't have fresh breadcrumbs? Blitz some day-old bread in your food processor, or if you're in a pinch, soak dry breadcrumbs in milk for 10 minutes.
The egg is your binder, but it's doing more than just holding things together. It adds richness and helps create that tender texture we're after. One large egg is perfect for this amount of meat — too much and your meatballs get rubbery, too little and they fall apart faster than my willpower at a bakery. Make sure it's at room temperature so it incorporates evenly throughout the mixture.
The Unexpected Star
Bourbon isn't just for drinking anymore — though I won't judge if you pour yourself a splash while cooking. When you add it to the barbecue sauce, something magical happens. The alcohol cooks off, leaving behind these incredible vanilla and caramel notes that make the sauce taste like it's been aging in oak barrels for years. It's the difference between a good barbecue sauce and one that makes people close their eyes and sigh contentedly. If you don't have bourbon, you could use whiskey, but please don't use that flavored stuff that tastes like artificial vanilla extract had a bad day.
Parmesan cheese in meatballs might seem weird, but trust me on this one. It adds this incredible umami depth that makes people ask what your secret ingredient is. The aged cheese brings a nutty, salty complexity that plays beautifully with the beef. Don't use the powdered stuff in the green can — grab a wedge and grate it yourself. Yes, it's more work, but so is eating mediocre food, and you're better than that.
The Final Flourish
Barbecue sauce choice is crucial here, and I have opinions. You want something with a good balance of sweet, tangy, and smoky — not that candy-sweet stuff that tastes like liquid smoke and corn syrup had a baby. Look for sauces that list tomatoes as the first ingredient and have a nice balance of vinegar and sweetness. We're doctoring it up with bourbon anyway, so start with a solid foundation. My go-to is a local brand that's been around since the 1950s, but any quality sauce will work.
Cheddar cheese needs to be sharp enough to stand up to all these bold flavors, but not so aged that it doesn't melt properly. A good aged cheddar — about 12 to 18 months — hits that sweet spot of flavor and meltability. Pre-shredded cheese is coated in cellulose to prevent clumping, which also prevents it from melting smoothly. Buy a block and shred it yourself; your sandwiches will thank you. Plus, you get to eat the little cheese shavings that don't make it into the bowl — cook's privilege.
Everything's prepped? Good. Let's get into the real action...
The Method — Step by Step
- Start by cooking your bacon in a large skillet over medium heat — this is where the magic begins. Lay the strips in a cold pan and let them heat up gradually; this renders the fat more evenly and gives you perfectly crispy bacon without burnt spots. The goal here is crispy-chewy bacon that'll hold its own against all the other textures, not shatter-in-your-mouth crispy. Turn the strips occasionally and watch for that perfect golden-brown color. When they're done, transfer to a paper towel-lined plate to drain, but whatever you do, don't pour out that bacon fat — it's liquid gold that we'll use to sauté our aromatics.
- While the bacon's doing its thing, get your onion and garlic party started in the same pan with a tablespoon of that glorious bacon fat. That sizzle when the onions hit the pan? Absolute perfection. Cook them over medium heat until the onions go translucent and start to caramelize around the edges — this takes about 5-7 minutes. The garlic goes in during the last minute because burnt garlic tastes like bitter disappointment, and we're not about that life. Once they're done, transfer them to a large mixing bowl and let them cool slightly so they don't start cooking the beef when we mix everything together.
- Now for the fun part — let's talk meatballs. In your large bowl with the cooled onion mixture, add the ground beef, breadcrumbs, Parmesan, egg, salt, and pepper. Here's the crucial technique that separates tender meatballs from dense disappointment: use your fingertips to gently mix everything together. Don't squeeze or overwork the meat — think of it like you're giving it a gentle massage. Overmixing activates the proteins and creates a tough, rubbery texture that'll make you sad. The mixture should just come together when you press it, but still feel slightly loose and airy.
- Time to roll! I use a small ice cream scoop to ensure uniform size — this isn't just about looks (though it does make them look professional). Even-sized meatballs cook at the same rate, so you don't end up with some overcooked and some still pink in the middle. Roll them gently between your palms; they should be about the size of a golf ball. Place them on a parchment-lined baking sheet as you go, and don't crowd them — they need personal space to brown properly. You'll get about 16-20 meatballs from this recipe, depending on how generous you are with the sizing.
- Heat a tablespoon of olive oil in your largest skillet over medium-high heat. When the oil shimmers and moves like water across the pan, it's ready for the meatballs. Don't overcrowd the pan — work in batches if necessary. The meatballs should sizzle when they hit the pan; if they don't, the pan isn't hot enough. Let them cook undisturbed for about 3 minutes until they develop a beautiful brown crust, then turn them to brown on all sides. This isn't the time to be gentle — you want them well-browned for maximum flavor development.
- Once the meatballs are browned all over, it's time for the bourbon barbecue bath. Pour in the bourbon and let it bubble for about 30 seconds — this cooks off the harsh alcohol flavor while leaving behind all those gorgeous vanilla and caramel notes. Then add the barbecue sauce and reduce the heat to medium-low. The sauce should just barely bubble around the edges. Cover the pan and let everything simmer for about 15 minutes, turning the meatballs occasionally to coat them in that incredible sauce. Your kitchen will start smelling like a Memphis barbecue joint, and your neighbors might show up with empty plates.
- While the meatballs are getting happy in their bourbon barbecue spa, prep your rolls. You want to lightly toast them so they can stand up to all that saucy goodness without falling apart. Split them almost all the way through, leaving a hinge so they can cradle all the fillings. Brush the insides with a little olive oil and pop them under the broiler for 2-3 minutes — watch them like a hawk because they go from perfectly toasted to charcoal in seconds. They should be just golden and slightly crispy around the edges.
- This next part? Pure magic. Take those crispy bacon strips and crumble them into pieces — not too small, you want to taste them in every bite. When the meatballs are cooked through (cut one open to check — it should be just cooked through but still juicy), stir half the bacon into the sauce. This distributes the smoky flavor throughout every bite. Reserve the other half for topping — we're building layers of bacon here, and nobody's complaining about that.
- The cheese situation is where we separate the good from the legendary. Sprinkle the cheddar cheese over the meatballs, cover the pan, and let it melt for about 2 minutes. The cheese should be completely melted and starting to bubble around the edges. If you want that Instagram-worthy cheese pull, hit it with the broiler for 30 seconds at the end — just until the cheese starts to brown in spots. This creates those crispy cheese edges that'll make you weak in the knees.
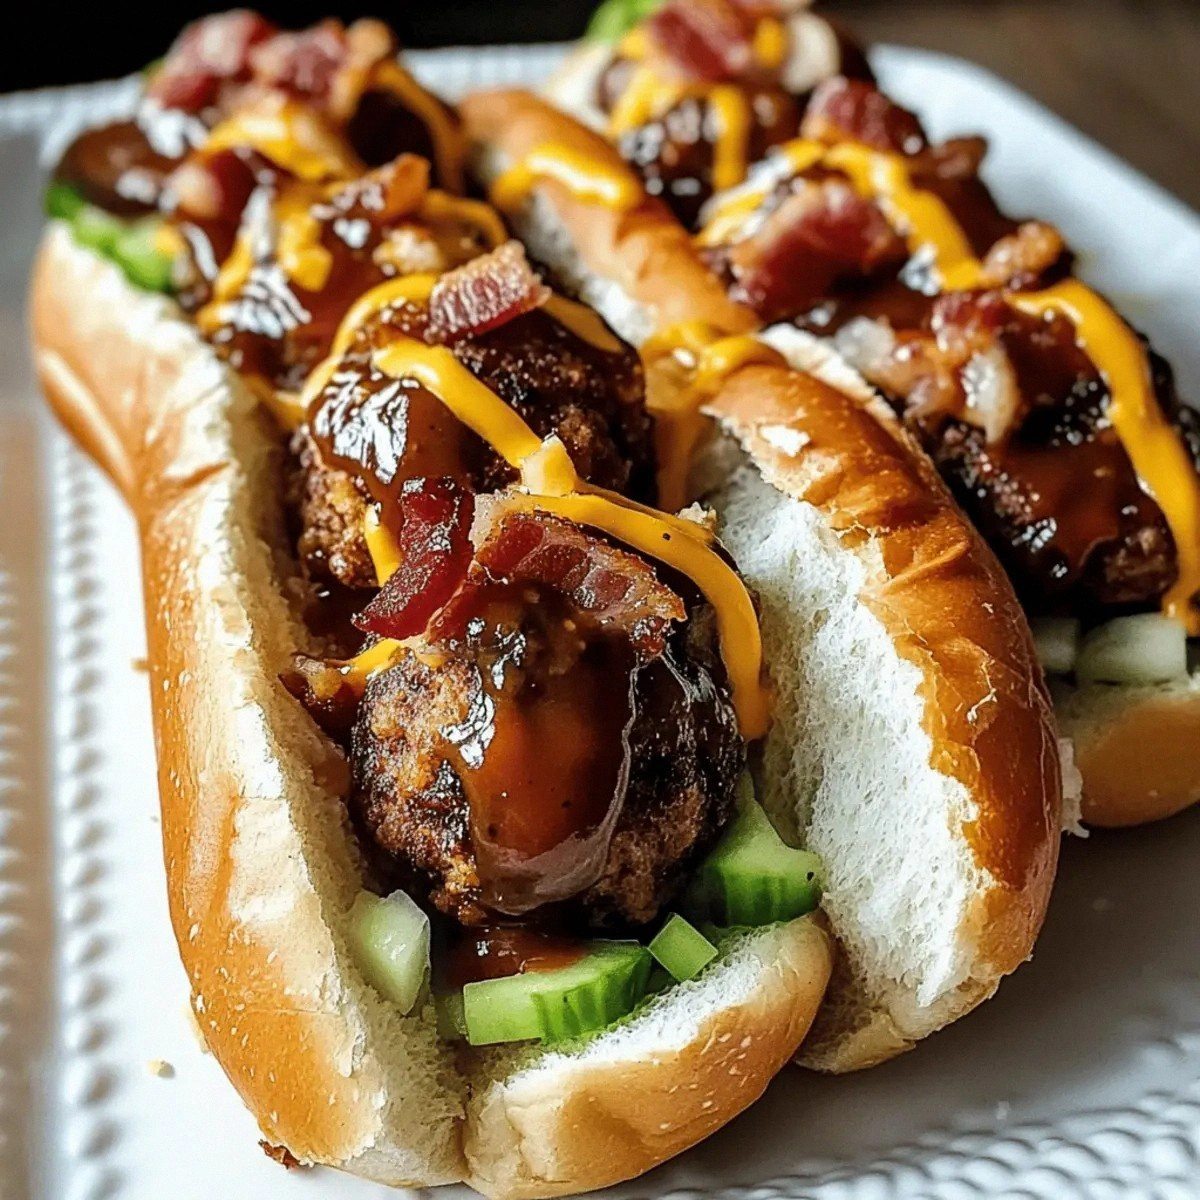
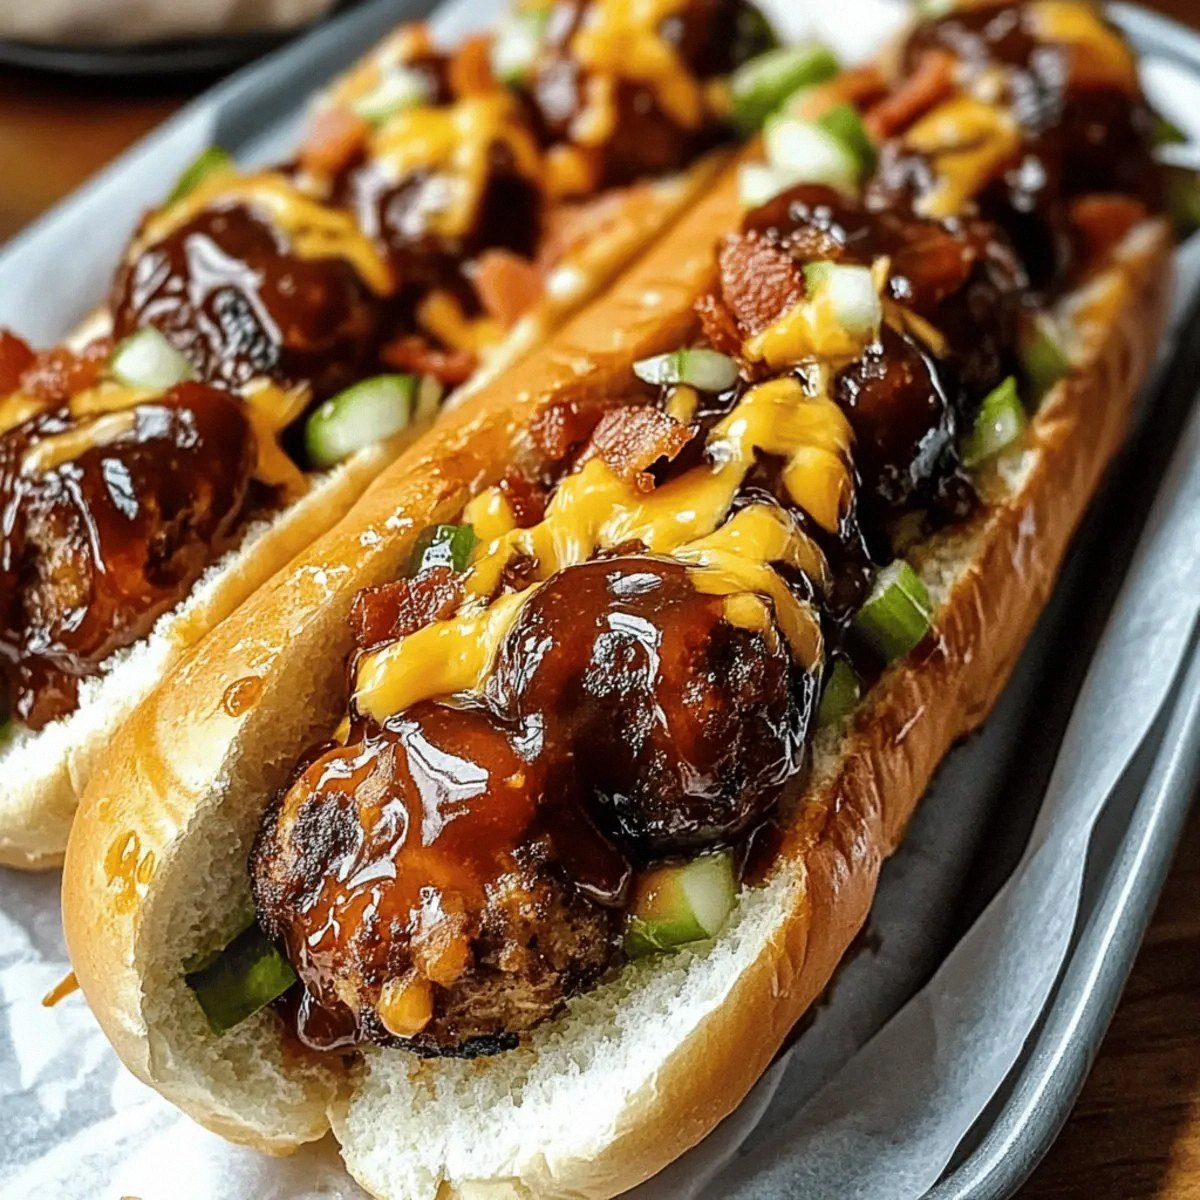
- Assembly time! Lay those toasted rolls on a platter and get ready for the moment of truth. Using a slotted spoon, pile 4-5 meatballs into each roll (depending on their size). Spoon extra sauce over the top — be generous here, you want it to drip down and flavor every bite. Top with the remaining crispy bacon, and if you're feeling fancy, some thinly sliced green onions or pickled jalapeños. Serve immediately while the cheese is still molten and the sauce is hot enough to make you do that little dance where you blow on your food but can't wait to eat it.
That's it — you did it. But hold on, I've got a few more tricks that'll take this to another level...
Insider Tricks for Flawless Results
The Temperature Rule Nobody Follows
Here's what actually works — use cold ground beef straight from the fridge. I know, I know, every recipe tells you to let meat come to room temperature, but for meatballs, cold is gold. Cold fat stays solid longer, which means as the meatballs cook, the fat renders slowly and keeps them incredibly juicy. A friend tried skipping this step once — let's just say it didn't end well. Her meatballs were dry and crumbly, and she had to serve them with extra sauce to hide the disappointment. Cold beef also means the meatballs hold their shape better during cooking, so you don't end up with meatball hash.
Why Your Nose Knows Best
Your nose is the most underrated kitchen tool you own. When the onions hit the pan, they should smell sweet and slightly sharp — if they smell acrid or bitter, your heat is too high. The garlic is ready when it smells fragrant and slightly nutty, not sharp or raw. And here's the real secret — when your meatballs are perfectly browned, they'll smell like the best steakhouse you've ever walked into. That rich, meaty aroma means the Maillard reaction is happening, creating hundreds of flavor compounds that'll make your taste buds sing. Trust your nose; it's been evolving for millions of years to detect exactly when food goes from good to incredible.
The 5-Minute Rest That Changes Everything
After you assemble these beauties, let them rest for exactly 5 minutes — not 3, not 7, but 5. This isn't some arbitrary rule I made up to torture hungry people. During these 5 minutes, the sauce soaks into the bread just enough to flavor it without making it soggy, the cheese sets slightly so it doesn't all slide off with the first bite, and the meatballs cool to that perfect temperature where you can taste all the flavors without burning your mouth. I've timed it perfectly — any longer and the bread gets mushy, any shorter and you're dealing with molten cheese lava. Set a timer, pour yourself a drink, and practice your patience. It's worth it.
The Double-Cheese Method
This is the game-changer that'll make people think you've been secretly training with Italian grandmothers. Instead of just melting cheese on top, we're doing a double-cheese technique. First, mix a handful of shredded cheddar into the hot sauce right before adding the cheese topping. This creates little pockets of molten cheese throughout the sauce, ensuring every bite has that perfect cheese pull. Then add the cheese on top for that beautiful melted blanket. It's like a cheese insurance policy — you're guaranteed maximum cheese distribution in every single bite.
Creative Twists and Variations
This recipe is a playground. Here are some of my favorite ways to switch things up:
The Smoky Mountain Version
Swap out regular bacon for thick-cut smoked bacon and add a teaspoon of smoked paprika to the meatball mixture. Use a smoky bourbon like Knob Creek and finish with smoked gouda instead of cheddar. This version tastes like it came straight from a mountain cabin where someone spent all day tending a smoker. It's perfect for those nights when you want to feel like you're eating around a campfire without actually having to sleep on the ground.
The Spicy Tex-Mex Take
Add a minced jalapeño to the onion mixture, swap the cheddar for pepper jack, and stir in a tablespoon of chipotle peppers in adobo sauce to the barbecue sauce. Top with pickled red onions and fresh cilantro. This version has a kick that builds slowly and leaves your lips tingling in the best way. If you've ever struggled with wanting spicy food that actually tastes like something beyond just heat, this is your answer.
The Breakfast-for-Dinner Remix
Use breakfast sausage instead of ground beef, add a teaspoon of maple syrup to the sauce, and top with a fried egg. The runny yolk creates this incredible sauce that mixes with the barbecue and makes you wonder why breakfast sandwiches don't always include bourbon barbecue sauce. I'll be honest — I ate half the batch before anyone else got to try it when I made this version.
The Italian-American Mashup
Replace half the ground beef with Italian sausage, use a mix of mozzarella and provolone for the cheese, and add a teaspoon of Italian seasoning to the meat mixture. Serve on garlic bread rolls for a sandwich that can't decide if it's Italian or American and doesn't care because it's too busy being delicious. It's like if a meatball sub and a cheeseburger had a baby that was raised by Italian grandparents.
The Healthy-ish Version
Use ground turkey (dark meat, not breast) and turkey bacon, swap regular breadcrumbs for whole wheat, and use a lower-sugar barbecue sauce. Add finely grated zucchini to the meat mixture — it'll disappear but add moisture and nutrients. Top with part-skim mozzarella. Is it exactly the same? No. Is it still crave-worthy and weeknight-friendly? Absolutely.
The Game-Day Giant
Instead of individual subs, make one giant sandwich using a whole loaf of Italian bread. Hollow it out, fill it with double the meatballs and sauce, wrap in foil, and bake for 20 minutes at 350°F. Slice it like a loaf cake and watch grown adults lose their minds over it. This feeds a crowd and makes you look like a sandwich wizard.
Storing and Bringing It Back to Life
Fridge Storage
These subs are actually better the next day — the flavors have time to meld and become best friends. Store the meatballs and sauce together in an airtight container for up to 4 days. Keep them separate from the rolls and cheese until you're ready to reheat. The key is letting everything come to room temperature before reheating, which prevents that weird texture you get when you nuke cold meatballs straight from the fridge. If you assembled the subs already, wrap them individually in foil and refrigerate for up to 2 days, though the bread will get a bit soggy.
Freezer Friendly
The meatballs freeze beautifully for up to 3 months — just cool them completely, then freeze in a single layer on a baking sheet before transferring to freezer bags. This prevents them from sticking together in one giant meatball blob. Freeze the sauce separately in ice cube trays, then pop out the cubes and store in bags. This way you can defrost exactly what you need. The assembled subs don't freeze well — the bread gets weird and the cheese gets grainy. But having meatballs and sauce ready means you can have this comfort food fix in about 15 minutes any time the craving hits.
Best Reheating Method
Add a tiny splash of water to the meatballs and sauce before reheating — it steams back to perfection. Microwave works in a pinch (covered, 60-70% power), but the stovetop is where it's at. Heat the meatballs and sauce in a covered skillet over medium-low heat, stirring occasionally, until they're heated through. Add the cheese during the last minute so it melts but doesn't get rubbery. For the assembled subs, wrap in foil and bake at 350°F for 15-20 minutes. If you're in a hurry, microwave for 30 seconds, then finish in a hot skillet with a little butter to crisp up the bread.