Ever had one of those kitchen catastrophes that turns into a culinary triumph? I was halfway through a hastily assembled chicken sandwich when the bread burned to a crisp char and the chicken was still raw. I stared at the mess, heart sinking, then laughed because I remembered a friend's dare: “Make the best chicken Parmesan grilled cheese you can, and I’ll eat it.” That dare sparked a mission, and the result is a sandwich that feels like a comforting Italian dinner, yet is as easy as a weeknight dinner. The moment the butter hits the pan, a crackling sound announces the transformation, and the aroma of garlic and oregano rises like a promise of flavor.
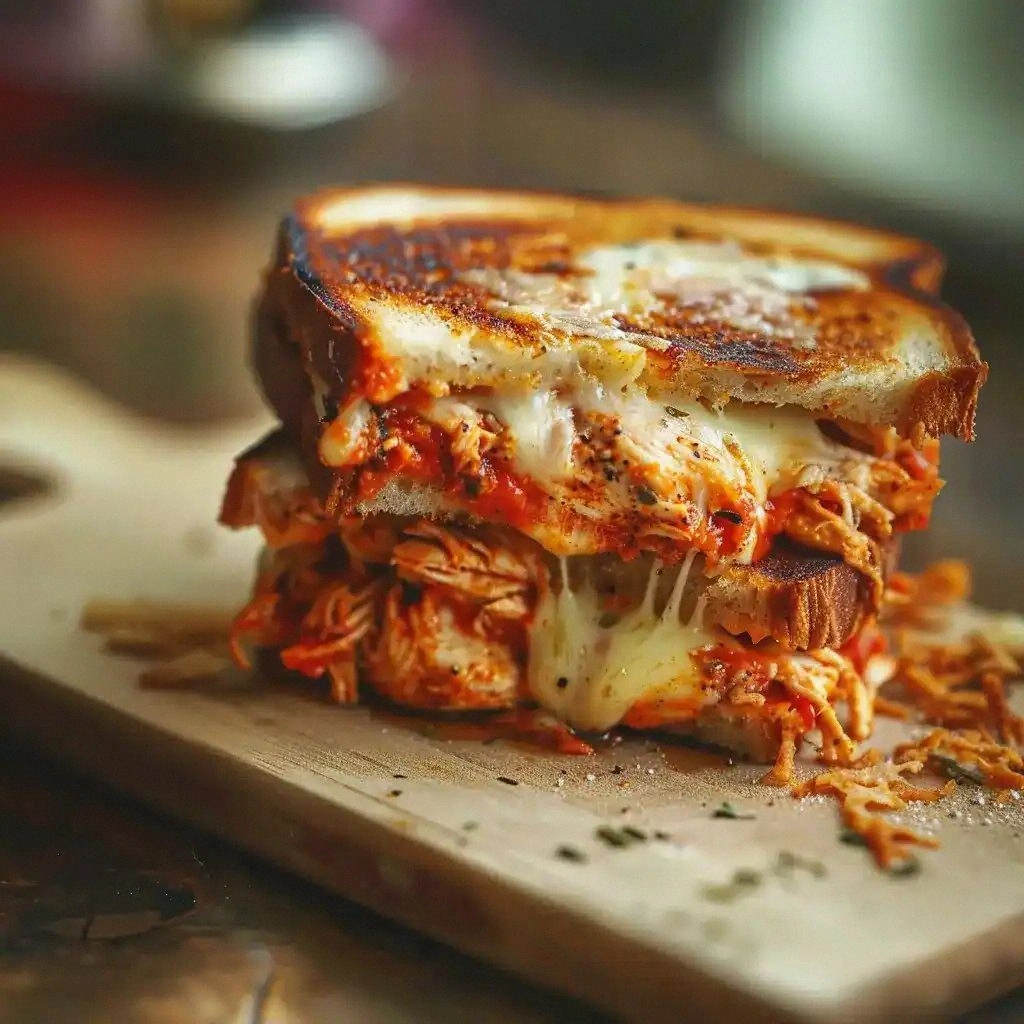
Picture yourself pulling this masterpiece out of the oven, the whole kitchen smelling incredible, and the sandwich looking like a golden, cheese‑laden treasure. The first bite melts the mozzarella into silky strands, while the marinara sauce coats the chicken like velvet. The breadcrumbs give a satisfying crunch that shatters like thin ice, and the Parmesan adds a savory depth that lingers. I dare you to taste this and not go back for seconds. It’s hands down the best version you'll ever make at home.
I’ve been a food‑obsessed friend for years, and I love discovering dishes that make a statement. This version is a statement of flavor, texture, and sheer comfort. It’s the kind of sandwich that turns a simple lunch into a celebratory moment, and it’s the kind of dish that keeps people coming back for more. If you've ever struggled with a grilled cheese that feels too plain, you're not alone—and I've got the fix. And now, stay with me here—this is worth it.
Let me walk you through every single step—by the end, you'll wonder how you ever made it any other way. From selecting the right cut of chicken to mastering the crispness of the bread, each detail matters. I’ll share the secrets that most recipes get wrong and how to avoid common pitfalls. The technique you’ll learn involves a quick bread‑battering trick that keeps the sandwich juicy inside and crispy outside. Ready? Let’s dive in.
What Makes This Version Stand Out
- Flavor: The combination of marinara, mozzarella, and Parmesan creates a layered taste profile that feels both hearty and comforting. The garlic powder, oregano, and basil bring aromatic depth, while the olive oil adds a silky finish. The result is a sandwich that tastes like a full Italian meal.
- Texture: The breadcrumbs provide a crunchy exterior that contrasts with the tender chicken and gooey cheese. The bread is buttered and toasted to a golden crisp, giving a satisfying bite. The sauce is thick enough to coat but not runny, keeping the sandwich intact.
- Visual Appeal: The golden cheese pull, the bright red marinara, and the buttery crust create a plate that looks as good as it tastes. The sandwich slices open to reveal a colorful interior that invites you to dig in. A sprinkle of fresh basil adds a pop of green.
- Ease: The recipe requires minimal prep time and no fancy equipment. All you need is a skillet and a few common pantry staples. Even beginners can achieve a professional result.
- Make‑Ahead Potential: You can assemble the sandwiches ahead of time and reheat them in the oven or skillet with a quick butter finish. The flavors only deepen with time, making it ideal for meal prep.
- Ingredient Quality: Using fresh mozzarella and high‑quality Parmesan elevates the dish. The bread should be sturdy enough to hold the fillings without becoming soggy. Choosing boneless chicken breasts ensures even cooking.
Inside the Ingredient List
The Flavor Base
Marinara sauce is the heart of this sandwich, providing a tangy, tomato‑rich foundation that balances the richness of the cheese. A cup of good quality marinara ensures a robust flavor without overwhelming the other components. If you prefer a smoother sauce, blend it slightly to reduce the chunkiness.
Mozzarella is the star of the show, melting into silky strands that cling to every bite. Use shredded mozzarella for even distribution; fresh mozzarella can be too watery and may make the sandwich soggy. A cup of shredded mozzarella gives enough coverage for a gooey, satisfying texture.
The Texture Crew
Italian breadcrumbs provide a crunch that contrasts beautifully with the tender chicken and molten cheese. Half a cup of breadcrumbs is enough to coat each chicken breast evenly. If you’re avoiding gluten, substitute with almond flour or a gluten‑free breadcrumb blend.
The ¼ cup of flour is used to lightly dust the chicken before breading, creating a crisp barrier that seals in juices. This thin layer also helps the breadcrumbs adhere better. Skipping the flour can result in a less crisp exterior.
The Unexpected Star
The egg acts as a binding agent, ensuring the breadcrumbs cling to the chicken and forming a protective crust. One large egg is sufficient for two breasts; if you’re making more, double the quantity. A beaten egg also adds a subtle richness to the coating.
Garlic powder, dried oregano, and dried basil infuse the sandwich with classic Italian aromatics. One teaspoon each of these spices brings depth without overpowering the other flavors. If you prefer a fresher taste, replace the dried herbs with fresh ones—just reduce the quantity by half.
The Final Flourish
Parmesan cheese adds a salty, nutty finish that balances the sweetness of the marinara. Half a cup of grated Parmesan is enough to sprinkle over the cheese layer for an extra burst of flavor. If you’re vegan, use nutritional yeast as a Parmesan substitute.
Butter and olive oil are the secret weapons that create that irresistible golden crust and keep the sandwich from drying out. Four tablespoons of butter spread on the bread, combined with two tablespoons of olive oil in the skillet, produces a glossy, buttery finish. A pinch of salt and pepper to taste rounds out the seasoning.
Everything's prepped? Good. Let's get into the real action.
The Method — Step by Step
- Season both sides of the chicken breasts with salt, pepper, garlic powder, oregano, and basil. Pat them dry with paper towels to ensure the coating sticks. Let them rest at room temperature for 10 minutes to allow the flavors to meld.
- Set up a breading station: one shallow dish of beaten egg, a second dish of flour, and a third of Italian breadcrumbs. Dip each chicken breast first in the flour, shaking off excess, then in the egg, and finally coat generously with breadcrumbs. The result should look like a golden, crunchy shell.
- Heat a skillet over medium heat and add two tablespoons of olive oil. Once the oil shimmers, place the breaded chicken breasts in the pan. Cook for 4–5 minutes on each side until the breadcrumbs are golden brown and the chicken is cooked through. The internal temperature should hit 165°F.
- While the chicken cooks, slice the bread into even pieces and spread butter on one side of each slice. This butter layer will melt into the bread, creating a golden crust when toasted. Keep the buttered side facing down on a separate plate.
- Once the chicken is cooked, remove it from the skillet and let it rest on a cutting board for 2 minutes. Then, top each breast with a generous spoonful of marinara sauce, followed by shredded mozzarella and grated Parmesan. The cheeses should begin to melt slightly from the residual heat.
- Place the cheese‑topped chicken back into the skillet, buttered side of the bread on top, and cover with a lid. Cook for 3–4 minutes, allowing the cheese to melt completely. The bread should develop a crispy, golden exterior.
- Using tongs, flip the sandwich carefully, pressing down slightly to keep the filling together. Cook the other side for an additional 2 minutes until the bread is crisp and the cheese is bubbling. The sandwich should feel warm and inviting.
- Remove the sandwich from the skillet and let it rest for 1 minute before slicing. This brief rest allows the cheese to set slightly, preventing a gooey mess. Slice in half diagonally and serve immediately, accompanied by a side salad or a glass of wine.
That's it — you did it. But hold on, I've got a few more tricks that'll take this to another level. The next section will reveal insider tips that elevate the flavor, texture, and overall experience of this sandwich.
Insider Tricks for Flawless Results
The Temperature Rule Nobody Follows
Cooking the chicken at the right temperature is crucial. Too low, and the breadcrumbs will turn soggy; too high, and the chicken will burn before it cooks through. Aim for medium heat, and use a thermometer to check the internal temperature. A quick test is to press the chicken; it should feel firm but still give slightly.
Why Your Nose Knows Best
Your sense of smell can tell you when the sandwich is ready. The aroma of melted cheese and toasted bread is a sign that the crust is crisp and the fillings are perfectly heated. If the scent is too mild, give it a minute more; if it's too strong, you may need to reduce the heat.
The 5-Minute Rest That Changes Everything
Letting the sandwich rest for five minutes after cooking allows the cheese to set and the flavors to meld. This short pause prevents the cheese from sliding off the bread when you cut into it. It also gives the breadcrumbs a chance to firm up slightly, making each bite more satisfying.
The Butter Swap for Extra Flavor
Replacing half of the butter with olive oil adds a subtle fruity note and reduces the heaviness. The olive oil also helps the bread crisp up faster, especially if your skillet is a bit old or uneven. Try this swap for a lighter, yet still indulgent, version.
The Quick Bread Refresh
If your bread has gone stale, give it a quick dip in warm water for 10 seconds before buttering. This rehydrates the crust, making it more pliable and less likely to crack when pressed. It also helps the butter spread evenly.
Creative Twists and Variations
This recipe is a playground. Here are some of my favorite ways to switch things up:
Mediterranean Melt
Swap marinara for a sun‑dried tomato pesto and add spinach for a green pop. Use provolone instead of mozzarella for a sharper bite. This version brings a Mediterranean flair that’s both vibrant and comforting.
Spicy Cajun Kick
Add a tablespoon of Cajun seasoning to the breadcrumb mix and drizzle a little sriracha over the cheese. The heat pairs wonderfully with the rich mozzarella and Parmesan. It’s a bold twist that will excite spicy food lovers.
Veggie‑Loaded Delight
Incorporate sliced bell peppers, zucchini, and mushrooms into the cheese layer for extra texture. Use whole‑grain bread to add fiber and a nutty flavor. This variation turns the sandwich into a wholesome, veggie‑filled meal.
Cheeseburger Fusion
Replace the chicken with a seasoned ground beef patty, add a slice of cheddar, and top with a dollop of ketchup. The marinara can be replaced with a tangy barbecue sauce. This fusion brings the best of both worlds.
Breakfast Bonanza
Swap the chicken for a fried egg, use English muffin bread, and drizzle maple syrup over the cheese. The sweet and savory combination is a breakfast twist that’s surprisingly delicious. It’s perfect for brunch or a late‑night snack.
Gluten‑Free Gourmet
Use gluten‑free bread and almond flour breadcrumbs to keep the sandwich safe for those with dietary restrictions. The flavors stay the same, but the texture becomes delightfully crisp. This version proves that gluten‑free can still be indulgent.
Storing and Bringing It Back to Life
Fridge Storage
Store assembled sandwiches in an airtight container in the refrigerator for up to 2 days. Keep the bread separate from the fillings until you’re ready to reheat to maintain crispness. Reheat in a skillet with a light drizzle of olive oil for a fresh, toasty finish.
Freezer Friendly
Wrap the sandwich tightly in foil, then place it in a freezer bag. It will keep for up to 3 months. Thaw overnight in the refrigerator before reheating. The bread may lose a bit of crunch, but the flavors remain intact.
Best Reheating Method
The best way to bring the sandwich back to life is in a skillet over medium heat, pressing down gently with a spatula. Add a splash of water to the pan and cover to create steam, which helps melt the cheese without drying out the bread. Once heated through, serve immediately for maximum enjoyment.