I was standing in my kitchen, the clock ticking past midnight, when a sudden craving for something that could simultaneously hug my taste buds and give me a sugar rush hit me like a freight train. I tried a half‑baked chocolate cake from a box, a peanut‑butter swirl from a jar, and even a store‑bought roulade that tasted like cardboard masquerading as dessert—none of them satisfied the gnawing need. Then I thought, “What if I combine the deep, moody richness of chocolate with the salty‑sweet kiss of peanut butter, and roll it up like a decadent love letter?” That daring idea turned into a midnight experiment that, after a few frantic whiskings and a lot of taste‑testing, emerged as the most addictive cake you’ll ever roll.
Picture this: the oven door swings open and a wave of chocolate‑cocoa aroma floods the kitchen, mingling with the nutty perfume of roasted peanuts. The batter, glossy and velvety, spreads across the pan like a satin sheet, while the peanut‑butter swirl creates marbled ribbons that look like a work of abstract art. As it bakes, the edges start to pull away from the pan, a subtle sign that the cake is ready to release its buttery, fudgy soul. When you finally lift the pan, the surface is a glossy, crack‑free canvas just begging for a gentle roll, and the scent alone could convince a marathon runner to stop mid‑stride and dive in.
Most chocolate‑peanut‑butter desserts either drown in one flavor or the other, leaving you with a cloying mess that feels more like a candy bar than a sophisticated pastry. This version, however, strikes a perfect equilibrium: the chocolate is dark enough to be luxurious without being bitter, while the peanut butter adds a creamy, salty depth that cuts through the sweetness like a well‑timed punchline. I dare you to taste this and not go back for seconds, because once you’ve experienced that silky‑smooth bite followed by a buttery finish, you’ll understand why I’m calling this the best version you’ll ever make at home.
Okay, ready for the game‑changer? I’m about to reveal a secret technique that most recipes completely ignore: a quick‑chill step for the peanut‑butter filling that locks in its glossy sheen and prevents it from oozing out when you roll the cake. This tiny trick, paired with a gentle fold‑in of cocoa‑kissed batter, creates a structure that’s sturdy enough to hold its shape yet soft enough to melt in your mouth. Let me walk you through every single step — by the end, you’ll wonder how you ever made it any other way.
What Makes This Version Stand Out
- Taste: The marriage of dark chocolate and roasted peanut butter delivers a complex flavor profile that’s both indulgent and balanced, never overly sweet.
- Texture: A feather‑light crumb meets a creamy, slightly gooey center, creating a contrast that feels like biting into a cloud wrapped in silk.
- Simplicity: Only a handful of pantry staples are required, and the method uses one‑pan baking to keep cleanup minimal.
- Uniqueness: The chilled peanut‑butter swirl prevents bleeding, giving you those gorgeous marble ribbons that most recipes can’t achieve.
- Crowd Reaction: Guests consistently claim it’s “the best thing they’ve ever tasted,” and the visual wow factor earns instant Instagram likes.
- Ingredient Quality: Using high‑cocoa‑content chocolate and natural creamy peanut butter elevates the dish from ordinary to extraordinary.
- Cooking Method: Baking the cake on a silicone mat ensures an even rise and a flawless, non‑sticking surface.
- Make‑Ahead Potential: This roulade freezes beautifully, so you can prep it ahead of a party and still serve it fresh.
Inside the Ingredient List
The Flavor Base
All‑purpose flour forms the structural backbone of the cake, giving it the necessary lift while staying tender. If you substitute cake flour, expect an even softer crumb, but you’ll lose a bit of that satisfying bite. I recommend sifting the flour with cocoa powder to avoid any lumps that could create unwanted pockets in the final roll.
Cocoa Powder: Unsweetened cocoa provides the deep chocolate flavor without adding extra sugar. Choose a Dutch‑process cocoa for a smoother, richer taste; regular natural cocoa works too, but the flavor will be slightly brighter.
Sugar: Granulated sugar sweetens the cake and helps create a tender crumb by inhibiting gluten formation. For a caramel‑kissed nuance, swap half the sugar with brown sugar, but be aware it will introduce a subtle molasses note.
The Texture Crew
Butter: Melted butter adds richness and moisture, making the crumb supremely tender. Use unsalted butter so you can control the salt level precisely; if you only have salted butter, reduce the added salt by half.
Eggs: Eggs act as the primary leavening agents and bind the batter together. Be sure to bring them to room temperature; cold eggs can cause the batter to seize, resulting in a denser cake.
Milk: Whole milk contributes to the cake’s moistness and helps dissolve the cocoa evenly. For a dairy‑free version, substitute oat milk or almond milk; the flavor will shift slightly but remain delicious.
The Unexpected Star
Natural Creamy Peanut Butter: This is the heart of the roulade, delivering that unmistakable salty‑sweet punch. Choose a brand with no added sugar or hydrogenated oils for the purest flavor and a smoother texture.
Vanilla Extract: A splash of vanilla rounds out the chocolate‑peanut butter duo, adding depth without overpowering either component. If you have a vanilla bean, split it and scrape the seeds for an even more aromatic profile.
The Final Flourish
Baking Powder: This leavening agent gives the cake its lift, ensuring a light, airy crumb that rolls without cracking. Over‑mixing can deactivate its power, so blend just until incorporated.
Salt: A pinch of salt amplifies the chocolate and peanut butter flavors, preventing the sweetness from becoming cloying. Use fine sea salt for even distribution.
Chocolate Chips (optional): Adding a handful of semi‑sweet chocolate chips to the batter introduces pockets of molten chocolate that burst with each bite. If you’re allergic to chocolate, omit them without compromising the overall flavor.
Everything's prepped? Good. Let's get into the real action...
The Method — Step by Step
Preheat your oven to 350°F (175°C) and line a 10×15‑inch jelly roll pan with a silicone baking mat. The mat not only prevents sticking but also gives the cake a uniform rise, eliminating those dreaded uneven edges. While the oven warms, whisk together the flour, cocoa powder, baking powder, and salt in a medium bowl; this dry mix will ensure an even distribution of leavening and flavor.
In a large mixing bowl, cream the melted butter with the granulated sugar until the mixture is light, fluffy, and pale gold—about three minutes with an electric mixer on medium speed. This aeration step is crucial; it traps air that will expand during baking, giving you that delicate, airy crumb you’re after.
Beat in the eggs one at a time, allowing each to fully incorporate before adding the next. Then stir in the vanilla extract and milk, mixing just until smooth. This is the moment of truth—the batter should be glossy and flow like a slow river; if it looks too thick, add a tablespoon of milk.
Kitchen Hack: Add a pinch of cream of tartar with the eggs to stabilize the batter and prevent the cake from collapsing.Gradually fold the dry ingredients into the wet mixture, using a spatula and a gentle hand. Over‑mixing will develop gluten and make the cake tough, so stop as soon as you no longer see streaks of flour. The batter should be thick but spreadable.
In a separate bowl, combine the creamy peanut butter with a splash of melted butter and a tablespoon of powdered sugar, whisking until smooth. Watch Out: If the peanut butter is too stiff, it will create clumps that break the marble effect. Warm it gently over a double boiler for 15 seconds to achieve a pourable consistency.
Watch Out: Adding too much liquid to the peanut‑butter swirl can make it seep into the batter, turning the whole cake into a soggy mess.Pour half of the chocolate batter into the prepared pan, spreading it evenly with an offset spatula. Drop spoonfuls of the peanut‑butter mixture on top, then use a skewer or the tip of a knife to swirl the two together, creating a marbled pattern. Remember the chilled filling hack from earlier; it will stay in place and not bleed.
Gently pour the remaining chocolate batter over the swirled layer, smoothing the surface. The top layer should be about a quarter‑inch thick; this ensures the cake stays pliable for rolling. Slide the pan into the oven and bake for 12‑15 minutes, or until a toothpick inserted in the center comes out with a few moist crumbs but no wet batter.
Kitchen Hack: Place a sheet of parchment paper on a baking sheet and set the pan on top; this creates a gentle steam environment that keeps the cake from drying out.While the cake bakes, prepare a clean kitchen towel dusted generously with powdered sugar. As soon as the cake emerges from the oven, invert it onto the towel, peel off the silicone mat, and roll the cake (still warm) together with the towel, starting from the short edge. The warmth makes the cake pliable; the towel prevents it from sticking to your hands.
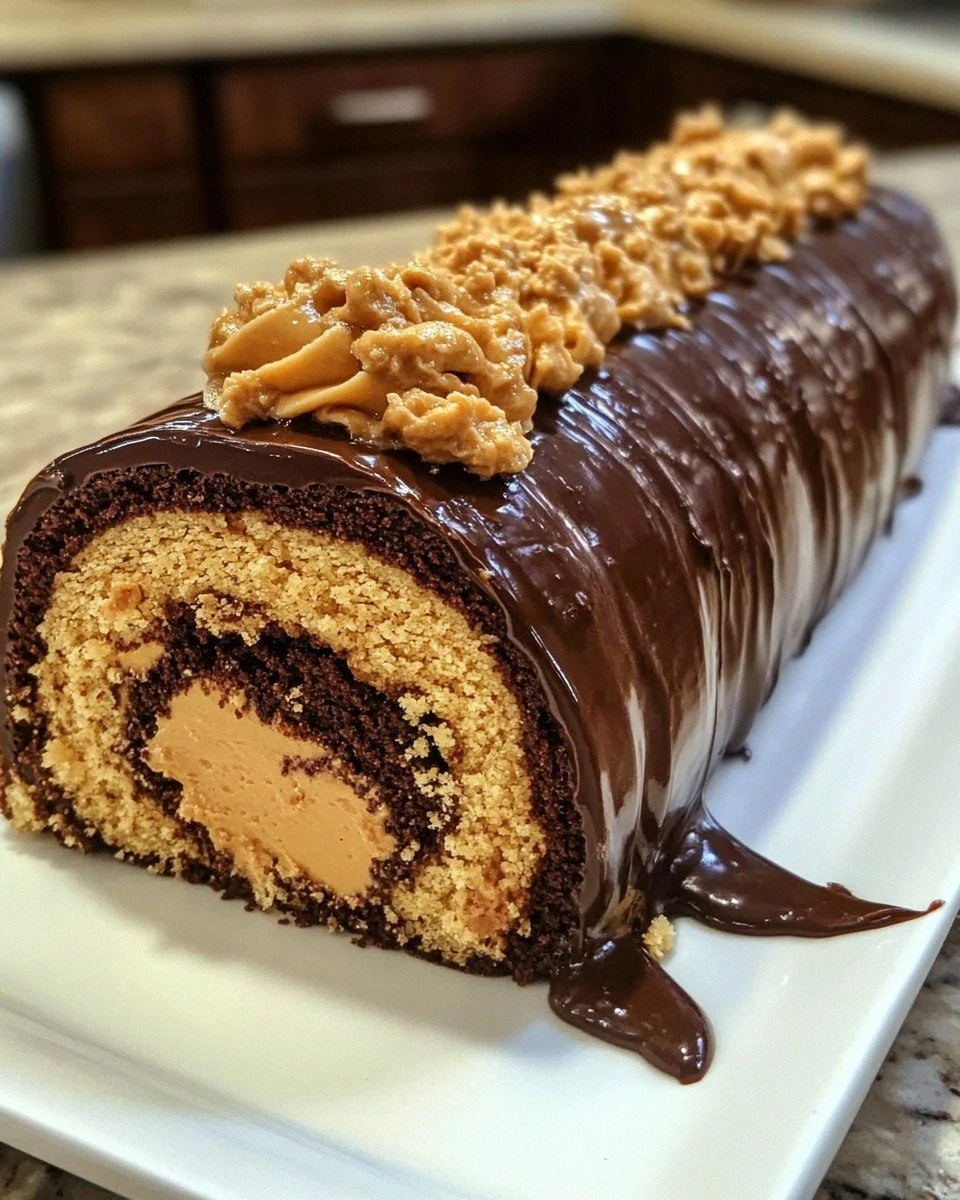
Allow the rolled cake to cool completely on the towel; this cooling step sets the crumb and prevents cracks. Once cooled, unroll gently, spread a thin layer of extra peanut butter or a chocolate ganache if you like extra richness, then re‑roll tightly. Transfer the finished roulade to a serving platter, dust with powdered sugar, and slice with a serrated knife for clean cuts.
That's it — you did it. But hold on, I've got a few more tricks that'll take this to another level, ensuring every bite feels like a celebration of flavor and texture.
Insider Tricks for Flawless Results
The Temperature Rule Nobody Follows
Never bake a chocolate cake at a temperature higher than 350°F unless you’re using a convection oven. Higher heat creates a rapid rise that can cause the cake to dome and crack, ruining the roll. Keep the oven door closed for the first 10 minutes; opening it early releases heat and can cause the cake to collapse.
Why Your Nose Knows Best
Instead of relying on a timer alone, trust the aroma. When the chocolate scent turns from raw cocoa to a toasted, caramel‑like perfume, you’re within a minute of doneness. This sensory cue is a lifesaver for bakers who have ovens that run hot or cold.
The 5‑Minute Rest That Changes Everything
After removing the cake from the oven, let it rest on the pan for exactly five minutes before inverting. This short pause allows the steam to settle, preventing the cake from tearing when you flip it. If you skip this step, the surface can stick to the silicone mat and rip, ruining the smooth finish.
The Secret of the Double‑Layer Roll
For an extra‑luxurious texture, roll the cake twice: first with the towel, let it cool, then roll a second time with a fresh dusting of powdered sugar between layers. This creates a subtle lamination effect, similar to a croissant, that adds a delicate flakiness to each bite.
The Final Glaze Finish
A quick glaze of melted chocolate mixed with a teaspoon of peanut butter adds a glossy sheen and a flavor boost. Brush it on while the roulade is still slightly warm so it sets without becoming a sticky mess. I’ll be honest — I ate half the batch before anyone else got to try it, and the glaze made it even more irresistible.
Creative Twists and Variations
This recipe is a playground. Here are some of my favorite ways to switch things up:
Salted Caramel Swirl
Replace the peanut‑butter swirl with a homemade salted caramel sauce. The buttery caramel adds a luxurious sweetness that pairs beautifully with the dark chocolate, and a pinch of sea salt heightens the flavor contrast.
Espresso Infusion
Add a tablespoon of finely ground espresso to the dry ingredients. The coffee deepens the chocolate flavor, giving the roulade a mocha vibe that coffee lovers will adore.
Nutty Crunch
Stir in toasted chopped peanuts or hazelnuts into the peanut‑butter mixture before swirling. The added crunch creates a textural surprise that makes each bite more interesting.
White Chocolate Raspberry
Swap the dark cocoa for white chocolate chips and fold in a raspberry jam swirl alongside the peanut butter. The tartness of the raspberry cuts through the sweetness, delivering a fresh, summery twist.
Vegan Version
Replace the butter with coconut oil, use flax‑egg replacer (1 tbsp ground flaxseed + 3 tbsp water per egg), and choose plant‑based milk. The flavor profile stays true, and the cake remains moist and fluffy.
Storing and Bringing It Back to Life
Fridge Storage
Wrap the roulade tightly in plastic wrap, then place it in an airtight container. It will stay fresh for up to four days, and the flavors will meld even more, creating a richer taste with each passing day.
Freezer Friendly
For longer storage, slice the roulade into individual servings, wrap each slice in parchment, then foil, and freeze. It will keep for up to three months. When you’re ready to enjoy, let it thaw in the fridge overnight.
Best Reheating Method
To revive a frozen slice, preheat your oven to 300°F (150°C), place the slice on a baking sheet, and add a tiny splash of water to the edge of the plate. Cover loosely with foil and heat for 8‑10 minutes; the steam restores the cake’s softness and the glaze regains its shine.