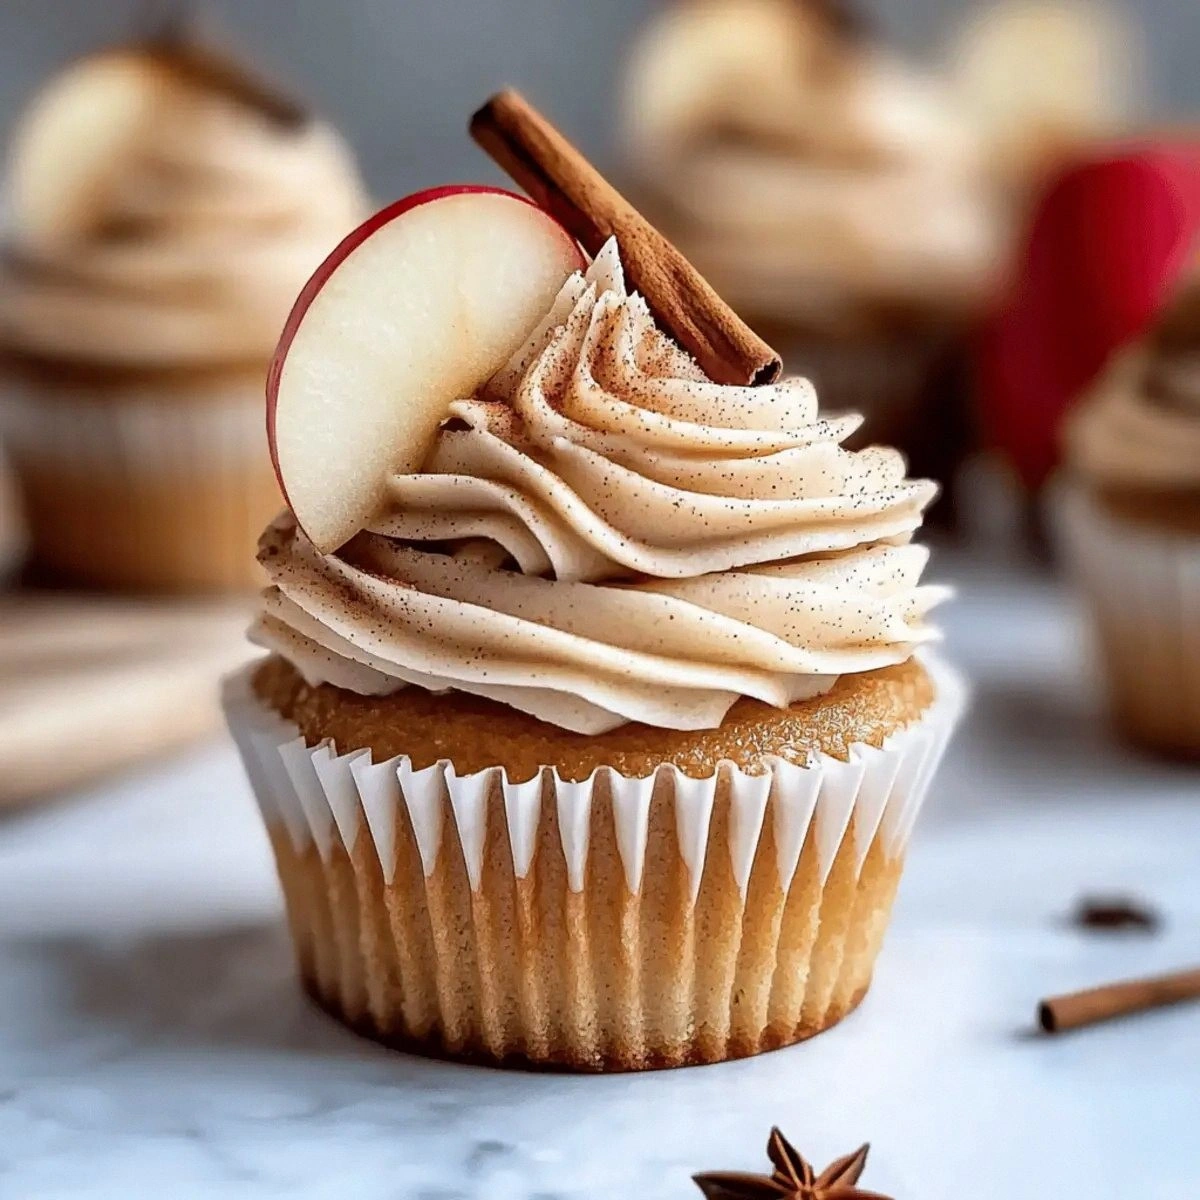
Okay, picture this: it’s a crisp Saturday morning in late October, the kind where the wind whistles through the trees like a choir of distant whistles, and you’re standing in your kitchen with a half‑empty bottle of apple cider and a mountain of fresh apples that you just rescued from a farmer’s market. I was in the middle of a frantic pancake‑flipping session when my roommate shouted, “If you can’t make a pumpkin spice latte, at least give us something that actually tastes like fall!” I laughed, I rolled my eyes, and then I thought, “Challenge accepted.” I grabbed the cider, diced the apples, and set out to create a cupcake that would make even the most seasoned barista weep with envy. The result? A cupcake that smells like a cozy cabin fireplace, tastes like a hug from your grandma, and has a frosting so silky it could double as a runway model for a beauty pageant.
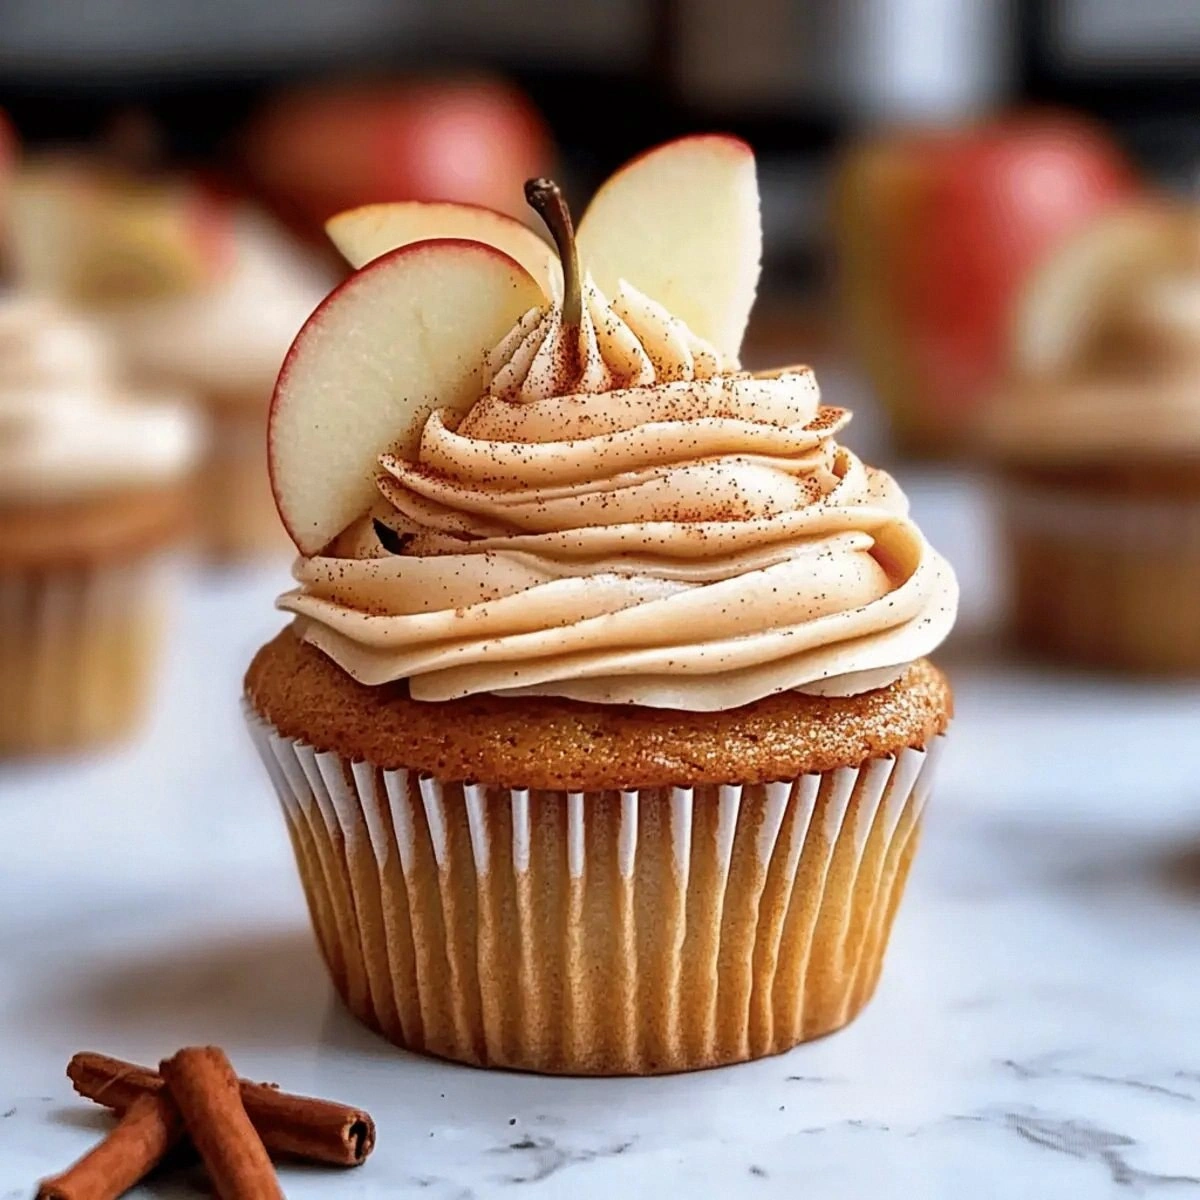
From the first whiff of cinnamon‑laden batter hitting the mixing bowl to the final swirl of cream‑cheese frosting, every step of this recipe is a sensory love affair. The batter is moist, buttery, and just sweet enough to let the apple’s natural tartness shine through. When the cupcakes rise, they develop a golden crown that cracks just enough to reveal a tender crumb underneath—think of it as the perfect balance between a crisp autumn leaf and a soft, buttery cloud. The frosting, on the other hand, is a dreamy, tangy cream‑cheese blend that hugs the cupcake like a cashmere scarf on a chilly evening. And that final drizzle of caramel? It’s the whisper of sugar that ties everything together.
Most recipes for apple‑cider cupcakes either drown the flavor in sugar or forget the crucial step of caramelizing the apples, leaving you with a bland, soggy mess. This version, however, takes the apple‑cider base and intensifies it with a slow reduction, then folds in diced apples that have been sautéed in butter and brown sugar until they’re caramel‑kissed and slightly sticky. The secret? A pinch of nutmeg and a generous spoonful of ground cinnamon that don’t just sit on top but become part of the batter, infusing every bite with that unmistakable fall vibe. I dare you to taste this and not go back for seconds.
And now, the part you’ve been waiting for: I’m about to walk you through every single step—by the end, you’ll wonder how you ever made cupcakes any other way. Okay, ready for the game‑changer? Let’s dive in.
What Makes This Version Stand Out
- Flavor Explosion: The combination of reduced apple cider, sautéed apples, and a double‑dose of cinnamon creates a flavor profile that’s both deep and bright, like a sunrise over a pumpkin patch.
- Moisture Mastery: By incorporating both butter and a splash of cider, the cupcakes stay moist for days, so you can bake them ahead and still enjoy that just‑out‑of‑the‑oven texture.
- Texture Contrast: The crumb is tender yet slightly crumbly, while the frosting offers a tangy cream‑cheese silkiness that cuts through the sweetness like a perfect autumn breeze.
- Simplicity Meets Sophistication: The ingredient list is short, but each component is chosen for maximum impact, meaning you won’t need a pantry full of obscure spices.
- Crowd‑Pleaser: I’ve served these at everything from casual family movie nights to upscale fall brunches, and the reaction is always the same—wide eyes, nods of approval, and the inevitable “Can I have the recipe?”
- Make‑Ahead Magic: The cupcakes freeze beautifully, and the frosting can be whipped up a day ahead, saving you precious time on the day of your gathering.
- Ingredient Quality: Using fresh, crisp apples and real apple cider (not the concentrate) makes the difference between a “good” cupcake and a “best‑ever” cupcake.
- Cooking Method: A gentle bake at 350°F ensures the cupcakes rise evenly without cracking, while a quick caramelization step adds that coveted caramel note.
Inside the Ingredient List
The Flavor Base
Apple cider is the heart of this recipe. It brings a bright, tangy sweetness that pairs perfectly with the warm spices. If you skip the reduction step, you’ll lose that concentrated depth, and the cupcakes will taste flat. Pro tip: choose a cider that’s unfiltered and has a hint of spice already in it—think of it as the “espresso shot” of fall.
The Texture Crew
Unsalted butter and both sugars (light brown and granulated) work together to create a tender crumb while also providing caramel notes. The brown sugar adds moisture because of its molasses content, whereas the granulated sugar helps with the rise. If you replace the butter with oil, you’ll get a denser texture—so stick with butter for that melt‑in‑your‑mouth feel.
The Unexpected Star
Diced apples are more than just a garnish; they’re a flavor bomb that bursts with juiciness as you bite. Sauté them in a bit of butter and brown sugar until they’re just soft enough to hold their shape but still have a slight bite. If you’re allergic to apples, try diced pears with a splash of maple syrup—they’ll give a similar sweet‑spicy profile.
The Final Flourish
Cream cheese frosting is the crown jewel. The tang from the cream cheese cuts through the cupcake’s sweetness, while the powdered sugar provides that glossy finish. If you’re looking for a lighter version, swap half the cream cheese for Greek yogurt, but be prepared for a slightly less stable frosting.
Everything's prepped? Good. Let's get into the real action...
The Method — Step by Step
Start by reducing the apple cider. Pour the 1 cup of cider into a wide, shallow saucepan over medium‑high heat. Let it bubble away, stirring occasionally, until it’s reduced by about half and has a syrupy consistency. You’ll know it’s ready when it coats the back of a spoon like amber glass. That sizzle when it hits the pan? Absolute perfection. This concentrated cider will be the secret weapon that gives the cupcakes their deep, caramel‑kissed flavor.
While the cider is reducing, dice the apples into ½‑inch cubes. Melt ¼ cup of unsalted butter in a skillet, add the diced apples, and sprinkle the ¼ cup of light brown sugar over them. Cook on medium, stirring gently, until the apples soften and the sugar caramelizes, forming a glossy coating. This step is where the magic happens—those caramelized apple pieces will become pockets of sweet, juicy goodness inside each cupcake. Watch out for the apples to burn; keep the heat moderate.
In a large mixing bowl, cream together ½ cup of unsalted butter, ¼ cup of light brown sugar, and ½ cup of granulated sugar until the mixture is light and fluffy—about 3 minutes with a hand mixer on medium speed. This aeration step is crucial; it creates air pockets that will help the cupcakes rise. I dare you to skip this step and see what happens—spoiler: they’ll be dense.
Add the three large eggs, one at a time, beating well after each addition. Then stir in 1 teaspoon of vanilla extract. The batter should look glossy and smooth, like a well‑polished pond on a calm morning. If it looks curdled, keep beating—eventually it will come together.
In a separate bowl, whisk together 2 cups of cake flour, 1 teaspoon of baking powder, 1 teaspoon of ground cinnamon, ½ teaspoon of nutmeg, and ½ teaspoon of kosher salt. Sifting the dry ingredients ensures a uniform distribution of the spices and prevents lumps. Once combined, gently fold the dry mixture into the wet batter, alternating with the reduced apple cider. The batter should be thick but pourable—think of a rich pancake batter.
Now fold in the caramelized apple pieces and the reduced cider. You’ll hear a faint “whoosh” as the glossy cider ribbons through the batter, creating little streaks that look like autumn leaves frozen in time. This is the moment of truth—if you can see those caramel ribbons, you’ve nailed the flavor infusion.
Line a 12‑cup muffin tin with paper liners and fill each about three‑quarters full. Bake at 350°F (175°C) for 20‑25 minutes, or until a toothpick inserted into the center comes out clean and the tops have a golden‑brown crown. The edges will start pulling away from the pan—this is your visual cue that they’re done. Resist the urge to overbake; a little soft center is what makes these cupcakes dreamy.
While the cupcakes are cooling, whip up the frosting. Beat together 8 ounces of softened cream cheese, ¼ cup of unsalted butter, and 2 cups of powdered sugar until the mixture is light, fluffy, and free of lumps. Add a splash of vanilla if you like, but the vanilla from the batter already does the heavy lifting. The frosting should be thick enough to hold its shape when piped but still soft enough to spread with a knife.
Once the cupcakes are completely cool, pipe or spread a generous dollop of cream‑cheese frosting on each. For an extra touch of decadence, drizzle a thin stream of caramel sauce over the top and sprinkle a pinch of extra cinnamon. Picture yourself pulling this out of the oven, the whole kitchen smelling incredible, and your guests’ eyes widening at the sight of those glossy swirls. That’s the payoff.
That's it — you did it. But hold on, I've got a few more tricks that'll take this to another level...
Insider Tricks for Flawless Results
The Temperature Rule Nobody Follows
Never bake cupcakes straight from the fridge. Let the batter sit at room temperature for at least 10 minutes before sliding it into the oven. This small step ensures a more even rise and prevents the dreaded “sunken middle.” I once tried to speed things up by popping a cold batter straight in, and the result was a flat, sad pancake‑like cupcake. Trust me, the extra minutes are worth it.
Why Your Nose Knows Best
Your sense of smell is a better timer than any clock when it comes to caramelizing the apples. When the butter turns a light amber and the sugar starts to bubble, you’ll notice a sweet, nutty aroma that fills the kitchen. If you can smell that, the apples are ready. If you’re unsure, just remember: the scent of toasted sugar is the signal to move on.
The 5‑Minute Rest That Changes Everything
After you fold the dry ingredients into the wet, let the batter rest for exactly five minutes before adding the cider. This short pause allows the flour to hydrate fully, resulting in a softer crumb. A friend tried skipping this rest once and ended up with a crumb that felt more like a dense cake than a fluffy cupcake. Don’t be that friend.
Frosting Freeze‑Proof
If you need to prep ahead, freeze the frosting in an airtight container for up to two weeks. When you’re ready to use it, let it soften at room temperature for 15 minutes and give it a quick whip with a hand mixer. It’ll regain that airy texture instantly. This trick saved my life during a Thanksgiving brunch when I realized I’d forgotten to make frosting the night before.
Caramel Drizzle Discipline
For a flawless caramel drizzle, heat the caramel sauce just until it’s fluid, then let it cool for 30 seconds before drizzling. If it’s too hot, it will soak into the frosting; if it’s too cold, it will harden into clumps. The perfect drizzle adds a glossy finish without making the frosting soggy.
Creative Twists and Variations
This recipe is a playground. Here are some of my favorite ways to switch things up:
Maple‑Brown Sugar Swirl
Replace half of the light brown sugar with pure maple syrup in the apple sauté. The maple adds a deeper, woodsy sweetness that pairs beautifully with the cinnamon. Perfect for those who love the classic maple‑pancake vibe.
Spiked Cider Boozy Version
Add a tablespoon of bourbon or dark rum to the reduced cider before folding it into the batter. The alcohol evaporates slightly during baking, leaving behind a subtle warmth that’s perfect for adult gatherings.
Nutty Crunch
Stir in ¼ cup of toasted chopped pecans or walnuts into the batter for a delightful crunch. The nuts also bring a buttery richness that complements the apple and cinnamon.
Vegan Friendly
Swap the butter for coconut oil, use a plant‑based cream cheese alternative, and replace the eggs with flax “eggs” (1 tablespoon ground flaxseed + 3 tablespoons water per egg). The result is a slightly denser cupcake but still bursting with flavor.
White Chocolate Drizzle
Melt white chocolate and drizzle it over the frosting instead of caramel. The sweet, creamy contrast adds a luxurious finish that’s especially popular with kids.
Storing and Bringing It Back to Life
Fridge Storage
Place the cooled cupcakes in an airtight container and store them in the refrigerator for up to 4 days. The frosting will firm up slightly, but a quick room‑temperature sit before serving restores its creamy texture. If you’re in a hurry, pop them in the microwave for 10 seconds to soften the frosting.
Freezer Friendly
Freeze the cupcakes (unfrosted) on a baking sheet, then transfer to a zip‑top bag. They’ll keep for up to 3 months. When you’re ready, thaw overnight in the fridge, then add the frosting fresh. The batter’s moisture content ensures they won’t dry out.
Best Reheating Method
To revive a refrigerated cupcake, place it on a microwave‑safe plate, add a tiny splash (about a teaspoon) of water beside it, and microwave on low for 15‑20 seconds. The steam generated re‑moisturizes the crumb, while the frosting stays intact. Add a pinch of extra cinnamon on top after reheating for an extra burst of aroma.