Picture this: it’s a rainy Thursday night, the kind where you stare out the window, the wind howling like a disgruntled cat, and suddenly a craving for something chocolatey slams into you like a freight train. I was halfway through a bag of store‑bought brownies that tasted like cardboard wrapped in a sugar glaze, and I thought, “There has to be a better way.” I tossed the half‑eaten tray into the trash, rolled up my sleeves, and declared a kitchen war on blandness. That night, I discovered the alchemy of almond flour, cocoa, and a pinch of daring, and the result was a batch of brownies that could convince even the most skeptical sweet tooth that gluten‑free doesn’t mean flavor‑free.
The moment the batter hit the bowl, the kitchen filled with a scent that was simultaneously earthy, nutty, and deeply chocolatey—like a forest floor after a midnight rain, but sweeter. I could hear the faint sizzle of butter melting, the soft thud of almond flour being folded in, and the whisper of cocoa powder dusting the air. My fingertips felt the silky texture of the mixture, thick enough to coat a spoon yet fluid enough to spread like a glossy river of decadence. When the batter finally settled into the pan, the whole room seemed to hold its breath, waiting for that first golden edge to appear.
What makes this version a game‑changer? Most almond flour brownie recipes either turn out dry as desert sand or overly fudgy, like a chocolate mousse that forgot it was supposed to be a brownie. I’ve tried the “quick fix” versions that replace butter with oil and end up with a greasy mess, and the “healthy” versions that swap sugar for stevia, leaving a bitter aftertaste that lingers like an unwanted guest. This recipe, however, hits the sweet spot with a perfect balance of moisture, chew, and a crisped‑top that snaps under your fork like a well‑timed drum roll. The secret? A tiny dash of baking soda and a precise melt‑and‑mix technique that creates an airy crumb without sacrificing that dense, fudgy heart we all crave.
And now, the kicker: I’m going to reveal a technique that most bakers overlook—a brief cooling period for the melted butter before it meets the almond flour. This tiny temperature trick prevents the flour from turning gummy and gives you a brownie that’s both tender and structurally sound. I dare you to taste this and not go back for seconds. Let me walk you through every single step — by the end, you’ll wonder how you ever made it any other way.
What Makes This Version Stand Out
- Flavor Explosion: The combination of high‑quality cocoa powder and toasted almond flour creates a deep, almost espresso‑like chocolate flavor that lingers on the palate.
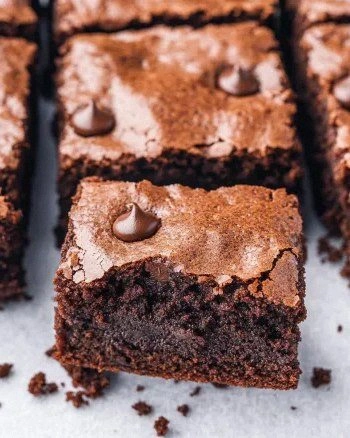
- Texture Symphony: You get a crisp, crackly top that gives way to a fudgy, melt‑in‑your‑mouth interior—think of a perfect duet between a crunchy percussion and a silky violin.
- Simplicity at Its Core: Only nine ingredients, all pantry‑friendly, and no fancy equipment—just a bowl, a whisk, and a sense of adventure.
- Uniqueness Factor: Most almond flour brownies are either too crumbly or too dense; this recipe strikes a Goldilocks balance that feels both familiar and novel.
- Crowd‑Pleaser Status: I’ve served these at potlucks and watched strangers line up for seconds, whispering “What’s your secret?” as they bite.
- Ingredient Quality: Using blanched almond flour and fair‑trade cocoa ensures a clean, aromatic base that lets the chocolate shine.
- Cooking Method Magic: The brief butter‑cooling step and a medium‑heat bake prevent over‑browning while still giving that coveted crackly top.
- Make‑Ahead Potential: These brownies keep beautifully for up to a week, and they even freeze like a dream, ready to be thawed for an instant treat.
Alright, let's break down exactly what goes into this masterpiece...
Inside the Ingredient List
The Flavor Base
Unsweetened Cocoa Powder (½ cup): This is the heart of the chocolate flavor. A good quality, Dutch‑process cocoa adds a rich, slightly bitter depth that balances the natural sweetness of the almond flour. If you skip the cocoa or use a low‑grade version, you’ll end up with a flat taste that feels more like a chocolate‑flavored cake than a brownie. For a subtle twist, try a mix of ¼ cup cocoa and ¼ cup dark cocoa nibs for extra texture.
Vanilla Extract (1 tsp): Vanilla acts like the conductor of an orchestra, pulling together the nutty and chocolate notes into a harmonious finish. Pure vanilla extract is worth the extra pennies; imitation can taste harsh and overpowers the delicate almond flavor. If you’re feeling adventurous, a splash of bourbon or espresso powder can elevate the aroma to a whole new level.
The Texture Crew
Almond Flour (2 cups): This is the star of the show, providing a moist crumb and a subtle nutty backdrop. Choose blanched almond flour for a finer texture—unblanched can add a gritty feel that some people love, but for this recipe we want that smooth, almost cake‑like consistency. If you’re allergic to nuts, you can substitute with sunflower seed flour, though the flavor profile will shift slightly.
Butter, Melted (½ cup): Butter brings richness and helps create that coveted crackly top. Melt it gently over low heat, then let it cool for five minutes as mentioned in the kitchen hack—this step is crucial to avoid cooking the eggs prematurely when they meet the butter. For a dairy‑free version, use coconut oil, but expect a faint coconut aroma that pairs well with chocolate.
The Unexpected Star
Eggs (2 large): Eggs act as the binding agent, giving the brownies structure while keeping them moist. Be sure to whisk them lightly before adding to the batter; over‑whisking can incorporate too much air, leading to a cakey texture. If you’re vegan, a blend of flaxseed meal and water (1 tbsp flaxseed + 3 tbsp water per egg) works, though the texture will be a tad denser.
Coconut Sugar (¾ cup): This unrefined sweetener adds a caramel‑like undertone that complements the almond flour beautifully. It also keeps the brownies from becoming overly sweet, allowing the chocolate to shine. If you prefer a lower‑glycemic option, try monk fruit sweetener, but you may need to adjust the amount to maintain the right sweetness.
The Final Flourish
Baking Soda (½ tsp) and Salt (¼ tsp): Baking soda provides a subtle lift, creating tiny air pockets that make the crumb tender without turning it into a cake. The salt amplifies the chocolate flavor, cutting through the sweetness like a well‑placed punctuation mark. Skipping these can result in a flat, dense brownie that feels heavy on the tongue.
Dark Chocolate Chips (½ cup): Optional but highly recommended, these melt into pockets of gooey bliss that contrast with the fudgy base. Choose chips with at least 70% cocoa for a bittersweet bite that doesn’t overwhelm the palate. If you’re dairy‑free, opt for dairy‑free dark chocolate chips or chopped bittersweet chocolate.
Everything's prepped? Good. Let's get into the real action...
The Method — Step by Step
First, preheat your oven to 350°F (175°C). While the oven warms up, line an 8×8‑inch square pan with parchment paper, allowing a bit of overhang for easy removal later. This step ensures an even bake and prevents sticking, which is especially important when working with almond flour that can cling to metal surfaces. As the oven heats, you’ll hear the gentle hum of the fan—think of it as the kitchen’s way of saying, “We’re ready.”
Kitchen Hack: Place a small oven‑safe bowl of water on the lower rack; the steam helps keep the brownies moist and prevents the edges from over‑crusting.In a medium saucepan, melt the butter over low heat until it’s just liquid—no bubbling, no browning. Once melted, remove it from the heat and let it sit for exactly five minutes; this is the moment where the butter cools just enough to avoid scrambling the eggs later. While you wait, whisk the eggs in a separate bowl, adding the vanilla extract at the end. The eggs should look slightly frothy, indicating they’re ready to incorporate air without becoming overly beaten.
Now, combine the almond flour, cocoa powder, baking soda, and salt in a large mixing bowl. Use a whisk to break up any lumps, ensuring a uniform, dark‑brown powder that will later coat the batter like velvet. This dry mixture is the backbone; any clumps here will become pockets of texture you didn’t intend, so take a moment to sift if needed.
Gradually pour the cooled melted butter into the dry ingredients, stirring with a rubber spatula until the mixture resembles coarse crumbs. The butter will coat each almond flour particle, creating a sand‑like texture that’s perfect for the next step. When you run your finger through the mixture, it should feel slightly gritty but hold together when pressed—this is the perfect consistency.
Time to bring in the sweetener. Add the coconut sugar to the butter‑flour blend, stirring until the sugar dissolves and the batter becomes glossy. The sugar will melt slightly, giving the batter a sheen that signals it’s ready for the eggs. At this point, you’ll notice a faint caramel aroma wafting from the bowl—a promising sign that the flavor layers are beginning to meld.
Watch Out: If the batter looks too dry, drizzle a tablespoon of milk (dairy or plant‑based) to loosen it; too much liquid will make the brownies cakey.Now, gently fold the whisked eggs into the batter. Use a gentle folding motion—think of coaxing the eggs in rather than beating them—so you don’t deflate the air you just introduced. The batter will thicken and become a deep, chocolate‑brown lava that looks almost too good to stir. Keep an eye on the texture; it should be thick enough to hold its shape when spooned but still pourable.
Finally, sprinkle the dark chocolate chips over the top, then give the batter one last light fold to distribute them evenly. The chips will create pockets of molten chocolate as they melt during baking, turning each bite into a surprise center of gooey bliss. If you love extra crunch, you can add a handful of toasted chopped almonds at this stage for an added nutty crunch.
Kitchen Hack: Use a silicone spatula to scrape every last bit of batter from the bowl; those hidden pockets are where the best flavor lives.Spread the batter evenly in the prepared pan, using the spatula to smooth the surface. The top should be level, but don’t press down too hard—you want those airy pockets to stay intact. Once spread, give the pan a gentle tap on the counter to release any air bubbles that may have formed, ensuring a uniform bake.
Slide the pan into the preheated oven and bake for 25‑30 minutes. The edges will start pulling away from the sides of the pan, and the top will develop a thin, crackly crust that smells like toasted nuts and chocolate. Insert a toothpick into the center; it should come out with a few moist crumbs but no wet batter. This is the moment of truth—if it’s too dry, you’ve overbaked; if it’s too wet, give it another 2‑3 minutes.
Remove the pan from the oven and let the brownies cool in the pan for at least 15 minutes. This resting period allows the crumb to set, making it easier to lift the brownies out using the parchment overhang. While you wait, the kitchen will be filled with a lingering aroma that makes you want to dive right in—trust me, patience is a virtue here.
That's it — you did it. But hold on, I've got a few more tricks that'll take this to another level...
Insider Tricks for Flawless Results
The Temperature Rule Nobody Follows
Most bakers rush straight from mixing to baking, but the temperature of each component matters. Let the melted butter cool for exactly five minutes; this tiny pause prevents the batter from becoming grainy and ensures a smoother crumb. I once tried skipping this step and ended up with a brownie that felt like chewing on sand—trust me, the difference is night and day.
Why Your Nose Knows Best
Instead of relying solely on a timer, use your sense of smell as a guide. When the top starts releasing a sweet, toasted aroma (usually around the 20‑minute mark), you know the crackly crust is forming. If you smell a burnt scent before the timer is up, lower the oven temperature by 10‑15°F and cover the pan loosely with foil.
The 5‑Minute Rest That Changes Everything
After removing the brownies from the oven, resist the urge to cut them immediately. Let them rest for five minutes on a cooling rack before slicing. This short rest allows the interior to firm up, giving you clean, sharp cuts instead of mushy, crumbling pieces. I once sliced too early and the brownies fell apart like a sad sandcastle.
Chocolate Chip Placement Mastery
For an even distribution of molten chocolate pockets, sprinkle the chips on the batter before the final fold, then gently swirl them with a spatula. This technique creates pockets that are evenly spaced, ensuring every bite has a surprise melty center. If you just dump them in, they’ll sink to the bottom and you’ll lose that delightful texture.
Pan Choice Matters
A light‑colored, non‑stick pan can cause the edges to brown too quickly, while a dark metal pan may under‑bake the center. I recommend a light‑colored glass or ceramic baking dish; it promotes even heat distribution and gives that coveted crackly top without over‑darkening the sides.
Creative Twists and Variations
This recipe is a playground. Here are some of my favorite ways to switch things up:
Salted Caramel Swirl
After spreading the batter in the pan, drizzle a mixture of melted butter, brown sugar, and a pinch of sea salt over the top, then use a knife to swirl it through. The result is a sweet‑salty ribbon that cuts through the chocolate richness like a perfect duet.
Espresso Infused
Replace 1 tablespoon of the almond flour with finely ground espresso beans, or dissolve a tablespoon of instant coffee in the melted butter before cooling. This adds a deep, earthy note that accentuates the chocolate, making the brownies taste like a mocha dessert.
Nutty Crunch
Fold in a half‑cup of toasted, chopped pecans or walnuts just before the final fold. The nuts add a satisfying crunch and an extra layer of nutty flavor that complements the almond flour beautifully.
Berry Burst
Gently fold in a quarter‑cup of freeze‑dried raspberries or blueberries after the batter is mixed. The berries provide a tart contrast that brightens the dense chocolate, and they add a pop of color that makes the brownies Instagram‑ready.
Vegan Delight
Swap the butter for coconut oil, replace the eggs with a flaxseed “egg” mixture (1 tbsp ground flaxseed + 3 tbsp water per egg), and use maple syrup instead of coconut sugar. The texture remains fudgy, and the flavor takes on a subtle tropical twist.
Spicy Chili
For a bold kick, add a pinch of cayenne pepper or a dash of chipotle powder to the dry ingredients. The heat pairs surprisingly well with the chocolate, creating a lingering warmth that makes you reach for another bite.
Storing and Bringing It Back to Life
Fridge Storage
Place the cooled brownies in an airtight container and store them in the refrigerator for up to five days. The almond flour keeps them moist, and the chocolate chips stay glossy. If you notice the edges drying out, cover the container with a damp paper towel before sealing.
Freezer Friendly
Wrap the entire pan (still in parchment) tightly with plastic wrap, then add a foil layer. Freeze for up to three months. When you’re ready to indulge, let the brownies thaw in the fridge overnight, then bring them to room temperature before serving for optimal texture.
Best Reheating Method
To revive that fresh‑out‑of‑the‑oven feel, preheat your oven to 300°F (150°C), place the brownies on a baking sheet, and warm for 8‑10 minutes. Add a tiny splash of water to the pan’s edge before reheating; the steam will re‑hydrate the crumb, making it as soft as the first day.