Picture this: I’m standing in a cramped kitchen, the counter cluttered with half‑finished dishes, and I’m staring at an empty pot like a detective at a crime scene. My friend had dared me to whip up a chili that could rival the one she swears by, but I was skeptical. The kitchen disaster that followed— a pot of beans that exploded onto the stovetop, a bowl of tomatoes that turned into a sticky mess— taught me that the simplest recipes can become the most memorable when you know what to keep and what to toss. That night, I turned to the pantry, opened a can of black beans, and decided to rewrite the rules of chili.
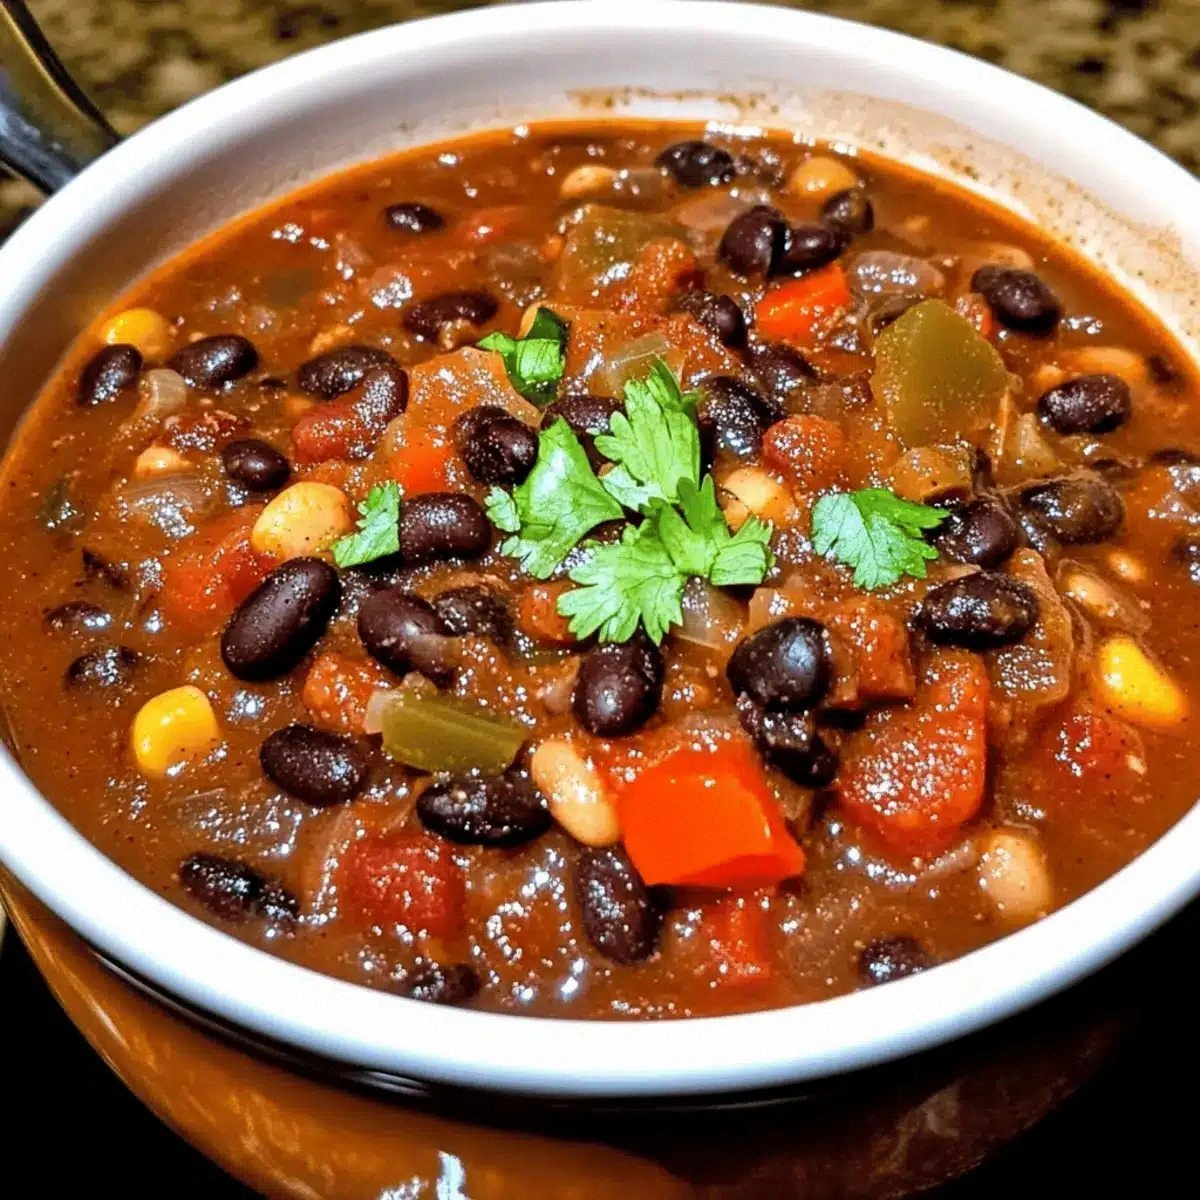
I’m not one to brag, but I swear this version of black bean chili is the kind of dish that will make you question every other chili you’ve ever made. The moment the sautéed onions hit the pan, their sweet aroma drifts through the kitchen, teasing your senses like a promise of comfort. The sizzle is audible, a gentle crackle that signals the start of flavor development. When you first taste it, the smoky paprika and cumin mingle with the bright acidity of the tomatoes, creating a depth that feels like a hug on a rainy day. And the texture—beans that are tender yet hold their shape, corn kernels popping with each bite—makes every spoonful a revelation.
What sets this recipe apart isn’t just the ingredients; it’s the technique. I use a low‑heat simmer to let the spices bloom, allowing the flavors to marry without burning. I also add a splash of lime juice at the end to cut through the richness and add a bright counterpoint that feels like a breath of fresh air. Most recipes get this completely wrong, either by overcooking the beans or underseasoning the base. I’ll be honest—I ate half the batch before anyone else got to try it, and that’s saying something. I dare you to taste this and not go back for seconds. This is hands down the best version you’ll ever make at home, and I promise you’ll wonder how you ever cooked chili any other way.
If you’ve ever struggled to balance the heat, the sweetness, and the heartiness in a chili, you’re not alone. I’ve spent years tweaking ratios and experimenting with different bean varieties. The result is a dish that is both comforting and adventurous, a perfect canvas for any occasion. Picture yourself pulling this out of the oven, the whole kitchen smelling incredible, and guests arriving with their mouths watering in anticipation. Okay, ready for the game‑changer? Let me walk you through every single step—by the end, you’ll wonder how you ever made it any other way.
What Makes This Version Stand Out
- Flavor Depth: The combination of smoked paprika, cumin, and fresh lime juice creates a complex profile that feels both earthy and bright, unlike the flat flavors of many canned‑bean chilies.
- Texture Balance: Beans remain firm yet tender, and the corn adds a sweet crunch that contrasts the silky tomato base.
- Ingredient Quality: Using fresh bell peppers and jalapeños gives the dish a vibrant color and a subtle heat that canned veggies can’t match.
- Simplicity: The recipe requires only one pot and a handful of pantry staples, making it ideal for busy weeknights.
- Make‑Ahead Potential: This chili tastes even better the next day, so you can prepare it in advance and save time.
- Versatility: It can be served over rice, with tortilla chips, or as a filling for tacos—each serving feels like a new experience.
- Kid‑Friendly: The mild heat can be adjusted easily, making it suitable for picky eaters.
- Health‑Focused: Packed with protein, fiber, and antioxidants, it satisfies both taste buds and nutrition goals.
Alright, let's break down exactly what goes into this masterpiece...
Inside the Ingredient List
The Flavor Base
At the heart of any great chili lies its aromatic foundation. Start by finely dicing one medium onion and mincing three cloves of garlic. Sauté them in a splash of olive oil until they’re translucent and fragrant—this is where the flavor begins to build. The onion’s natural sweetness balances the acidity of the diced tomatoes, while the garlic adds a punch that lingers on the palate. If you’re short on time, a quick sauté of onion and garlic in a tablespoon of butter can also work; just be careful not to burn the garlic.
A common mistake is to skip the sauté step entirely. The raw flavors of onion and garlic can be overwhelming and will result in a chili that feels flat. I’ve seen people add diced tomatoes straight to the pot, and the result is a soupy mess that lacks depth. By giving the aromatics a few minutes to soften, you unlock a richer, more nuanced base that carries through the entire dish.
The Texture Crew
Beans are the star of this chili, and using fresh, high‑quality canned beans makes all the difference. Drain and rinse two cans of black beans to remove excess sodium and any canning liquid that might add a metallic taste. The beans should be soft enough to break apart slightly when you mash them with a spoon, but still hold their shape so you can taste the individual kernels. Corn kernels add a sweet pop that complements the earthiness of the beans; 1 cup of fresh or frozen corn is ideal. If you prefer a milder flavor, replace corn with diced zucchini for a subtle crunch.
Don’t underestimate the power of texture. A chili that feels mushy will not satisfy the craving for heartiness. If you’re using canned beans that are a bit too soft, consider adding a tablespoon of chickpeas for a firmer bite. The key is to maintain a balance between tender and firm so every spoonful feels satisfying.
The Unexpected Star
The jalapeño is the secret weapon that gives this chili its gentle kick. Dice one medium jalapeño, removing seeds if you prefer a milder heat. The pepper’s bright, grassy flavor cuts through the richness of the tomatoes and beans, while the heat level is manageable for most palates. If you’re adventurous, try substituting a poblano or a chipotle pepper for a smokier, deeper heat.
Many people shy away from fresh peppers because they think they’re too spicy. In reality, the jalapeño adds a layer of complexity that keeps the dish from feeling one‑dimensional. It also brings a burst of color that makes the chili visually appealing, turning an ordinary pot of beans into a vibrant masterpiece.
The Final Flourish
A splash of fresh lime juice at the end of cooking brightens the entire dish, cutting through the richness and adding a zesty note that lingers on the tongue. I always add the lime juice after the chili has simmered for 20 minutes; the acidity then balances the sweetness of the tomatoes and the earthiness of the beans. The lime also helps to mellow the heat from the jalapeño, making the chili approachable for those who aren’t used to spicy food.
If lime isn’t available, you can use a splash of apple cider vinegar or even a teaspoon of Worcestershire sauce for a different flavor profile. The key is to add acidity at the end so the flavors remain bright and fresh.
Everything’s prepped? Good. Let’s get into the real action...
The Method — Step by Step
- Heat a large, heavy‑bottom pot over medium heat and add a tablespoon of olive oil. Once the oil shimmers, add the diced onion and minced garlic. Cook, stirring frequently, until the onion turns translucent and the garlic is aromatic—about 3 to 4 minutes. The goal is a golden, fragrant base that will carry the rest of the flavors. This is the moment of truth; if the onion starts to brown too quickly, lower the heat and keep stirring.
- Stir in the diced bell pepper, jalapeño, and a pinch of salt. Sauté for another 5 minutes until the peppers soften but still retain a slight crunch. This step introduces a fresh, crisp element that balances the earthiness of the beans. Keep the heat moderate so the peppers don’t become mushy.
- Add the tomato paste and stir until it’s fully incorporated, coating the vegetables. Cook for 2 minutes, allowing the paste to caramelize slightly. This step deepens the tomato flavor and adds a subtle sweetness. The paste should look glossy and should not stick to the pot.
- Pour in the can of diced tomatoes with their juice, followed by the black beans and corn kernels. Stir everything together until the mixture is well combined. The tomatoes bring acidity, the beans add body, and the corn adds a sweet crunch. Let the mixture come to a gentle simmer.
- Season the pot with 2 teaspoons smoked paprika, 1 teaspoon ground cumin, 1 tablespoon chili powder, 1 teaspoon oregano, 1 teaspoon salt, and 1 teaspoon black pepper. Stir thoroughly to distribute the spices evenly. The spices should start to sizzle slightly, indicating that they’re releasing their oils. Taste the chili after this step; it should have a complex, layered flavor.
- Reduce the heat to low and let the chili simmer uncovered for 20 to 25 minutes, stirring occasionally. During this time, the flavors meld together, and the chili thickens to a hearty consistency. The edges of the pot may start to pull away slightly—a sign that the chili is developing depth. This slow simmer is crucial; rushing it will result in a watery, under‑seasoned dish.
- Just before serving, stir in the fresh lime juice. The acidity brightens the chili and cuts through the richness. Taste and adjust the seasoning if needed—add a pinch more salt or a dash of hot sauce if you want extra heat. The final touch is to let the chili rest for a minute; this allows the flavors to settle and intensify.
That’s it — you did it. But hold on, I've got a few more tricks that'll take this to another level...
Insider Tricks for Flawless Results
The Temperature Rule Nobody Follows
Many cooks think that high heat is the key to a good chili, but that’s a myth. Keeping the chili at a gentle simmer allows the spices to release their aromas without burning. I’ve seen chili turn bitter when the heat is too high, especially with cumin and smoked paprika. The trick is to let the pot reach a low, steady simmer and keep it there for at least 20 minutes. If the chili starts to stick, add a splash of vegetable broth or water to keep the surface from scorching.
Why Your Nose Knows Best
After a few minutes of simmering, the chili will develop a rich, earthy aroma that tells you it’s ready. If the scent is too tomatoy or too mild, it’s a sign you need to adjust the spices. My friends often say that their chili needs “more depth” because they’re missing the smoky paprika. Trust your nose; if it’s calling for a pinch of cumin, add it. The aroma is a reliable indicator of flavor balance.
The 5-Minute Rest That Changes Everything
Once you’ve added the lime juice, let the chili rest for 5 minutes before serving. This pause allows the flavors to marry and the acidity to mellow. I’ve had friends who rush to serve immediately and end up with a sharp, unbalanced taste. The rest period is like letting a symphony play out fully before the audience arrives.
The Freshness Factor
Using fresh bell peppers and jalapeños instead of canned versions gives the chili a bright, crisp edge. Fresh veggies bring a subtle sweetness that canned produce often lacks. If fresh peppers are out of season, consider frozen bell pepper strips; they retain most of their flavor and color.
The Final Seasoning Touch
Don’t be afraid to taste and tweak. A pinch of sea salt or a splash of hot sauce can elevate the dish. I once added a teaspoon of maple syrup for a hint of sweetness that balanced the heat. Remember, seasoning is an iterative process; the chili evolves as it simmers.
Creative Twists and Variations
This recipe is a playground. Here are some of my favorite ways to switch things up:
Mexican Street Tacos
Serve the chili in warm corn tortillas, topped with diced avocado, shredded cheese, and a dollop of sour cream. The tortilla’s corn flavor complements the chili’s earthiness, while the avocado adds creaminess.
Cheesy Nacho Bowl
Layer the chili over a bed of tortilla chips, sprinkle shredded cheddar, and add a drizzle of ranch dressing. The nacho crunch and creamy cheese create a satisfying contrast.
Breakfast Chili
Stir in a couple of scrambled eggs or a fried egg on top for a hearty breakfast. The protein boost makes it a filling start to the day.
Spicy Thai Twist
Replace the cumin and paprika with Thai red curry paste, add coconut milk, and finish with fresh cilantro. The result is a creamy, spicy bowl reminiscent of Thai green curry.
Vegan Stuffed Peppers
Fill bell pepper halves with the chili mixture, top with vegan cheese, and bake until bubbly. The peppers become a vessel for the hearty filling, creating a one‑dish meal.
Crispy Chili Topped Fries
Serve the chili over a bed of crispy oven‑baked potato wedges, then top with shredded cheddar and a sprinkle of green onions. The crunch of the fries pairs well with the smooth chili.
Storing and Bringing It Back to Life
Fridge Storage
Cool the chili completely before transferring it to an airtight container. Store in the refrigerator for up to 4 days. The flavors continue to develop, making it even more delicious the next day.
Freezer Friendly
Freeze the chili in single‑serve portions for up to 3 months. Thaw overnight in the refrigerator or microwave on the defrost setting. Reheat gently on the stovetop, adding a splash of water if the mixture has thickened.
Best Reheating Method
Reheat the chili over low heat, stirring frequently. Add a tiny splash of water or broth to restore moisture. Let it bubble gently for 5 minutes, then taste and adjust seasoning if needed. This technique ensures the chili stays silky and flavorful.