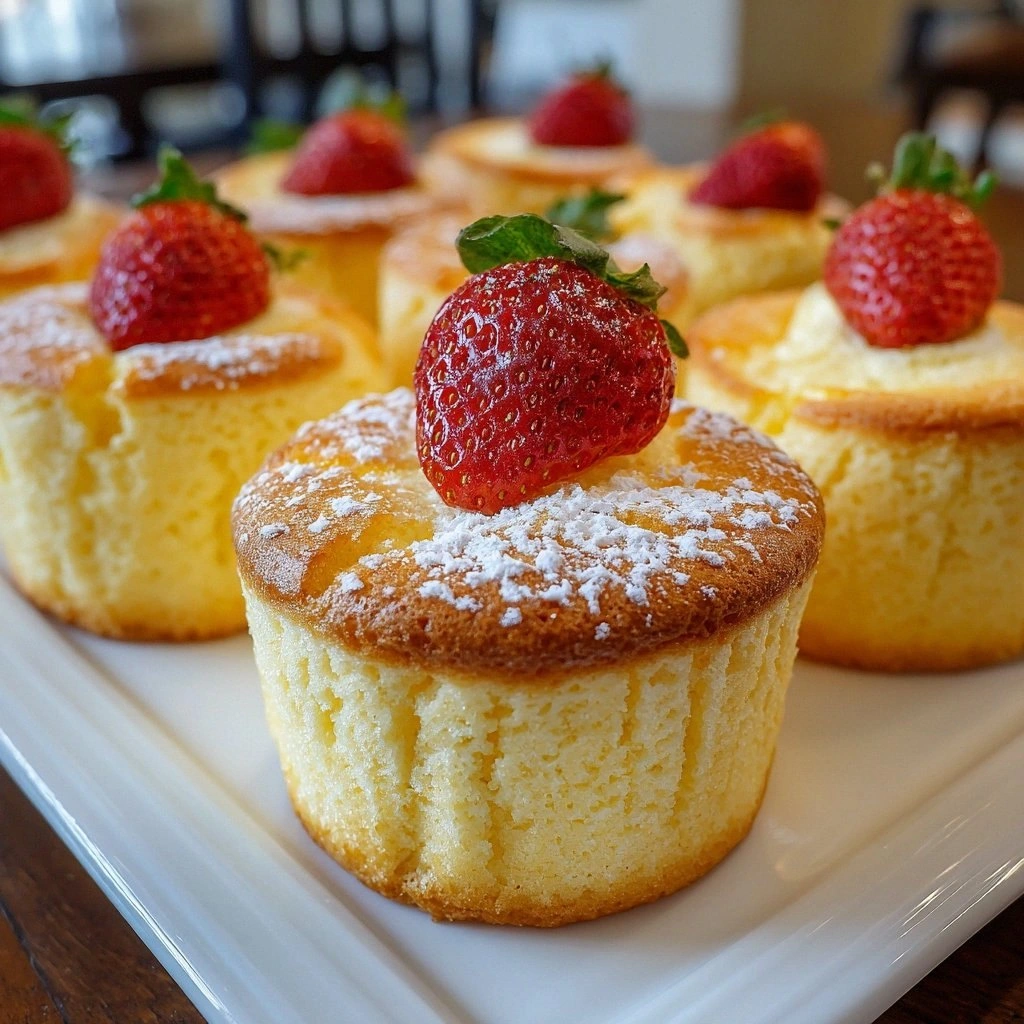
I remember the night I tried to bake a Japanese cotton cheesecake for the first time and ended up with a sad, dense mess that looked more like a brick than a cloud. The kitchen was a chaotic symphony of clanging pans, a faint scent of burnt sugar, and a lingering taste of disappointment on my tongue. That disaster became the spark that ignited my obsession with finding the perfect fluffy version—one that feels like a cloud you can bite into, not a lump of custard. I spent nights watching videos, flipping through cookbooks, and experimenting with different ratios until I finally cracked the secret formula. The result? A cupcake that rises like a soufflé, with a silky interior that melts in your mouth, and a delicate, airy exterior that feels like a whisper of cotton candy. That’s the kind of dessert that turns a simple snack into a celebration.
Picture this: you open the oven door and are greeted by a gentle, sweet aroma that makes your stomach do a happy dance. The cupcakes rise to a golden crown, their tops lightly crisping while the inside remains soft and airy, a contrast that feels like a breath of fresh air after a long day. You take a bite, and the flavor explodes—rich cream cheese balanced by a subtle sweetness, a hint of vanilla, and a whisper of tang from the cream of tartar. The texture is a revelation: the crumb is light and almost powdery, yet the center is wonderfully moist, not dry or gummy. It’s the kind of dessert that makes you pause, smile, and say, “I dare you to taste this and not go back for seconds.”
What sets this version apart from the countless others you’ll find online is that it’s not just a recipe—it's a process that respects each ingredient, leverages a unique technique, and delivers a result that feels effortless. I’ve distilled the essential elements into a single, cohesive approach that eliminates the usual pitfalls of Japanese cotton cheesecake: dense texture, uneven rise, and a bland flavor profile. Every step is crafted to bring out the best in your batter, from the precise whisking of egg whites to the gentle folding of cream cheese. This is hands down the best version you'll ever make at home, and once you taste it, you’ll never settle for anything else.
Now, let’s dive into the details. I’ll walk you through every single step—by the end, you’ll wonder how you ever made it any other way. The journey starts with understanding why each ingredient matters and how they work together to create that signature fluffiness. Then we’ll move through the preparation, the baking, and the finishing touches that elevate this dessert from good to unforgettable. Get ready for a recipe that feels like a secret handshake between you and the kitchen, a ritual that turns ordinary ingredients into a masterpiece.
What Makes This Version Stand Out
- Fluffy Texture: The secret lies in the meticulous whisking of egg whites to stiff peaks, which creates a delicate lattice that traps air, giving the cupcakes their signature cloud-like rise.
- Balanced Sweetness: Granulated sugar is measured precisely to balance the tang of cream cheese without overpowering the subtle vanilla undertone.
- Rich Creaminess: Cream cheese is the star, providing a velvety mouthfeel that melts instantly, creating a luxurious interior.
- Light Structure: All-purpose flour is sifted and folded gently, ensuring the batter stays airy while still setting properly.
- Flavor Depth: Vanilla extract and a pinch of salt enhance each component, turning a simple cupcake into a symphony of flavors.
- Make‑Ahead Friendly: Once baked, these cupcakes keep well in the fridge, making them perfect for parties or a last‑minute dessert.
- Visual Appeal: The golden crust and the soft, pale interior create a striking contrast that’s almost as satisfying to look at as to eat.
Inside the Ingredient List
The Flavor Base
Cream cheese is the foundation of this dessert, providing the rich, tangy flavor that defines Japanese cotton cheesecake. Use a full-fat variety for maximum creaminess; low-fat will compromise the silky texture. If you’re aiming for a dairy-free version, substitute with a high-protein tofu blend, but be prepared to adjust the sweetness.
The Texture Crew
Granulated sugar is not just a sweetener; it plays a crucial role in the batter’s structure by dissolving into the mixture and creating a finer crumb. Milk adds moisture, helping the batter stay light and preventing a dry center. Unsalted butter, melted and cooled, contributes richness without the risk of over-salting, allowing you to control the final flavor precisely.
The Unexpected Star
Eggs are divided into yolks and whites—yolks for richness and color, whites for lift. Whipping the whites to stiff peaks before folding them in ensures the batter remains airy. The cream of tartar stabilizes the whites, preventing them from collapsing and giving you that coveted fluffy texture.
The Final Flourish
All-purpose flour provides structure while keeping the batter from becoming too dense. Sift it to remove lumps and aerate it, then fold it in gently to preserve the incorporated air. A pinch of salt amplifies all flavors, acting as a subtle enhancer that balances the sweetness and creaminess.
Everything’s prepped? Good. Let’s get into the real action and start baking.
The Method — Step by Step
- Preheat your oven to 325°F (165°C) and line a muffin tin with paper liners. This low temperature is crucial; it allows the cupcakes to rise evenly without cracking. While the oven warms, gather all ingredients so you can work efficiently. A smooth workflow reduces the risk of overmixing.
- In a heatproof bowl, combine 8 oz (2 cups) of softened cream cheese with 1 cup of granulated sugar. Beat them together using an electric mixer on medium speed until the mixture is pale and fluffy. The goal is to incorporate air, not just dissolve sugar; this will form the backbone of the airy crumb.
- Add ½ cup of milk and ¼ cup of melted unsalted butter to the cream cheese mixture. Stir gently until the batter is smooth and glossy. The butter should be cooled to room temperature to prevent curdling. This step also helps to emulsify the mixture, giving it a silky mouthfeel.
- Separate 2 eggs—reserve the yolks for the batter and set the whites aside for whipping. Fold the yolks into the cream cheese mixture, ensuring they’re fully incorporated. This addition brings richness and color to the cupcakes.
- Whip the egg whites in a clean bowl with ¼ tsp of cream of tartar until stiff peaks form. The whites should hold their shape when the beaters are lifted. This step is the heart of the fluffiness; skip it and you’ll end up with a dense cake.
- Sift 1 cup of all‑purpose flour and ¼ tsp of salt. Gently fold the dry ingredients into the batter, alternating with the whipped whites. Use a spatula and a folding motion to preserve the air bubbles. The batter should be smooth but still slightly lumpy, indicating that the air has been retained.
- Add 1 tsp of vanilla extract, and give the batter one final gentle fold. The vanilla will deepen the flavor profile, giving each cupcake a warm, fragrant undertone. At this point, the batter should look light and airy.
- Fill each muffin cup about ¾ full with the batter. Place the tin in the preheated oven and bake for 30 minutes. The cupcakes should rise to a golden crown, and the tops will start to pull away from the sides. Keep an eye on them; overbaking will dry them out.
- Once baked, turn off the oven and leave the cupcakes inside for 10 minutes with the door slightly ajar. This gentle cooling period allows the structure to set without cracking. Then transfer them to a wire rack to cool completely.
- After cooling, you can serve them as is or top with fresh berries, a dusting of powdered sugar, or a drizzle of chocolate ganache. The cupcakes are best enjoyed within 24 hours for optimal freshness. If you’re planning ahead, store them in an airtight container in the fridge.
That’s it—you did it. But hold on, I’ve got a few more tricks that will take this to another level.
Insider Tricks for Flawless Results
The Temperature Rule Nobody Follows
Many bakers use high heat to get a quick rise, but the secret to a flawless cotton cheesecake is a low, steady oven temperature. Baking at 325°F (165°C) allows the cupcakes to expand slowly, creating a uniform crumb. If you’re using a convection oven, reduce the temperature by 25°F to avoid overcooking.
Why Your Nose Knows Best
As the cupcakes bake, the aroma will change from sweet to nutty. This subtle shift signals that the batter has set enough to hold its shape. Trusting your nose helps you catch the perfect moment to pull them out before they dry out.
The 5-Minute Rest That Changes Everything
Leaving the cupcakes in the oven for 5 minutes after turning it off gives the structure a chance to stabilize. This step prevents cracks and ensures a smooth, even rise. Skipping it can lead to a slightly uneven top and a less airy interior.
Fold, Don’t Stir
When incorporating the whipped whites, always fold with a gentle, sweeping motion. Stirring can cause the delicate air bubbles to collapse, turning your airy cupcakes into a dense cake. A light fold preserves the lightness.
Use a Light‑Touch Mixer
Mix the batter on a low speed initially to avoid overworking the flour. Once the flour is incorporated, you can increase the speed slightly for a few seconds to ensure even distribution. This technique keeps the batter airy while preventing gluten overdevelopment.
Cool Completely Before Serving
Serving warm cupcakes can cause the interior to melt, losing the signature fluffy texture. Let them cool on a rack for at least 30 minutes before serving. If you need to serve them quickly, a quick chill in the fridge for 10 minutes works fine.
Creative Twists and Variations
This recipe is a playground. Here are some of my favorite ways to switch things up:
Matcha Magic
Add 2 tbsp of matcha powder to the dry ingredients for a subtle green tea flavor. The earthy tones pair beautifully with the sweet, creamy base, making it a perfect dessert for spring or a tea party.
Citrus Zest
Incorporate the zest of one lemon or orange into the batter. The bright citrus cuts through the richness, offering a refreshing contrast that’s ideal for summer gatherings.
Chocolate Swirl
Fold a swirl of melted dark chocolate into the batter before baking. The chocolate ribbon adds a decadent touch, and the contrast between the sweet cream cheese and rich cocoa is irresistible.
Balsamic Glaze Finish
Drizzle a thin layer of aged balsamic reduction over the cooled cupcakes. The slight tang balances the sweetness, creating a sophisticated flavor profile that’s perfect for a dinner party.
Almond Infusion
Replace ¼ cup of flour with almond flour and add 1 tbsp of almond extract. The nutty undertone adds depth, and the cupcakes take on a delicate, nutty aroma that’s hard to resist.
Berry Burst
Fold in fresh blueberries or raspberries just before baking. The burst of fruit adds juiciness and a pop of color, turning the cupcakes into a vibrant, fruit‑laden treat.
Storing and Bringing It Back to Life
Fridge Storage
Store the cupcakes in an airtight container at room temperature for up to 3 days. If you notice they’re drying out, place a slice of bread in the container; the bread will release moisture and keep the cupcakes soft.
Freezer Friendly
For longer storage, wrap each cupcake individually in plastic wrap, then place them in a freezer bag. They’ll stay fresh for up to 2 months. Thaw in the fridge overnight before serving.
Best Reheating Method
To revive a frozen or stale cupcake, microwave on low power for 10–15 seconds or warm in a 300°F oven for 5 minutes. Add a tiny splash of water before reheating; this steams the interior back to perfection without drying it out.