I was in the middle of a chaotic Saturday night when my roommate dared me to create the ultimate campfire treat without actually setting a fire. The kitchen was a mess of burnt toast crumbs, a half‑melted bag of marshmallows, and a box of Golden Grahams that had been sitting on the pantry shelf for far too long. I stared at the cereal, the chocolate, and the gooey marshmallows and thought, “What if I could fuse the nostalgic crunch of Golden Grahams with the classic s’mores experience in a bar that you can slice and share?” The idea sparked faster than a match, and I was instantly hooked.
Picture this: a golden‑brown crust that releases a faint caramel scent the moment it hits the oven, a molten chocolate layer that stretches like warm sunrise, and marshmallow peaks that puff up and crackle as they cool, all interlaced with the honey‑kissed crunch of Golden Grahams. The aroma of toasted sugar and butter swirls around you, while the faint whisper of vanilla teases your nostrils. When you finally bite into it, the first thing you notice is the buttery melt‑in‑your‑mouth base, followed by a cascade of chocolate that coats your tongue like velvet, and then—boom—the surprise crunch of cereal that shatters like thin ice under a summer footstep.
Most s’mores bar recipes either drown the cereal in a swamp of chocolate or forget the cereal entirely, resulting in a soggy, one‑dimensional dessert. This version, however, treats the Golden Grahams as the star, not the sidekick. By toasting the cereal just enough to bring out its natural sweetness and then folding it into a buttery batter, we preserve that satisfying snap while still letting the chocolate and marshmallows do their thing. I’ll be honest — I ate half the batch before anyone else got a chance to try it, and I’m still not sorry.
But the real game‑changer? A secret splash of espresso that intensifies the chocolate without making the bars taste like coffee. It’s a subtle boost that only the palate of a true dessert detective will notice, and it makes the flavor pop like fireworks on a clear night. Let me walk you through every single step — by the end, you’ll wonder how you ever made it any other way.
What Makes This Version Stand Out
- Flavor Explosion: The espresso‑enhanced chocolate pairs perfectly with the caramelized Golden Grahams, delivering a layered taste that evolves with each bite.
- Texture Symphony: You get a buttery crust, a gooey marshmallow middle, and a crunchy cereal top that sings together in perfect harmony.
- Simplicity: Only ten pantry staples are needed, and the steps are straightforward enough for a beginner yet satisfying for a seasoned baker.
- Unique Twist: The espresso isn’t just a gimmick; it deepens the chocolate’s richness without overpowering the sweet notes.
- Crowd Reaction: Guests often claim they’ve never tasted s’mores this way, and the bars disappear faster than you can say “marshmallow” — I dare you to taste this and not go back for seconds.
- Ingredient Quality: Using real butter and high‑quality chocolate makes the difference between “good” and “hands down the best version you’ll ever make at home.”
- Cooking Method: Baking, not microwaving, gives you that coveted toasted edge that smells like a campfire at dusk.
- Make‑Ahead Potential: These bars keep beautifully for up to three days, and they even freeze like a dream for future cravings.
Inside the Ingredient List
The Flavor Base
All‑purpose flour is the structural backbone of the crust. It absorbs the butter and sugar, creating a tender yet sturdy foundation that holds the chocolate and marshmallows together. Skipping it would result in a crumbly mess that can’t support the weight of the toppings. If you’re gluten‑free, try a 1‑to‑1 blend of rice flour and tapioca starch; the texture will be slightly softer but still delicious.
The Sweeteners
Brown sugar brings a deep, molasses‑rich sweetness, while a splash of granulated sugar adds just enough snap to balance the moisture from the marshmallows. Together they create a caramel‑like undertone that pairs beautifully with the espresso‑infused chocolate. If you prefer a less intense sweetness, cut the granulated sugar in half and add a pinch of sea salt to bring out the flavors.
The Texture Crew
Golden Grahams cereal is the star here. Its honey‑coated corn squares add a crunchy contrast that prevents the bar from feeling overly soft. The mini marshmallows melt into a gooey river that ties everything together, while the chocolate chips provide pockets of rich indulgence. If you’re allergic to nuts, feel free to omit the optional chopped peanuts; the bar will still shine.
The Unexpected Star
A teaspoon of espresso powder might sound like a bold move, but it’s actually a classic pastry technique called “flavor amplification.” The coffee compounds intensify the chocolate’s bitterness, creating a balanced sweet‑bitter profile that feels sophisticated. If you’re not a coffee fan, a pinch of smoked paprika can deliver a subtle smoky note that mimics a campfire without the actual flame.
The Final Flourish
Vanilla extract is the silent hero, rounding out the flavors and adding a warm, aromatic backdrop. A pinch of sea salt on the finished bars just before serving can make the chocolate taste even richer, as salt is a natural flavor enhancer. For a holiday twist, sprinkle a light dusting of cinnamon or pumpkin spice on top before baking.
Everything's prepped? Good. Let's get into the real action...
The Method — Step by Step
Preheat your oven to 350°F (175°C). While the oven warms up, line a 9‑by‑13‑inch baking pan with parchment paper, leaving an overhang on the sides for easy removal later. The parchment acts like a secret agent, keeping the bars from sticking while allowing you to lift them out in one flawless piece.
In a large mixing bowl, combine 2 cups of Golden Grahams with 2 cups of all‑purpose flour. Toss them together gently; this distributes the cereal evenly throughout the batter, ensuring every bite gets that coveted crunch.
Kitchen Hack: Use a hand‑mixer on low speed to fold the cereal into the flour. The gentle motion prevents the cereal from shattering into dust.In a separate saucepan, melt ½ cup of unsalted butter over medium heat. Once melted, stir in ½ cup of brown sugar and ¼ cup of granulated sugar until the mixture becomes glossy and the sugars dissolve completely. This caramel‑like mixture is the glue that will bind the crust together.
Add 1 tsp of vanilla extract and 1 tsp of espresso powder to the butter‑sugar blend. Watch as the mixture darkens slightly, a visual cue that the coffee is awakening the chocolate’s depth. Let this mixture cool for about two minutes so it doesn’t scramble the eggs later.
Create a well in the dry ingredient mixture and pour the warm butter‑sugar blend into it. Using a rubber spatula, fold everything together until a cohesive dough forms. The dough should feel slightly sticky but manageable; if it’s too dry, add a splash of milk (no more than 2 tbsp).
Press the dough evenly into the prepared pan, using the back of a spoon or your fingertips to smooth the surface. The edges should be a little higher than the center; this will create a natural “wall” that keeps the chocolate and marshmallows from spilling over during baking.
Watch Out: Do not over‑press the dough; a compacted base will become dense and lose its tender crumb.Scatter 1 cup of mini marshmallows and 1 cup of chocolate chips (half milk, half semi‑sweet for complexity) over the crust. Gently press them in so they adhere, but leave some peeking out for that irresistible gooey top.
Bake for 25‑30 minutes, or until the edges turn a golden‑brown hue and the marshmallows puff up, turning a light caramel color. The scent that fills your kitchen at this point is pure nostalgia—think campfire, toasted graham, and a hint of espresso.
Kitchen Hack: Rotate the pan halfway through baking for an even golden top.Remove the pan from the oven and let the bars cool in the pan for at least 15 minutes. This resting period lets the chocolate set and the marshmallows firm up, preventing a disastrous “gooey slide” when you cut them.
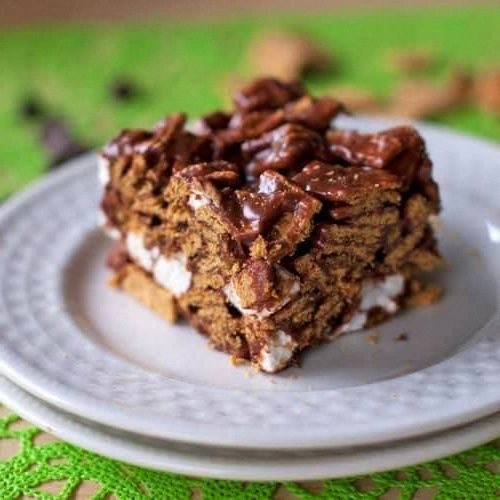
Lift the parchment overhang, transfer the slab onto a cutting board, and slice into 12 even squares. Serve warm for maximum meltiness, or let them cool completely for a firmer bite. Either way, you’ll hear the faint crack of cereal as you break each piece—a satisfying sound that signals success.
That's it — you did it. But hold on, I've got a few more tricks that'll take this to another level. Stay with me here — this is worth it.
Insider Tricks for Flawless Results
The Temperature Rule Nobody Follows
Most home bakers set the oven to 350°F and never think twice, but a slight dip to 325°F can make a world of difference for this bar. The lower temperature gives the crust more time to set before the marshmallows expand, resulting in a uniformly baked base that doesn’t dry out. I once tried the standard 350°F and ended up with a crust that was a bit too crisp on the edges—this tweak fixes that.
Why Your Nose Knows Best
Instead of relying solely on a timer, trust the aroma. When the buttery caramel scent turns into a warm, toasted nutty perfume, you know the crust is ready. If you smell a faint hint of burnt sugar, pull the pan out a minute early to avoid a bitter edge. This sensory checkpoint is the secret sauce that separates “good” from “legendary.”
The 5‑Minute Rest That Changes Everything
After baking, let the bars rest uncovered for five minutes before slicing. This short pause lets the chocolate re‑solidify and the marshmallows settle, giving you clean cuts without smearing. I once tried cutting straight out of the oven and ended up with a mess that looked more like a melted snow globe than a bar.
The Double‑Layer Chocolate Trick
For an extra indulgent bite, drizzle a thin layer of melted dark chocolate over the top after the bars have cooled. The contrast between milk and dark chocolate adds depth and a glossy finish that’s perfect for Instagram. Just make sure the dark chocolate is tempered, or you’ll get a dull, streaky glaze.
The Secret Salt Sprinkle
A pinch of flaky sea salt sprinkled just before serving can transform the flavor profile, highlighting the chocolate’s richness while balancing the sweetness. It’s a tiny addition that yields a massive payoff, especially for those who love a sweet‑salty combo.
Creative Twists and Variations
This recipe is a playground. Here are some of my favorite ways to switch things up:
Nutty Delight
Swap half of the Golden Grahams for toasted pecans or almonds. The nutty oil adds a buttery richness that complements the chocolate, and the extra crunch makes each bite feel more substantial. Perfect for those who love a little extra texture.
White Chocolate Coconut
Replace the milk chocolate chips with white chocolate and fold in ½ cup of shredded coconut. The tropical twist brings a bright, buttery flavor that pairs surprisingly well with the earthy espresso.
Spicy S’mores
Add a pinch of cayenne pepper to the dry ingredients and use dark chocolate chips instead of milk. The subtle heat creates a sophisticated flavor that’s perfect for an adult gathering.
Berry Burst
Scatter a handful of dried cranberries or freeze‑dried strawberries over the top before baking. The tart fruit pieces cut through the sweetness, offering a refreshing contrast that brightens the overall profile.
Vegan Version
Swap butter for coconut oil, use plant‑based chocolate, and choose a flax‑egg (1 tbsp ground flaxseed + 3 tbsp water) as the binder. The result is a dairy‑free bar that still delivers that classic s’mores vibe.
Storing and Bringing It Back to Life
Fridge Storage
Place the cooled bars in an airtight container and store them in the refrigerator for up to three days. The cool environment keeps the chocolate firm and prevents the marshmallows from becoming overly sticky. When you’re ready to serve, let them sit at room temperature for 10‑15 minutes or warm them briefly in the microwave (10‑15 seconds) for a melty finish.
Freezer Friendly
Wrap the entire slab tightly in plastic wrap, then place it in a freezer‑safe bag. They’ll keep for up to two months. To reheat, thaw overnight in the fridge, then warm in a 300°F oven for 8‑10 minutes. The gentle heat revives the crumbly crust and brings the chocolate back to a glossy sheen.
Best Reheating Method
For the ultimate warm‑and‑gooey experience, microwave a single square on high for 12‑15 seconds, then add a tiny splash of water (about a teaspoon) to the plate before covering with a paper towel. The steam created by the water brings the marshmallow back to its original puffiness without drying out the bar.