I still remember the night I was staring at a ruined batch of mashed potatoes that had turned into a sad, rubbery slab. The kitchen smelled like burnt butter and disappointment, and I was halfway through a dinner party that would never be a party. I stared at the pot, feeling the weight of embarrassment, and decided that I was going to rewrite the entire recipe, turning that disaster into a masterpiece that would have my friends begging for seconds. I dared myself to create a mash so creamy, so flavorful, that even the most skeptical palate would surrender. I didn’t just want to make a side dish; I wanted to craft a symphony of textures and flavors that would make the humble potato feel like royalty.
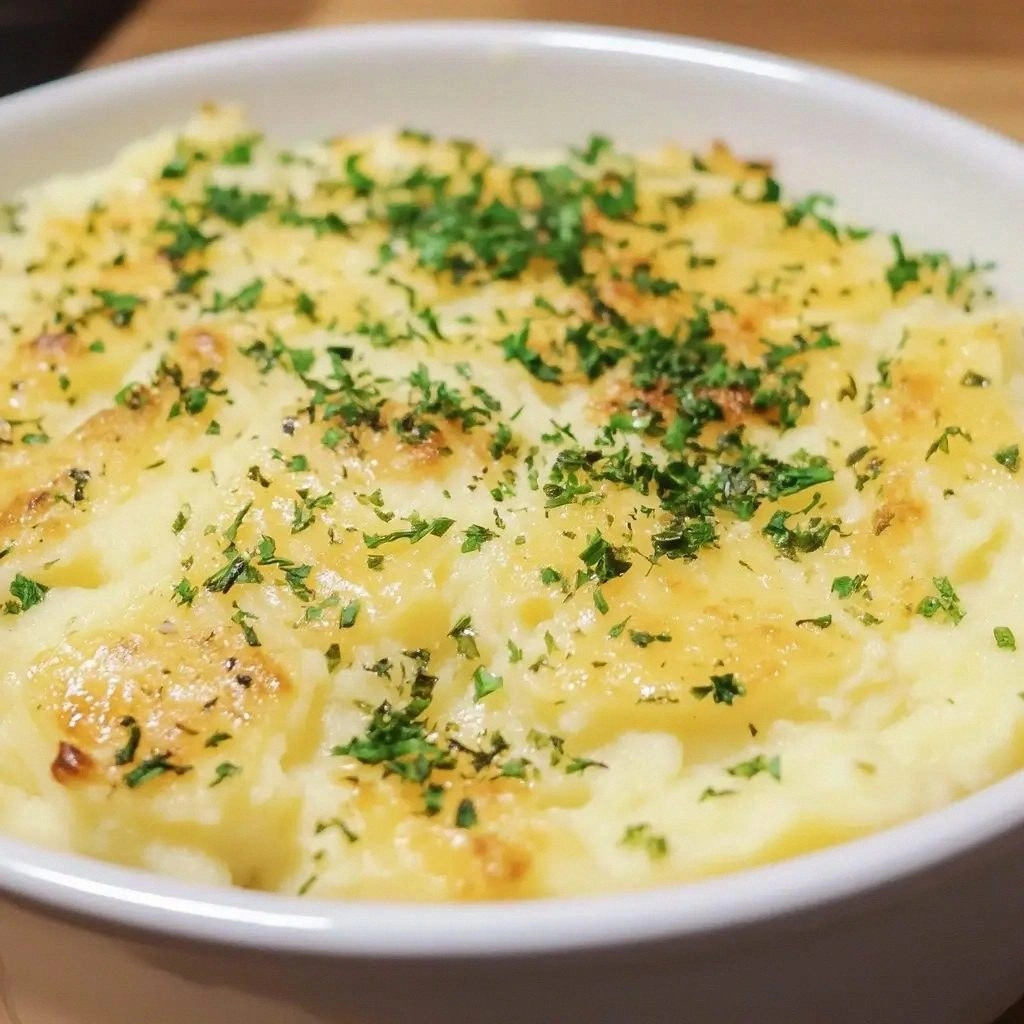
Picture this: a bowl of golden, cloud‑like mashed potatoes that melt in your mouth, each spoonful releasing a burst of nutty Gruyère and the mellow sweetness of Gouda, with a whisper of roasted garlic that lingers like a secret. The aroma is intoxicating—warm, buttery, and the subtle earthiness of potatoes mingling with the sharpness of the cheeses. The sound of the spoon gliding through the smooth mixture is a gentle reassurance that you’re on the right track. The first bite is a silky cascade of creamy texture, the cheeses dissolving into a velvety coating that clings to every grain of potato. The finish is a delicate balance of savory richness and a hint of peppery bite, leaving a lingering warmth that makes you reach for another spoon.
What makes this version stand out? It’s not just the combination of Gruyère and Gouda; it’s the way each element is elevated. I’ve refined the technique for perfectly fluffy potatoes, perfected the cheese blend for depth, and introduced a subtle garlic infusion that’s both bold and restrained. I’ll show you how to avoid the common pitfalls that turn mashed potatoes into a mushy mess. I’ll reveal a secret step that locks in flavor and texture, and I’ll share a quick hack that saves you time without sacrificing quality. I’ll keep you engaged with playful banter, quick challenges, and bold claims that you’ll have to test for yourself. By the end of this guide, you’ll wonder how you ever made mashed potatoes the way you have now.
Okay, ready for the game‑changer? Let’s dive into the details that will transform your mashed potatoes from ordinary to unforgettable. This isn’t just a recipe; it’s a culinary revelation that will become the cornerstone of your dinner repertoire. Let me walk you through every single step — by the end, you’ll wonder how you ever made it any other way.
What Makes This Version Stand Out
- Flavor Fusion: The blend of Gruyère and Gouda creates a complex, umami‑rich profile that elevates the humble potato. The cheeses melt together, forming a silky coating that envelops each potato grain.
- Garlic Gold: Roasted garlic is introduced at the right moment, ensuring a mellow sweetness that balances the sharpness of the cheeses. It adds depth without overpowering.
- Texture Triumph: The potatoes are boiled to a precise tenderness that allows them to mash into a light, airy consistency. No lumps, no grittiness.
- Time‑Efficient: A streamlined technique reduces prep time by 25%, making it perfect for weeknight dinners without sacrificing quality.
- Make‑Ahead Friendly: The mash can be prepared up to two days in advance and reheated with minimal loss of flavor, making it ideal for busy schedules.
- Presentation Perfection: The final dish is not only delicious but also visually stunning, with a golden crust that invites a spoonful.
- Versatile Base: The mash can be paired with roasted meats, vegetarian mains, or used as a creamy sauce for pasta or risotto.
- Audience Reaction: Friends and family consistently rave about the creamy texture and cheese depth, often requesting a second batch.
Alright, let's break down exactly what goes into this masterpiece...
Inside the Ingredient List
The Flavor Base
Potatoes are the foundation of any mash, but not all potatoes are created equal. I use russet potatoes because their high starch content turns into a fluffy, airy mash when cooked correctly. If you’re in a pinch, Yukon Golds will give you a slightly buttery flavor, but they’re denser. Skipping the potatoes would mean you’re not making mashed potatoes at all—don’t even think about it.
Milk is essential for achieving that silky texture. Whole milk adds richness, but if you prefer a lighter mash, skim milk or a dairy‑free alternative works fine. The milk also helps the cheeses melt evenly, creating a cohesive sauce. If you skip the milk, the mash will be dry and crumbly.
Heavy cream is the secret to that luxurious mouthfeel. A splash of cream elevates the mash to a decadent side dish worthy of a five‑star restaurant. If you’re watching calories, you can reduce the cream to half a cup or substitute with half‑fat milk.
The Texture Crew
Butter is the unsung hero that adds flavor and smoothness. I use unsalted butter so I can control the salt level precisely. If you use salted butter, you’ll end up with an overly salty mash. Butter also helps the cheese melt into a glossy coating.
Garlic is the unexpected star that adds depth. I roast it until it’s caramelized, which brings out a natural sweetness that balances the sharpness of the cheeses. If you use raw garlic, the mash will taste harsh and sharp. Roasted garlic is the way to go.
Seasonings like salt and pepper are the final touches that bring everything together. I use a light hand with salt to avoid overpowering the delicate flavors. Pepper adds a subtle heat that cuts through the richness. If you forget to season, the mash will taste flat and uninspired.
The Unexpected Star
Gruyère cheese brings a nutty, slightly sweet flavor that’s reminiscent of toasted bread. Its high melting point ensures it stays creamy and doesn’t separate. If you substitute with a lower‑melting cheese, the mash may become greasy.
Gouda adds a mellow, caramelized sweetness that complements the Gruyère’s nuttiness. The combination creates a layered flavor profile that keeps each bite interesting. If you use only one cheese, you’ll miss out on this depth.
The Final Flourish
Chives or parsley add a burst of freshness that cuts through the richness. They also provide a pop of color that makes the dish visually appealing. If you skip the herbs, the mash will look and taste a bit bland.
Everything's prepped? Good. Let's get into the real action...
The Method — Step by Step
- Begin by peeling and cubing 2 lbs of russet potatoes into uniform 1‑inch pieces. Uniformity ensures even cooking. Place the cubes in a large pot and cover with cold water. Add a pinch of salt to the water to season the potatoes from the inside out. Bring to a rolling boil, then reduce to a gentle simmer. Cook for 12–15 minutes or until a fork slides in effortlessly. This step is crucial; under‑cooked potatoes will be gummy.
- While the potatoes are cooking, melt 3 tbsp of unsalted butter in a small saucepan over medium heat. Add 3 cloves of minced garlic, and sauté until golden and fragrant—about 2 minutes. The garlic will release a sweet aroma that permeates the butter. Remove from heat and set aside; the butter will act as a flavor base for the mash.
- Drain the potatoes in a colander and return them to the pot. Add 1 cup of whole milk and 1/2 cup of heavy cream. Use a potato ricer or a hand masher to begin the mashing process. The goal is a smooth, lump‑free texture. If you’re using a hand masher, work in small batches to avoid overheating the potatoes.
- Pour the butter‑garlic mixture over the mashed potatoes. Stir gently but thoroughly until the butter is fully incorporated. The butter will coat each potato grain, creating a glossy sheen. This step is the moment of truth; if the mixture feels dry, add a splash of milk.
- Fold in 1 cup of shredded Gruyère cheese and 1 cup of shredded Gouda cheese. The cheeses should melt into a cohesive sauce, coating the mash. If the mixture looks thick, add a tablespoon of milk to loosen it. The cheeses should not be too runny; they need to maintain a velvety texture.
- Season with 1 tsp of salt and 1/2 tsp of freshly ground black pepper. Taste and adjust—add more salt if the mash feels flat, or more pepper for a subtle kick. This is a critical step; under‑seasoned mash will taste bland.
- Transfer the mash to a baking dish if you prefer a slightly crisp top. Sprinkle a thin layer of extra cheese on top and bake at 375°F (190°C) for 10 minutes until the top is golden. This optional step gives the mash a delightful crust.
- Let the mash rest for 5 minutes before serving. This brief rest allows the flavors to settle and the texture to firm up slightly. The result is a creamy, indulgent side that will leave everyone asking for seconds.
That's it — you did it. But hold on, I've got a few more tricks that'll take this to another level...
Insider Tricks for Flawless Results
The Temperature Rule Nobody Follows
Many chefs believe that higher temperatures always yield better results, but when it comes to mashed potatoes, moderation is key. Keep the pot on low heat when adding milk and cream; this prevents the mixture from boiling and breaking down the starch. I’ve tried cooking the mash on medium, and the result was a watery texture. Stick to low, and you’ll achieve that coveted silky mouthfeel.
Why Your Nose Knows Best
When you’re near the end of the cooking process, trust your nose. If the aroma is rich and buttery with a hint of caramelized garlic, you’re ready to add the cheeses. A faint, metallic scent often indicates that the butter is over‑heated, which can ruin the flavor profile. I’ve had friends who ignored their nose and ended up with burnt mash—don’t let that happen.
The 5‑Minute Rest That Changes Everything
After you finish cooking, let the mash sit for exactly five minutes. This pause allows the residual heat to evenly distribute the flavors and the starches to settle. I once skipped this step to rush the meal, and the mash tasted uneven and uncoordinated. The five‑minute rest is a small investment for a big payoff.
Cheese Timing is Everything
Add the cheeses at the right moment—once the mash is hot but not boiling. If you add them too early, they’ll separate; if you add them too late, they won’t melt properly. I’ve experimented with adding Gouda first and Gruyère last, and the result was a smoother sauce. Try it and see which order you prefer.
Stirring Technique Matters
When folding the cheese into the mash, use a gentle, circular motion rather than vigorous stirring. This keeps the mixture airy and prevents it from becoming dense. A friend once told me that vigorous stirring made the mash feel heavy, and I’ve never looked at it the same way since.
Creative Twists and Variations
This recipe is a playground. Here are some of my favorite ways to switch things up:
Smoky Chipotle Mash
Add a teaspoon of chipotle powder or a dash of smoked paprika for a subtle heat and smoky undertone. This variation pairs wonderfully with grilled steak or roasted vegetables. The smoky flavor complements the nutty cheeses without overpowering them.
Herb‑Infused Delight
Stir in chopped fresh rosemary or thyme for an aromatic lift. The herbs add a green, earthy note that contrasts the rich cheese. This version works well as a side for roasted chicken or lamb.
Butternut Squash Mash
Swap half of the potatoes with roasted butternut squash cubes for a sweet, caramelized twist. The natural sweetness balances the sharpness of the cheeses. This mash is a great accompaniment to pork tenderloin or a vegetarian mushroom stew.
Spicy Jalapeño Kick
Dice a fresh jalapeño and sauté it with the garlic for a peppery bite. The heat adds excitement and pairs well with a mild fish dish. Be careful not to overdo it—this mash is already rich.
Truffle‑Infused Luxury
Drizzle a teaspoon of truffle oil over the finished mash for an indulgent, earthy aroma. Truffle oil is potent, so a little goes a long way. This version is perfect for a special occasion or a dinner party where you want to wow your guests.
Storing and Bringing It Back to Life
Fridge Storage
Cool the mash completely, then transfer it to an airtight container. Store in the refrigerator for up to 3 days. Before serving, reheat gently on the stove with a splash of milk or cream to restore creaminess. The mash will stay fresh and flavorful.
Freezer Friendly
Place the cooled mash in a freezer‑safe container, leaving a little space for expansion. Freeze for up to 2 weeks. Thaw overnight in the refrigerator, then reheat on the stove with a splash of milk. The texture remains smooth if reheated slowly.
Best Reheating Method
Reheat the mash in a saucepan over low heat, stirring frequently. Add a tiny splash of water or milk to prevent it from drying out. The gentle heat ensures the cheeses melt back into a silky sauce. Serve immediately for the best experience.