I was staring at an empty fridge one Tuesday morning, craving something sweet but not wanting to indulge in a sugar overload. The kitchen smelled faintly of burnt coffee and stale bread, a reminder of last night's baking mishap where I accidentally overmixed the batter and ended up with a lumpier than expected dough. That disaster sparked a mission: to create a chocolate breakfast treat that would feel like a donut but stay wholesome. I dove into my pantry, pulled out a bag of oat flour, a jar of unsweetened cocoa, and a tub of chocolate protein powder, and the idea began to take shape.
The first time I tasted the batter, I felt a wave of chocolatey bliss that reminded me of childhood mornings when my grandma would slide a fresh donut into a glass of milk. The texture was airy, almost like a cloud, but with a subtle chew that made each bite satisfyingly substantial. The aroma hit the kitchen like a warm blanket, coaxing even the most skeptical of my friends to come closer. I was already convinced this would be the ultimate breakfast chocolate treat.
What sets this version apart is that it doesn't rely on refined sugars or heavy butter; instead, it uses the natural sweetness of protein powder and the richness of cocoa to deliver a flavor punch. The oat flour gives it a gentle nuttiness and keeps the batter from becoming too dense, while the baking powder ensures a light rise. I dared you to taste this and not go back for seconds, because once you try it, you'll wonder why you ever settled for ordinary muffins. And if you think it's just a sweet breakfast, think again—it's a protein-packed, fiber-rich start to your day.
Most recipes get this completely wrong by overbaking or adding too much liquid, but I found the sweet spot by watching the batter's color and texture. The final result is a donut that looks golden, feels soft inside, and has a slightly crisp edge that shatters like thin ice when you bite. Picture yourself pulling this out of the oven, the whole kitchen smelling incredible, and then sharing it with friends who will swear it's the best version you'll ever make at home. The next step? Let me walk you through every single step—by the end, you'll wonder how you ever made it any other way.
What Makes This Version Stand Out
- Flavor Depth: The combination of unsweetened cocoa and chocolate protein powder creates a layered chocolate experience that satisfies both sweet and savory cravings. Each bite delivers a velvety finish that lingers on the palate.
- Texture Perfection: Oat flour gives a tender crumb, while the baking powder lifts the batter into airy rings. The result is a donut that melts in your mouth with a satisfying chew.
- Nutritional Balance: With 25 grams of protein per serving and 30 grams of complex carbs, this breakfast keeps you full until lunch. The natural fibers in oat flour also aid digestion.
- Gluten‑Friendly: By using oat or spelt flour, you can enjoy a gluten‑free version without sacrificing texture or flavor. The batter remains stable and cohesive.
- Crowd‑pleaser: Friends and family who are usually skeptical of health foods find themselves craving more. The chocolate aroma alone is enough to win over the toughest critics.
- Make‑Ahead Potential: These donuts bake quickly and can be frozen in a single layer. Reheat them in a toaster or oven for a fresh start, and you’ll have a ready‑to‑eat breakfast in minutes.
Inside the Ingredient List
The Flavor Base
Unsweetened cocoa powder is the backbone of this recipe, offering a rich, bitter chocolate note that balances the natural sweetness from protein powder. Its fine texture integrates seamlessly into the batter, ensuring a uniform flavor profile. Skipping cocoa would leave the donuts bland, while too much would make them overly bitter.
The Texture Crew
Oat flour is chosen for its ability to absorb liquids without becoming heavy. It adds a subtle nuttiness that pairs beautifully with chocolate. If you prefer a lighter feel, switch to spelt flour, which offers a slightly sweeter taste. Remember, the flour type directly influences the mouthfeel; experiment to find your favorite.
The Unexpected Star
Chocolate protein powder is the secret weapon that turns this breakfast treat into a post‑workout favorite. It boosts protein content without adding sugar or fat, and its chocolate flavor complements the cocoa. For a dairy‑free version, opt for a plant‑based protein powder; just adjust the liquid slightly to maintain consistency.
The Final Flourish
Baking powder acts as the leavening agent, creating lightness and preventing the donuts from becoming dense. A pinch of salt sharpens the chocolate’s flavor and balances sweetness. These small additions are crucial for achieving the perfect rise and taste.
Everything's prepped? Good. Let's get into the real action...
The Method — Step by Step
- Step 1: Preheat the oven to 350°F (175°C). While the oven warms, line a mini muffin tin with paper liners. The heat will ensure even baking, and the liners keep the donuts from sticking. I always set the timer for 12 minutes and then check for doneness.
- Step 2: Whisk the dry ingredients. In a large bowl, combine 3/4 cup oat flour, 3 tbsp unsweetened cocoa powder, 2 tbsp chocolate protein powder, 1 tsp baking powder, and 1/4 tsp salt. Use a fine-mesh sieve to prevent clumps, especially if you’re using a high‑protein powder. The mixture should look like a fine, dark sand.
- Step 3: Mix the wet components. In a separate bowl, whisk 1 cup of unsweetened almond milk with 1/4 cup melted coconut oil and 2 tbsp maple syrup. The oil keeps the donuts moist, while the maple syrup adds a subtle natural sweetness. Pour the wet mixture into the dry ingredients and stir until just combined—overmixing will make the donuts tough.
- Step 4: Fill the muffin cups. Spoon the batter into the liners, filling each about ¾ full. The batter should spread slightly, creating a ring shape. Use a spatula to smooth the top; this helps the donuts bake evenly.
- Step 5: Bake and watch the magic. Place the tin in the preheated oven and bake for 12–14 minutes. The donuts should rise slightly and develop a light brown crust. When you insert a toothpick, it should come out with a few moist crumbs, not wet batter.
- Step 6: Cool before removal. Let the donuts cool in the tin for 5 minutes. This brief rest allows the structure to set, preventing them from breaking apart. After 5 minutes, transfer them to a wire rack to finish cooling.
- Step 7: Check for doneness. The edges should pull away slightly from the paper liners, and the center should be firm yet moist. If they look pale, bake for an additional minute. Overbaking will dry them out.
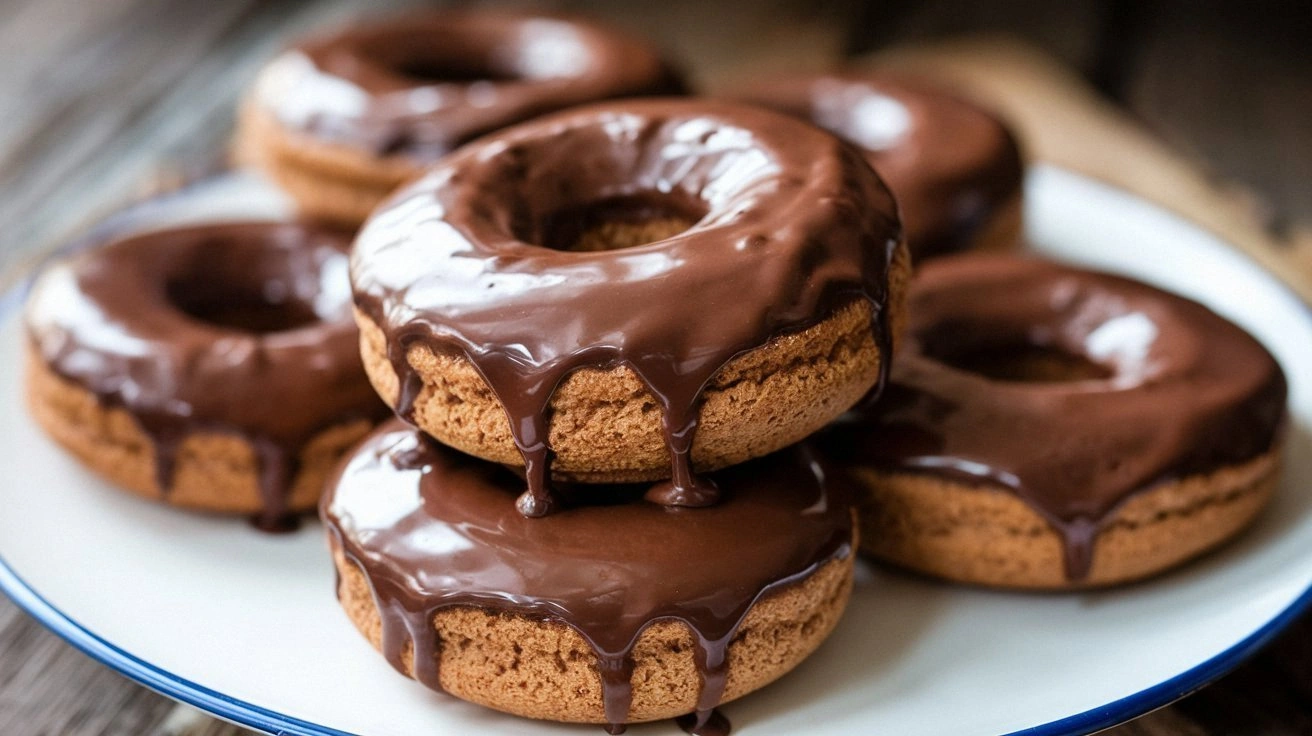
- Step 8: Optional glaze or topping. While the donuts are still warm, drizzle a simple chocolate glaze made from 2 tbsp melted dark chocolate and 1 tbsp coconut milk. The glaze sets quickly, adding a glossy finish and a burst of flavor. For a crunch, sprinkle chopped nuts or shredded coconut before the glaze dries.
- Step 9: Serve and enjoy. Arrange the donuts on a platter, dust with powdered sugar or cocoa if desired, and serve immediately. They pair beautifully with a cup of hot cocoa or a protein shake. If you’re in a hurry, store them in an airtight container for up to 2 days.
That’s it — you did it. But hold on, I've got a few more tricks that'll take this to another level...
Insider Tricks for Flawless Results
The Temperature Rule Nobody Follows
Oven temperature consistency is the silent hero of baking. I’ve found that using an oven thermometer gives a more accurate reading than the built‑in display. This ensures the donuts rise evenly and prevents the edges from burning while the centers stay undercooked.
Why Your Nose Knows Best
Before you even touch the dough, inhale the batter. If it smells like fresh chocolate, you’re good to go. A sour or off scent is a red flag that the ingredients may be stale. Trust your olfactory senses—they’re often the most reliable quality control.
The 5‑Minute Rest That Changes Everything
Letting the donuts sit in the tin for 5 minutes after baking is crucial. During this short rest, the heat continues to work, allowing the interior to set without drying out. Skipping this step can lead to a crumbly texture.
Use a Paper Liner to Prevent Stickiness
Paper liners create a non‑stick surface that makes removal painless. If you prefer a more rustic look, you can skip liners, but then you’ll need to grease the tin with a light spray of coconut oil.
Freeze for a Quick Breakfast
Once cooled, stack the donuts in a freezer bag, separating layers with parchment paper. When you’re ready, pop a donut out and toast it in a toaster or microwave for 20–30 seconds. The result is a warm, fluffy treat that feels freshly baked.
Add a Splash of Vanilla for Depth
A teaspoon of pure vanilla extract enhances the chocolate flavor without overpowering it. Vanilla’s sweet aroma adds a layer of complexity that makes each bite feel more indulgent.
Creative Twists and Variations
This recipe is a playground. Here are some of my favorite ways to switch things up:
Almond Joy Rings
Swap half of the oat flour for almond flour, and add a tablespoon of shredded coconut to the batter. Once baked, drizzle with a coconut‑infused glaze and top with chopped almonds for a tropical twist.
Minty Freshness
Add a teaspoon of peppermint extract to the wet mixture and sprinkle crushed mint candies on top before glazing. The cool mint cuts through the chocolate richness, creating a refreshing contrast.
Spiced Cinnamon Crunch
Incorporate ½ teaspoon of ground cinnamon and a pinch of nutmeg into the dry mix. After baking, roll the donuts in a cinnamon‑sugar blend for a warm, aromatic finish.
Berry Burst
Fold in a handful of fresh blueberries or raspberries into the batter before baking. The berries burst in the center, adding a juicy surprise and a pop of color.
Savory Savant
Replace the maple syrup with a tablespoon of unsweetened applesauce and add a pinch of sea salt to the batter. After baking, dust with grated Parmesan cheese for a savory, protein‑rich snack.
Nutty Power Pack
Add 3 tablespoons of ground flaxseed or chia seeds to the dry mix. These seeds boost omega‑3s and fiber, turning each donut into a superfood powerhouse.
Storing and Bringing It Back to Life
Fridge Storage
Store cooled donuts in an airtight container at room temperature for up to 3 days. Keep them away from direct sunlight to preserve their moisture. If you notice a slight dryness, sprinkle a teaspoon of water over the top before reheating.
Freezer Friendly
For longer storage, place donuts in a freezer bag, separating layers with parchment paper. Freeze for up to 3 months. To thaw, leave them at room temperature for 30 minutes before reheating.
Best Reheating Method
The secret to reviving a frozen donut is a quick toast. Place the donut in a toaster set to medium or pop it in a preheated oven at 300°F (150°C) for 5 minutes. For a softer texture, add a splash of water to the donut before microwaving for 20–25 seconds.