Introduction
I was halfway through my third store-bought "protein bagel" of the week — the kind that tastes like cardboard married a sponge and had a very sad wedding — when I realized I'd been duped. Here I was, a grown adult with functioning taste buds, willingly eating these rubbery frisbees just because the label promised "15 grams of protein." There had to be a better way. That night, I stood in my kitchen at 11:47 PM, staring down a tub of cottage cheese like it owed me money, and thought: what if the answer has been sitting in my fridge this whole time?
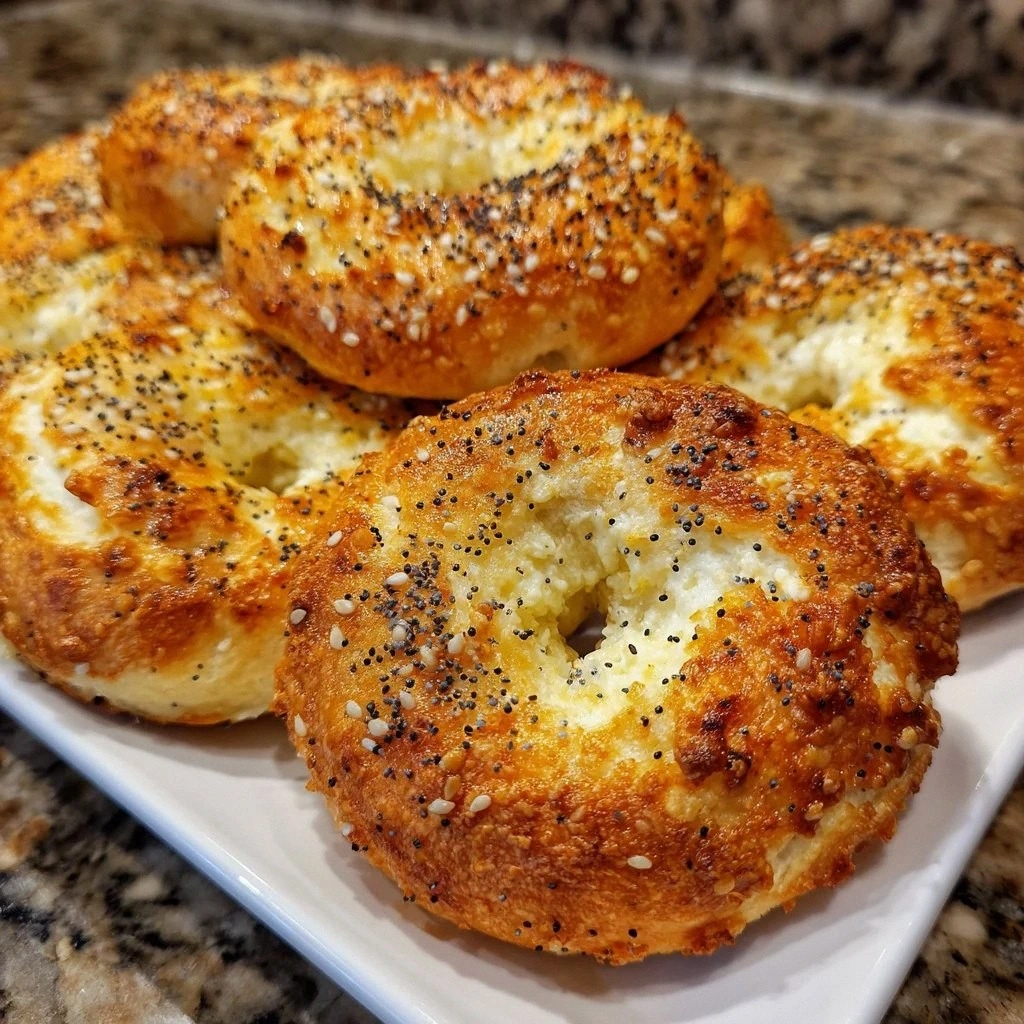
Three batches, two minor explosions, and one very enthusiastic taste-tester neighbor later, I cracked the code. These high-protein cottage cheese bagels aren't just "good for a healthy recipe" — they're straight-up dangerous in the best way possible. We're talking crusty, golden exteriors that crackle when you bite them, revealing tender, fluffy interiors that taste like someone took everything you love about a New York bagel and infused it with creamy, protein-packed magic. The first time I pulled these from the oven, my kitchen smelled like a Brooklyn bakery had a baby with a dairy farm, and I was here for it.
Here's what nobody tells you about homemade bagels: most recipes are needlessly complicated. They want you to boil, then bake, then sacrifice your firstborn to the carb gods. Meanwhile, this cottage cheese version comes together faster than deciding what to watch on Netflix, and it's forgiving enough that even my friend who once burned water managed to nail it on the first try. The secret lies in the chemistry between the tangy cottage cheese and self-rising flour — together they create this miraculous texture that's somehow both substantial and cloud-like.
But the real kicker? Each bagel packs a whopping 25 grams of protein. That's more than those sad store-bought imposters, and these actually taste like food you'd choose to eat even if you weren't trying to hit your macros. I dare you to taste one warm from the oven with a shmear of cream cheese and not immediately start plotting your next batch. Let me walk you through every single step — by the end, you'll wonder how you ever made it any other way.
What Makes This Version Stand Out
Before we dive into the floury depths of bagel-making, let me set the record straight about why these aren't just another "healthy" recipe that tastes like disappointment. These bagels are the real deal, and here's exactly what makes them special:
- Protein Powerhouse: Each bagel delivers 25 grams of muscle-building protein, turning your morning carb fix into a legitimate meal that keeps you full until lunch. Compare that to regular bagels that offer maybe 9 grams if you're lucky, and you'll understand why this changes everything.
- One-Bowl Wonder: Unlike traditional bagels that require boiling, special equipment, and a PhD in dough chemistry, this recipe comes together in one bowl with ingredients you probably already have. We're talking ten minutes of active work, maximum.
- Texture That Makes You Weak in the Knees: The cottage cheese creates these incredible air pockets that make the interior unbelievably fluffy, while the outside develops that perfect chewy crust. It's like if a cloud and a bagel had a beautiful baby.
- Flavor That Actually Tastes Like Something: Between the slight tang from the cottage cheese and the golden-brown exterior from the egg wash, these have more depth than most artisan bakery bagels. No bland cardboard vibes here.
- Make-Ahead Magic: These freeze like champions. Make a double batch on Sunday, and you've got grab-and-go breakfasts that taste fresh-baked all week long. Just pop them in the toaster, and you're golden.
- Customizable Canvas: Everything bagel seasoning, sesame seeds, asiago cheese, cinnamon raisin — this dough plays well with whatever flavors you're craving. It's like the Swiss Army knife of breakfast foods.
- Foolproof Formula: The cottage cheese provides built-in moisture insurance, so even if you slightly overbake them, they stay tender. It's basically impossible to mess these up unless you forget them entirely in the oven.
Alright, let's break down exactly what goes into this masterpiece...
Inside the Ingredient List
Great bagels start with understanding why each ingredient matters, not just throwing things in a bowl and hoping for the best. Once you know what each component brings to the party, you'll never look at bagel-making the same way again.
The Foundation Builders
Self-rising flour is your secret weapon here — it's regular flour that's been pre-mixed with the perfect ratio of baking powder and salt. This means you get consistent rise every single time without playing chemist in your kitchen. The leavening agents in self-rising flour work with the moisture from the cottage cheese to create those gorgeous air pockets that make these bagels light instead of dense like hockey pucks. If you only have all-purpose flour, you can DIY by adding 1.5 teaspoons of baking powder and 0.5 teaspoons of salt per cup of flour, but honestly, keeping self-rising flour on hand is a game-changer for quick breads.
Full-fat cottage cheese is the unsung hero that makes this whole operation possible. The curds melt during baking, leaving behind tiny pockets of creamy richness throughout the dough. Go with full-fat if you want that luxurious texture that makes people ask "what's your secret?" — the lower-fat versions work but give you a slightly drier result. When shopping, look for cottage cheese with small curds; they incorporate more smoothly into the dough. And here's a pro tip: let it come to room temperature before mixing for easier blending and better rise.
The Golden Touch
That egg wash isn't just for show — it's the difference between pale, anemic-looking bagels and ones that look like they came from a professional bakery. The proteins in the egg create that gorgeous mahogany crust when they hit the heat of the oven, while the fat helps everything brown evenly. Don't skip this step unless you want bagels that look like they need a tan. For the best results, beat your egg well and strain it through a fine-mesh strainer — this removes the gloopy bits that can create uneven browning.
The Flavor Makers
Everything bagel seasoning is having a moment for good reason — it's like the party mix of the spice world. The combination of poppy seeds, sesame seeds, dried garlic, dried onion, and salt creates this umami bomb that makes everything taste better. But don't stop there: sesame seeds give you nutty depth, poppy seeds add subtle crunch, and asiago cheese creates these crispy, salty pockets of heaven. The key is pressing your toppings into the dough slightly so they adhere rather than falling off like sad confetti when you slice them.
Everything's prepped? Good. Let's get into the real action...
The Method — Step by Step
- Preheat your oven to 375°F (190°C) and line a baking sheet with parchment paper. This temperature is the sweet spot — hot enough to create that gorgeous crust but not so hot that the outside burns before the inside cooks through. While the oven heats, you're giving your dough time to relax, which makes it easier to shape. Don't be tempted to crank up the heat higher; these bagels need time to develop their flavor and texture. If your oven runs hot, consider using an oven thermometer — most home ovens are off by 25 degrees, and precision matters here.
- In a large bowl, combine 2 cups of self-rising flour with 1 cup of cottage cheese. At first, it'll look like a mistake — like cottage cheese got lost and wandered into the wrong party. Keep mixing with a sturdy spoon or your hands until it comes together into a shaggy dough. The cottage cheese curds will start breaking down and incorporating into the flour, creating this weird but wonderful texture. If it seems too dry after a minute of mixing, add cottage cheese a tablespoon at a time. Too sticky? Dust with a bit more flour, but be conservative — the dough should be tacky but not glued to your fingers.
- Knead the dough on a lightly floured surface for 3-4 minutes until smooth and elastic. This is where the magic happens — the gluten develops and the cottage cheese fully incorporates, creating this smooth, pliable dough that's almost therapeutic to work with. You'll feel it transform from rough and lumpy to silky and cohesive. Don't over-knead or you'll develop too much gluten and end up with tough bagels. The dough is ready when it's smooth and bounces back slightly when poked. If it keeps sticking, flour your hands instead of the dough to avoid adding too much extra flour.
- Divide the dough into 4 equal portions and roll each into a ball. Use a kitchen scale if you're obsessive about uniformity, or just eyeball it — these are rustic bagels, not factory-perfect clones. Cup your hand over each ball and roll it in a circular motion on the counter to create surface tension. This helps them hold their shape during baking. If the dough springs back immediately when shaping, let it rest for a couple minutes — the gluten needs to relax. Cover the balls with a clean towel while you work so they don't dry out.
- Shape each ball into a bagel by poking your thumb through the center and gently stretching to create a 1.5-inch hole. The hole should be bigger than you think — these babies will puff up during baking and you don't want them closing completely. Gently rotate the dough around your fingers to even out the thickness. If the dough tears, just pinch it back together; it's very forgiving. Place them on your prepared baking sheet as you go, spacing them at least 2 inches apart so they have room to expand without becoming conjoined twins.
- Beat one egg with a splash of water and brush generously over each bagel. This is your insurance policy for that bakery-quality shine and color. Make sure to get the tops and sides — anywhere the egg wash touches will turn that gorgeous golden-brown. Don't drown them; you're going for an even coat, not an egg bath. If you're vegan or egg-free, almond milk works but won't give you the same shine. For extra adhesion power, sprinkle your toppings on immediately after brushing while the wash is still wet.
- Add your chosen toppings, pressing them gently into the surface. This is where you get to play artist — everything bagel seasoning for the classic vibe, sesame seeds for nutty sophistication, or asiago cheese for those crispy, salty edges. Press the toppings in with your palm so they stick rather than falling off like sad sprinkles. Mix and match if you're feeling wild — half everything, half asiago is my personal favorite combo. Don't be shy here; bagels can handle more seasoning than you think.
- Bake for 25-30 minutes until golden brown and crusty. Rotate the pan halfway through for even browning if your oven has hot spots. You'll know they're done when they're deeply golden and sound hollow when tapped on the bottom. If they start getting too dark but still feel soft, tent with foil for the last 5-10 minutes. The cottage cheese makes them incredibly moist, so they won't dry out easily. Let them cool for at least 10 minutes before slicing — I know it's torture, but the texture sets as they cool.
That's it — you did it. But hold on, I've got a few more tricks that'll take this to another level...
Insider Tricks for Flawless Results
The Temperature Rule Nobody Follows
Room temperature ingredients aren't just fancy chef talk — they actually make or break this recipe. Cold cottage cheese straight from the fridge won't incorporate smoothly, leaving you with lumpy dough that bakes unevenly. Let it sit out for 30 minutes while you preheat the oven and prep your toppings. Same goes for your egg wash; a cold egg won't spread as evenly and can create splotchy browning. This tiny bit of patience pays off in bagels that look like they came from a professional bakery instead of your sleepy morning kitchen.
Why Your Nose Knows Best
Trust your sense of smell when these are baking — it's actually more reliable than a timer. When the toasty, slightly nutty aroma fills your kitchen and makes you involuntarily say "oh my god," that's when they're close to done. The smell intensifies in the last five minutes of baking, so stick around instead of scrolling through your phone in the other room. This olfactory alarm system has saved me from over-baking more times than I can count. Plus, it's basically aromatherapy for carb lovers.
The 5-Minute Rest That Changes Everything
After they come out of the oven, let these beauties rest for exactly five minutes on the pan before moving to a cooling rack. This allows the structure to set so they don't collapse when you transfer them. But here's the key — don't let them cool completely on the pan or the bottoms will get soggy from steam. Five minutes is the sweet spot where they're stable but still releasing moisture. Set a timer because this is the difference between bagels with crispy bottoms and ones that taste like they were steamed instead of baked.
The Slice Timing Secret
Wait a full 45 minutes before slicing into these bad boys. I know, I know — warm bagels are basically impossible to resist. But slicing too early tears the delicate crumb and lets all the steam escape, leaving you with dry bagels that need to be toasted. The cottage cheese creates this incredibly moist, almost creamy texture that needs time to set properly. Use this waiting time to brew coffee, whip up some schmear, or just pace around your kitchen sniffing the air like a crazy person. Patience, young grasshopper.
The Storage Game-Changer
Store completely cooled bagels in a paper bag at room temperature for up to two days — the paper lets them breathe while maintaining that perfect crust. Plastic bags are the enemy here; they trap moisture and turn your gorgeous crust into a sad, chewy situation. For longer storage, slice and freeze them with parchment paper between halves. They'll toast up like fresh-baked for up to three months, which is basically wizardry. Just pop them straight from freezer to toaster without thawing.
Creative Twists and Variations
This recipe is a playground. Here are some of my favorite ways to switch things up:
Everything But the Bagel Remix
Take your everything seasoning up a notch by adding lemon zest and cracked black pepper to the mix. The citrus brightens all those savory flavors and makes your kitchen smell like a Mediterranean spice market. Mix the zest right into your everything seasoning before sprinkling it on. This version pairs ridiculously well with smoked salmon cream cheese and makes you feel like you're brunching in Tel Aviv instead of your kitchen.
Cinnamon Raisin Protein Power
Add 2 tablespoons of brown sugar, 1 teaspoon of cinnamon, and ½ cup of raisins to the dough when you mix in the cottage cheese. The brown sugar caramelizes slightly, creating these little pockets of sweetness that contrast beautifully with the tangy cottage cheese. These taste like the cinnamon raisin bagels from your childhood but with way more staying power. Toast them and spread with almond butter for what I call "dessert that keeps you full until dinner."
Mediterranean Herb Explosion
Mix in 2 tablespoons each of chopped fresh dill and chives, plus ¼ cup of crumbled feta to the dough. The feta creates these salty, creamy pockets throughout, while the herbs make everything taste garden-fresh. Top with sesame seeds and a little za'atar if you're feeling fancy. These are incredible with hummus or just plain butter — they're flavorful enough to stand alone.
Jalapeño Cheddar Fire
Fold in ¼ cup of pickled jalapeños and ½ cup of shredded sharp cheddar when you mix the dough. The vinegar from the jalapeños adds this subtle tang that plays beautifully with the cottage cheese, while the cheddar creates crispy, cheesy edges that'll make you weak in the knees. These have just enough heat to wake you up but won't destroy your taste buds. Perfect for those mornings when coffee isn't cutting it.
Chocolate Chip Breakfast Cookie
Swap in 3 tablespoons of sugar and fold in ½ cup of mini chocolate chips. This creates what I call "socially acceptable breakfast cookies" — they're chocolatey enough to feel like dessert but packed with protein so you can justify eating them at 7 AM. The chocolate melts into little pockets of joy throughout the bagel. My nephew calls these "morning candy" and honestly, he's not wrong.
Pumpkin Spice Autumn Vibes
Add ¼ cup of pumpkin puree, 2 tablespoons of maple syrup, and 1 teaspoon of pumpkin pie spice to the dough. These turn out orange-hued and smell like fall exploded in your kitchen. They're particularly good with maple cream cheese or just butter and honey. Make these in September and watch them disappear faster than pumpkin spice lattes at a basic convention.
Storing and Bringing It Back to Life
Fridge Storage
Never, ever store these in the refrigerator — the cold air actually speeds up the staling process and ruins that perfect texture you worked so hard to achieve. Instead, keep them in a paper bag at room temperature for up to 48 hours. The paper absorbs excess moisture while letting the crust stay crispy. If your kitchen is particularly humid, you can wrap them loosely in a clean kitchen towel inside the paper bag. They'll stay fresh-tasting and ready to toast for two whole days of breakfast bliss.
Freezer Friendly
These bagels are freezer champions — they freeze beautifully for up to three months without losing any of their magic. Slice them in half first, then place parchment paper between the halves before freezing in a freezer bag. This lets you grab just one half at a time for those mornings when one whole bagel feels like too much commitment. Press out as much air as possible from the bag to prevent freezer burn. Pro tip: write the date and flavor on the bag because three months from now, you'll have no idea if these are everything bagels or cinnamon raisin.
Best Reheating Method
The toaster is your friend here, but there's a trick: toast them straight from frozen on a medium setting, then give them a second toast on a darker setting. This two-stage approach ensures the inside heats through without burning the outside. If you're dealing with a fresh bagel, just one round on medium-high does the job. For that bakery-fresh experience, split them and toast cut-side down first, then flip for the final minute. Add a tiny splash of water to the toaster tray — the steam helps recreate that fresh-baked texture that'll make you question whether these were actually frozen yesterday.