It started with a kitchen mishap that would forever change my holiday dessert game. I was attempting to salvage a batch of over‑baked chocolate cookies, and the result was a sticky, chocolate‑crusted disaster that could only be described as “brown goo.” The moment I cracked the box and the scent of burnt chocolate wafted through the air, I vowed to create something that would turn that frustration into pure bliss. That single incident sparked the idea for the most irresistible peppermint cheesecake bars you’ll ever taste.
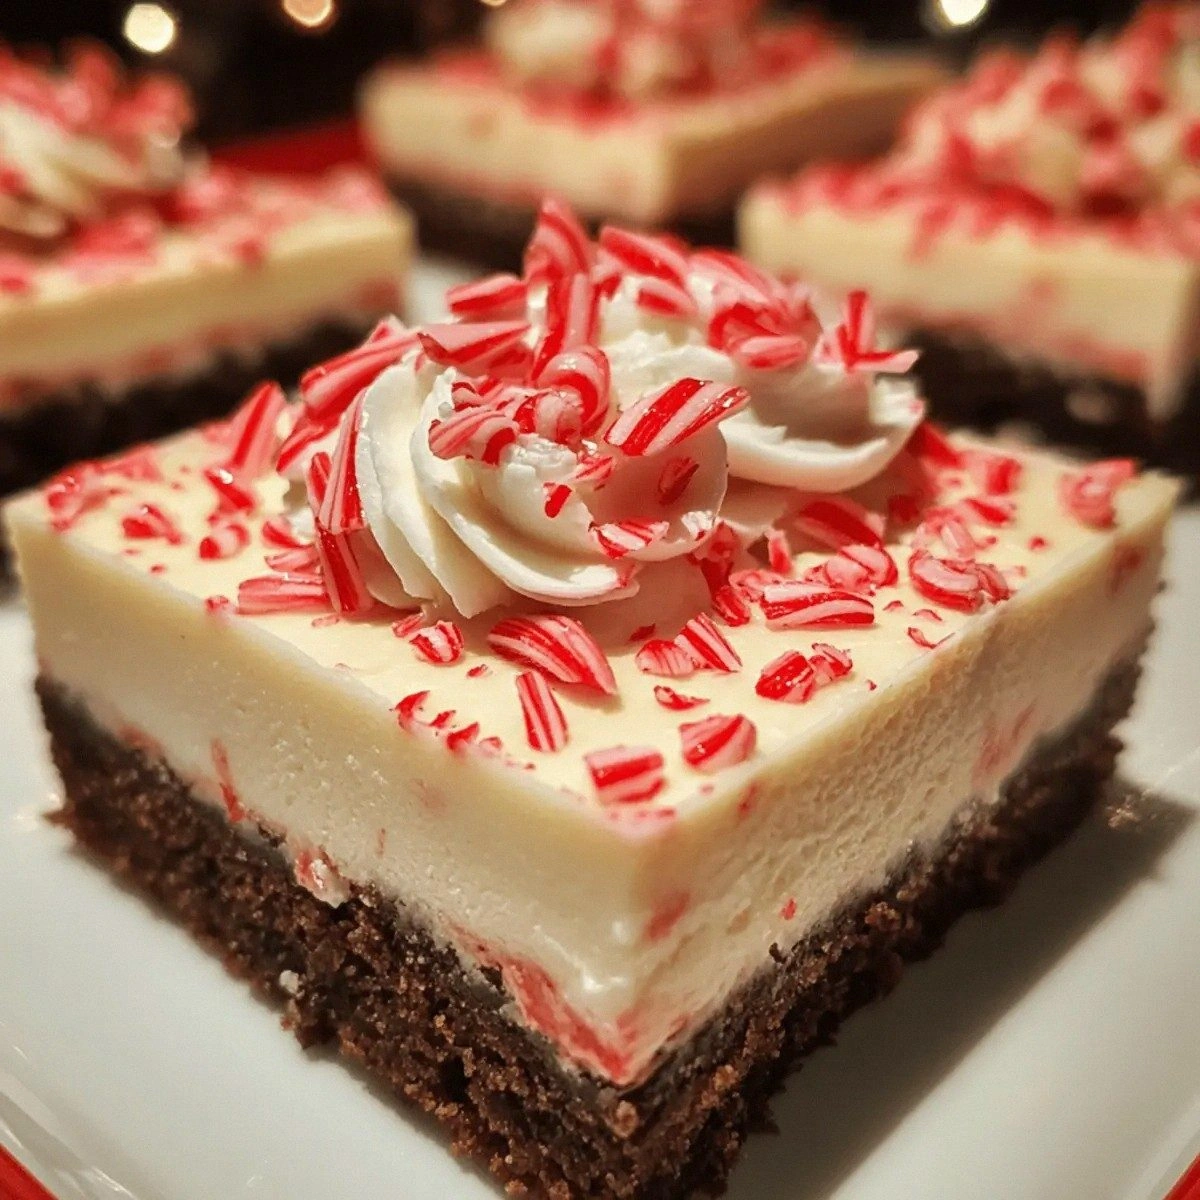
The first bite of these bars is a symphony of textures: a crisp, buttery graham base that snaps like a fresh snowflake, a silky cream cheese center that melts in your mouth like a dream, and a crunchy candy‑cane crown that crackles with a satisfying crunch. The aroma that fills the kitchen is a heady blend of roasted chocolate, sweet vanilla, and a sharp, refreshing peppermint that lingers long after the last bite. The visual appeal is undeniable: a golden‑brown crust, a glossy white top speckled with candy canes, and a subtle sheen of white chocolate chips. The sound of the first forkful, the gentle crunch, is music to any dessert lover’s ears. The feeling of that first bite, warm and comforting, is like a hug from the inside out.
What makes this recipe stand out is not just the flavor profile, but the meticulous balance between sweetness and minty freshness, the depth of chocolate, and the playful crunch of candy canes. It’s the kind of dessert that feels both indulgent and wholesome, and it’s the secret that keeps guests coming back for seconds—and sometimes thirds—despite the “I dare you” challenge I always throw out. I’ve spent countless hours tweaking the ratios to achieve the perfect chew, the ideal crumb, and that unmistakable peppermint kick that sets it apart from every other cheesecake bar I’ve tried. The result is a dessert that is hands down the best version you’ll ever make at home, and it’s proof that a little science and a lot of love can turn a kitchen disaster into culinary gold.
Now, picture yourself pulling these bars out of a pre‑heated oven, the kitchen smelling like a winter wonderland, and the golden crust glistening under the holiday lights. The first bite is a revelation, and you’ll wonder how you ever settled for anything less. The technique that makes this recipe so unique involves a surprising twist—infusing the cream cheese with crushed candy canes before the batter even starts. This subtle step locks in the peppermint flavor and adds an extra layer of texture that is simply unforgettable. Let me walk you through every single step — by the end, you’ll wonder how you ever made it any other way.
What Makes This Version Stand Out
- Flavor Fusion: The combination of rich chocolate, smooth cream cheese, and sharp peppermint creates a depth of flavor that’s both comforting and exciting. The candy canes add a crunchy contrast that keeps each bite interesting. The result is a dessert that feels indulgent yet balanced.
- Texture Mastery: The graham cracker crust provides a buttery crunch that contrasts with the silky center. The crushed candy canes introduce a delightful bite that doesn’t overpower the creamy filling. The white chocolate chips melt into the top, giving a glossy finish.
- Ingredient Integrity: Using premium, unsalted butter and fresh cream cheese elevates the taste profile. The peppermint extract is pure, ensuring a clean mint flavor without bitterness. Every component is chosen for its quality.
- Make‑Ahead Friendly: These bars can be assembled a day ahead, chilled, and baked just before serving. They hold up wonderfully in the fridge and can even be frozen for later. The flavors intensify over time, making them even more irresistible.
- Visual Appeal: The golden crust, white chocolate glaze, and candy cane shards create a festive look that’s perfect for holiday parties. The bars are easy to slice into uniform squares, making presentation a breeze.
- Time Efficiency: While the process involves several steps, each stage is quick and straightforward. You’ll finish in under an hour from start to finish. The recipe is perfect for last‑minute holiday baking.
- Scalability: Whether you’re making a single batch for a family dinner or a large quantity for a holiday gathering, the recipe scales effortlessly. The ingredient ratios remain consistent, ensuring the same quality every time.
- Flavor Versatility: The base can be adapted with different extracts or chocolate types, allowing you to customize the bars for any theme. The peppermint is the star, but the recipe is flexible enough to accommodate variations.
Alright, let's break down exactly what goes into this masterpiece...
Inside the Ingredient List
The Flavor Base
The chocolate graham crackers form the foundation of these bars, delivering a subtle sweetness and a buttery crunch that anchors every bite. They also absorb some of the cream cheese mixture, creating a harmonious blend of textures that feels like a chocolate cookie meets cheesecake. Skipping this component would strip the bars of their signature crunch and depth, leaving a flat, uninteresting dessert. If you’re looking for a twist, try substituting dark chocolate graham crackers for a richer, more intense chocolate flavor that pairs beautifully with peppermint.
Choosing the right graham crackers is essential; look for a brand with a balanced sweet-to-butter ratio. The texture should be firm enough to hold its shape when crushed but soft enough to blend smoothly with the butter. A good rule of thumb is to press the crackers in your hand until they crumble like fine sand. This ensures an even distribution of chocolate throughout the base.
The Creamy Core
Cream cheese is the heart of this recipe, providing a velvety, tangy backdrop that balances the sweetness of chocolate and candy canes. Using full‑fat cream cheese gives a richer mouthfeel and a smoother finish. If you prefer a lighter version, you can replace half of the cream cheese with Greek yogurt, but expect a slightly tangier flavor. The key to a silky filling is to bring the cream cheese to room temperature before mixing.
When blending, start by beating the cream cheese on low speed until it’s smooth, then gradually add the sugars and eggs. This technique prevents lumps and ensures a consistent texture. A small trick: add a splash of heavy cream after the eggs to loosen the mixture and give it a luxurious glide.
The Unexpected Star
Crushed candy canes are the secret weapon that injects a burst of minty freshness and a satisfying crunch into every bite. The peppermint flavor is subtle yet unmistakable, and the candy cane shards add a playful texture that elevates the dessert’s overall experience. If you can’t find candy canes, try peppermint chocolate chips or even peppermint candy sticks, but be prepared for a slightly different mouthfeel.
To maximize the peppermint impact, crush the candy canes finely so that the mint flavor is evenly distributed. A quick way to do this is to place them in a zip‑lock bag and tap them with a rolling pin. This method preserves the shards’ crunch while infusing the batter with a deep, aromatic peppermint.
The Final Flourish
White chocolate chips add a silky, sweet finish that melts into the top, creating a glossy glaze that’s impossible to resist. They also provide a subtle contrast to the darker chocolate graham base, creating a visual and flavor balance. If you’re a fan of dark chocolate, you can replace half of the white chocolate chips with dark chocolate chips for a richer, bittersweet finish.
When adding the white chocolate chips, fold them gently into the batter after the heavy cream. This ensures they don’t melt into the mixture prematurely, preserving their shape and texture. The final touch is a light dusting of crushed candy canes on top before baking, which adds a decorative sparkle and extra flavor.
Everything's prepped? Good. Let's get into the real action...
The Method — Step by Step
- Preheat your oven to 325°F (165°C) and line a 9×13‑inch baking pan with parchment paper. The parchment ensures easy release and a clean finish. While the oven heats, gather all your ingredients and place them at room temperature to speed up the mixing process. The temperature of your ingredients matters; cold cream cheese can cause lumps. This is the moment of truth: if your batter looks smooth, you’re ready to go.
- In a medium bowl, crush the chocolate graham crackers with a rolling pin until they resemble fine crumbs. Add the melted butter and ¼ cup granulated sugar, then stir until the mixture is evenly moistened. Press the crumb mixture into the bottom of the prepared pan, creating an even layer. The crust should feel firm to the touch; if it’s too loose, add a bit more butter. Let it set in the fridge while you work on the filling.
- Take the cream cheese out of the fridge and let it soften at room temperature for about 10 minutes. In a large mixing bowl, beat the cream cheese on medium speed until creamy and free of lumps. This step is crucial for a silky texture. If you’re feeling adventurous, add a pinch of sea salt to balance the sweetness.
- Gradually add ¾ cup granulated sugar to the softened cream cheese, beating continuously until the mixture is light and fluffy. Then incorporate the eggs one at a time, mixing well after each addition. The batter should be smooth and glossy. This process helps incorporate air, giving the bars a light, airy interior.
- Add 1 teaspoon pure peppermint extract and ½ cup heavy cream, then fold in the crushed candy canes. Stir until the candy canes are evenly distributed throughout the batter. The peppermint aroma will fill the kitchen, and the candy cane shards will create a delightful crunch in each bite.
- Pour the batter over the chilled graham crust, smoothing the top with a spatula. The batter should spread evenly, covering the crust completely. If you notice any gaps, simply press the batter back into place. This step ensures every bite contains the perfect balance of crust, filling, and candy cane.
- Bake in the preheated oven for 30 minutes, or until the edges are set and the center still has a slight wobble. The bars should develop a golden brown top. Watch the timer closely; overbaking will result in a dry texture. Let the bars cool in the pan for 15 minutes before lifting them onto a wire rack to cool completely.
- While the bars cool, melt ½ cup white chocolate chips in a heat‑proof bowl over a pot of simmering water. Stir until smooth, then drizzle the melted chocolate over the top of the bars. The white chocolate will set into a glossy finish that’s both eye‑catching and delicious.
- Once the chocolate has set, cut the bars into squares or rectangles using a sharp knife. For a cleaner cut, heat the knife in hot water, wipe it dry, and slice through the bars. The bars should hold together firmly, showcasing the crisp crust and creamy center.
- Store the bars in an airtight container in the refrigerator for up to a week. If you’re planning ahead, you can freeze them for up to three months; thaw in the fridge overnight before serving. When reheating, a quick splash of water on the surface will steam the bars back to perfection. Serve chilled or at room temperature for the best experience.
That's it — you did it. But hold on, I've got a few more tricks that'll take this to another level...
Insider Tricks for Flawless Results
The Temperature Rule Nobody Follows
Many bakers assume room temperature ingredients are always best, but for this recipe, slightly chilled batter is key. Keeping the cream cheese and butter slightly cold before mixing prevents the batter from becoming too runny, which can lead to a dense center. I’ve found that letting the batter sit in the fridge for 15 minutes before baking gives it the perfect consistency. If you’re in a hurry, you can skip this step, but the bars may end up softer than desired.
Why Your Nose Knows Best
The aroma of peppermint is a powerful indicator of flavor balance. As the batter mixes, the scent should be fragrant but not overpowering. If it feels too minty, add a pinch of salt or a splash of vanilla extract to mellow the intensity. Trust your nose; it’s your best judge of whether the bars will hit the spot.
The 5-Minute Rest That Changes Everything
After baking, allow the bars to rest at room temperature for exactly five minutes before cutting. This brief rest lets the interior set just enough to hold together, yet remains soft enough to slice cleanly. Cutting too soon can cause the bars to crumble, while cutting too late can make them overly firm.
Silky Smooth Cream Cheese
Beat the cream cheese until it’s completely smooth before adding any other ingredients. A small trick: place the bowl in a larger bowl of warm water for a minute to soften it further. This technique ensures a lump‑free batter and a silky finish that melts in your mouth.
Evenly Distributed Candy Canes
To avoid clumps of candy canes, sift the crushed candy canes through a fine mesh sieve before folding them into the batter. This step guarantees an even distribution of mint flavor and crunch throughout each bar. A friend once tried to fold in the candy canes without sifting and ended up with pockets of candy that made the bars uneven.
White Chocolate Glaze Mastery
When melting the white chocolate, use a double boiler to prevent scorching. Stir frequently and remove from heat once smooth. Drizzle the glaze over the bars while they’re still warm; this ensures a glossy, firm coating that doesn’t crack.
Creative Twists and Variations
This recipe is a playground. Here are some of my favorite ways to switch things up:
Dark Chocolate Delight
Replace the chocolate graham crackers with dark chocolate graham crackers for a richer, bittersweet base. Swap the white chocolate chips for dark chocolate chips to create a cohesive chocolate theme. The result is a decadent dessert that still delivers that iconic peppermint kick.
Nutty Crunch
Add chopped toasted almonds or pecans to the batter for a nutty crunch. The nuts pair wonderfully with the candy cane shards, adding a new layer of texture. This variation is perfect for guests who love a bit of crunch in their sweets.
Almond Joy Fusion
Incorporate shredded coconut and a splash of almond extract into the filling. Top the bars with a drizzle of almond butter for an extra flavor boost. The combination of coconut, almond, and peppermint creates a tropical twist to this classic dessert.
Vegan Version
Use vegan cream cheese and coconut milk instead of dairy. Substitute the eggs with flaxseed meal mixed with water for binding. This version keeps the same flavor profile while being plant‑based.
Birthday Party Bars
Replace the peppermint extract with a mix of vanilla and almond extracts for a milder, celebratory flavor. Add a sprinkle of edible gold dust on top for a festive touch. The bars become a showstopper at birthday celebrations.
Mini Cheesecake Bites
Use a silicone mini muffin pan to bake individual bars. This makes serving easier and allows for creative shapes. Each bite is a portable, perfect‑portion dessert for parties.
Storing and Bringing It Back to Life
Fridge Storage
Place the bars in an airtight container and refrigerate for up to one week. The cool temperature preserves the creamy texture and prevents the chocolate glaze from melting. When ready to serve, let the bars sit at room temperature for 10 minutes for a more indulgent bite.
Freezer Friendly
Wrap each bar tightly in plastic wrap, then place them in a freezer‑safe bag. Store for up to three months. When you’re ready to enjoy, thaw in the fridge overnight. The bars retain their texture and flavor even after freezing.
Best Reheating Method
To reheat, preheat the oven to 300°F (150°C) and place the bars on a baking sheet. Warm for 5–7 minutes until the center is just warm. Alternatively, microwave on low for 15–20 seconds and serve immediately. A splash of water before reheating steams the bars back to perfection.