The first time I tried to make a mousse, I thought I was simply whisking cream into a bowl. The result was a lumpy, half‑cooked mess that looked like a failed soufflé and tasted like burnt sugar. I was staring at the kitchen counter, wondering why my friends were laughing and how I could ever recover from that culinary catastrophe. The moment that changed everything was a dare from my best friend, who challenged me to turn that disaster into a crowd‑pleaser using nothing but Oreo cookies and a handful of pantry staples.
I stood in front of the fridge, the air thick with the scent of vanilla and butter, the sound of the refrigerator humming like a contented beast. The sight of the chocolatey Oreos glimmering in the dim light made my mouth water. I could feel the weight of the bowl in my hand, the anticipation building like a drumbeat before a concert. As I crushed the cookies, their crumbs clung together, forming a fine, sweet dust that seemed to promise something extraordinary. The first bite, when it finally came, was a revelation: airy, creamy, and impossibly indulgent.
What makes this version of Oreo mousse stand out is that it doesn’t rely on fancy kitchen gadgets or obscure ingredients. It uses a simple, foolproof technique that turns ordinary Oreos into a silky, cloud‑like dessert that still delivers that iconic crunch. The mousse is light enough to be airy, yet rich enough to satisfy even the most decadent cravings. It’s a sweet‑and‑salty symphony that plays on your palate like a well‑tuned orchestra. And best of all, it’s ready in under an hour, so you can impress your guests without spending the whole day in the kitchen.
I’ll be honest—my first attempt at this recipe left half the batch on the counter, and I ate it before anyone else got a taste. The result was a silky, chocolatey cloud that melted instantly in my mouth, leaving me craving more. That moment was the spark that pushed me to refine the technique, to perfect the balance between the buttery base and the crunchy cookie shards. I discovered that the key is to fold in the whipped topping just before the mousse sets, ensuring a smooth texture that doesn’t separate. The secret, I realized, was in the timing and the quality of the ingredients.
If you’ve ever struggled with mousse that separates or tastes like a failed experiment, you’re not alone—this is the fix you’ve been waiting for. I dare you to taste this and not go back for seconds. Picture yourself pulling this out of the fridge, the whole kitchen smelling incredible, and seeing the glossy, chocolate‑laden surface glisten under the lights. The first spoonful is a revelation: the cookie flavor is bold, the whipped topping is airy, and the finish is a smooth, velvety finish that lingers on the tongue.
Most recipes get this completely wrong, focusing on the texture or the flavor in isolation. Here’s what actually works: a balanced ratio of sweet to salty, a buttery base that carries the cookie crumbs, and a whipped topping that adds that signature lightness. The result is a dessert that feels like a cloud of chocolatey bliss, with a satisfying crunch that keeps you coming back for more. It’s hands down the best version you’ll ever make at home, and I’m thrilled to share every detail with you.
Okay, ready for the game‑changer? This next part is pure magic. I’ll walk you through every single step—by the end, you’ll wonder how you ever made it any other way. From crushing the Oreos to folding in the whipped topping, every move is designed to maximize flavor and texture. Trust me, the process is straightforward, but the outcome is nothing short of spectacular. Let’s dive in.
The final touch that sets this mousse apart is the optional chocolate drizzle that adds a glossy finish and a hint of bitterness. It’s a small detail that elevates the entire experience, making each bite feel like a decadent treat you’d find in a luxury dessert bar. But don’t worry—if you’re short on time, you can skip it and still enjoy a perfectly balanced mousse. The key is in the layers of flavor, from the buttery base to the crunchy cookie shards. You’ll be amazed at how simple ingredients can create such a luxurious dessert.
What Makes This Version Stand Out
- Texture: The mousse is airy and silky, achieved by folding in whipped topping just before chilling. This technique prevents separation and gives a smooth mouthfeel that’s reminiscent of a well‑made custard. The result is a dessert that melts in your mouth without feeling heavy.
- Flavor: The combination of sweet Oreos, salty butter, and a hint of vanilla creates a complex flavor profile that satisfies every craving. The chocolatey crunch of the cookies contrasts beautifully with the creamy base, delivering a delightful bite. It’s a flavor symphony that lingers on the palate.
- Ingredient Simplicity: You only need nine ingredients, all of which you’re likely to have on hand. No need for exotic spices or specialty equipment. This recipe is a testament to the power of pantry staples.
- Make‑Ahead Potential: The mousse can be prepared up to 48 hours in advance, making it a perfect dessert for parties or last‑minute gatherings. Just keep it chilled and top with fresh crumbs before serving. The texture remains flawless even after a day in the fridge.
- Crowd Appeal: Whether you’re serving it at a family dinner or a fancy cocktail party, this mousse is guaranteed to wow. The chocolatey richness and crunchy texture make it a hit with both kids and adults.
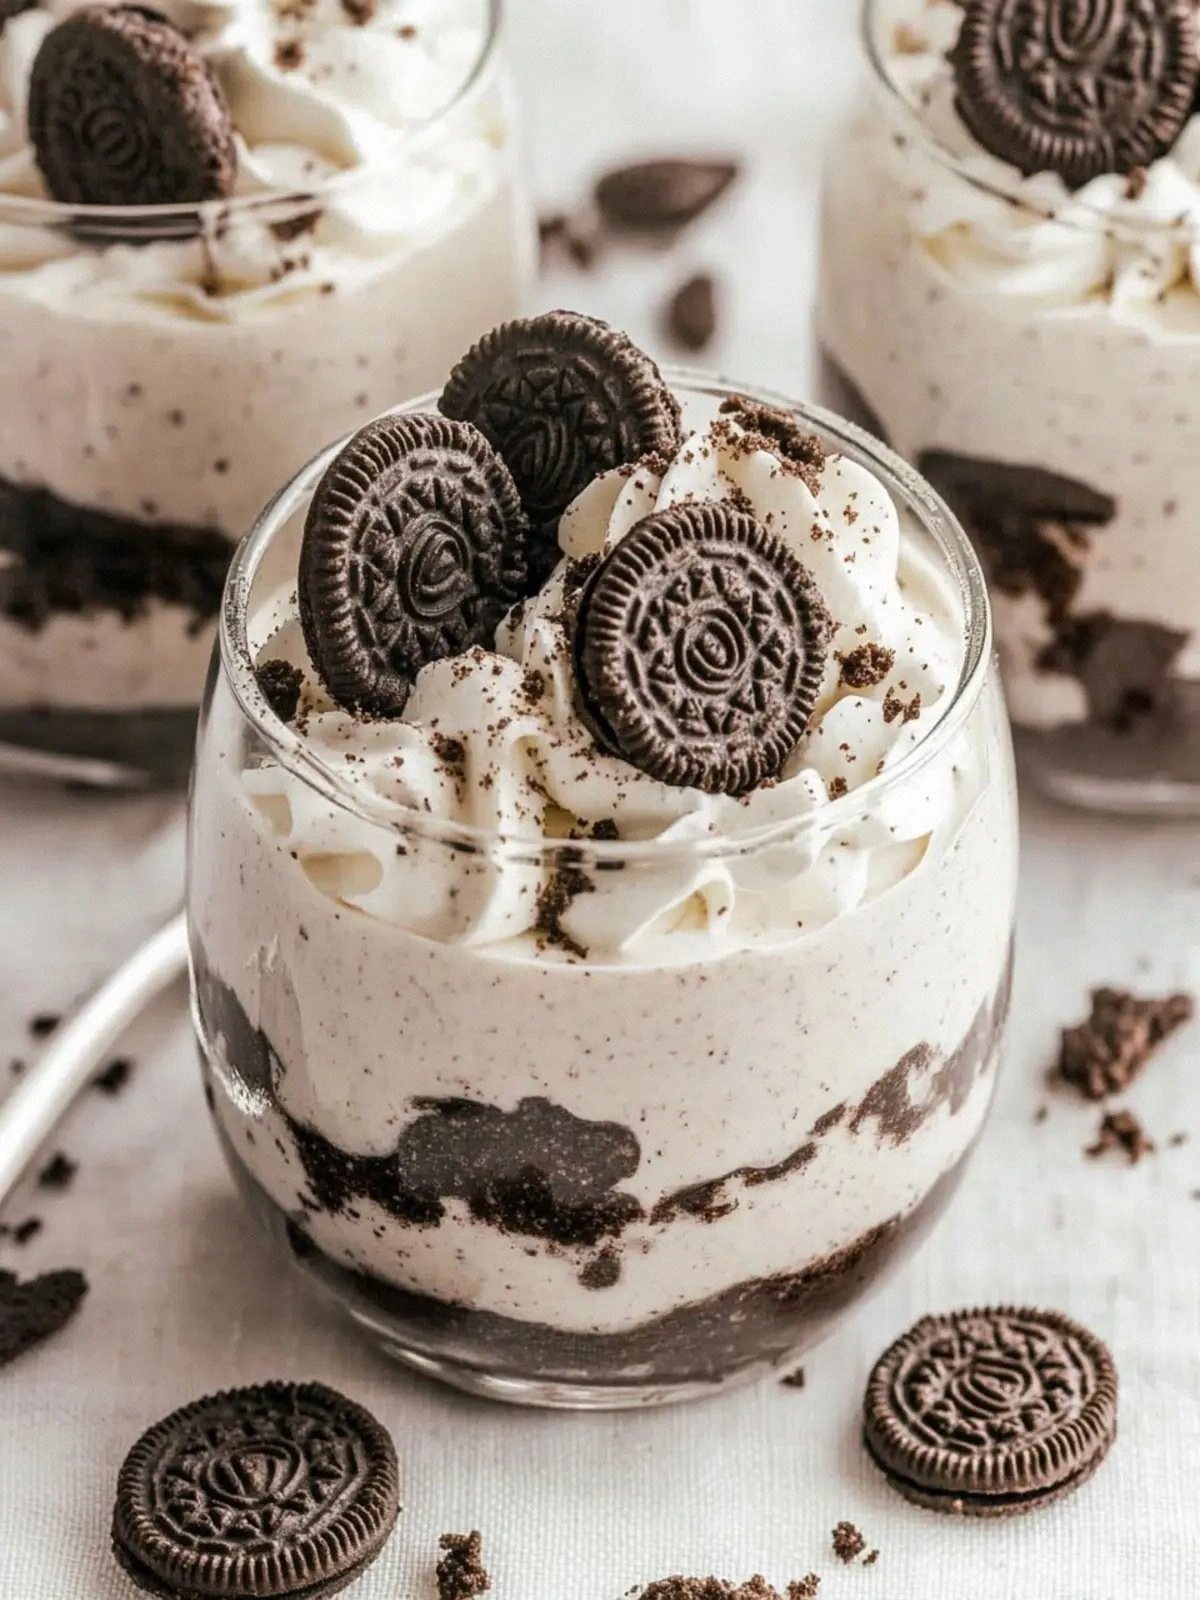
- Visual Impact: The glossy, chocolate‑laden surface and the contrasting dark and light colors make it Instagram‑ready. It’s a dessert that looks as good as it tastes, perfect for capturing on social media.
Inside the Ingredient List
The Flavor Base
The base of this mousse is a simple custard made from milk, sugar, cornstarch, and egg yolks. Each component plays a vital role: milk provides richness, sugar balances the bitterness of chocolate, cornstarch thickens the mixture, and egg yolks add depth and silky texture. Skipping any of these will result in a mousse that feels thin or overly sweet. If you’re looking for a dairy‑free version, substitute the milk with a plant‑based milk and use a thickener like arrowroot powder.
The Texture Crew
Whipped topping is the secret to that airy, cloud‑like consistency that makes this mousse unforgettable. It’s the lightness that balances the dense cookie crumbs, creating a dessert that feels both indulgent and refreshing. If you’re allergic to dairy or prefer a vegan option, use a plant‑based whipped topping and the result will still be delightfully creamy. The key is to fold it in gently to preserve the air bubbles.
The Unexpected Star
Gluten‑free Oreos add a delightful crunch and chocolate flavor that’s essential to the mousse’s identity. Their unique texture ensures that each bite has a satisfying snap before the creamy mousse melts it away. If you prefer a different cookie flavor, feel free to experiment with chocolate chip cookies or even biscotti for a different twist. Just remember to keep the crumb size fine for a smooth mouthfeel.
The Final Flourish
Butter and vanilla are the final touches that bring everything together. Butter adds a rich, silky finish, while vanilla provides a subtle warmth that enhances the chocolate notes. If you’re looking to reduce the fat content, use a light butter or a butter substitute. For an extra burst of flavor, consider adding a splash of espresso or a pinch of sea salt.
Everything's prepped? Good. Let's get into the real action and start building that dreamy mousse.
The Method — Step by Step
- Crush 15 gluten‑free Oreos into fine crumbs using a food processor or a zip‑lock bag and a rolling pin. Reserve a handful of crumbs for topping. This step is crucial because the texture of the crumbs directly affects the mousse’s mouthfeel. If the crumbs are too coarse, the mousse will feel gritty.
- In a medium saucepan, whisk together 1/2 cup sugar, 2 tablespoons cornstarch, and 1/4 teaspoon salt until smooth. This mixture prevents lumps and ensures a silky base. The cornstarch acts as a thickening agent, giving the mousse its body. Keep the mixture cold until you add milk.
- Gradually pour 1 1/4 cups milk into the dry mixture, whisking constantly to avoid lumps. The milk hydrates the cornstarch, creating a smooth custard. Stir until the mixture is glossy and free of lumps. This step sets the stage for a rich, creamy texture.
- Cook over medium heat, stirring continuously until the mixture thickens and reaches 170°F (77°C). Use a thermometer to check the temperature; this ensures the custard is cooked through but not overdone. The mixture should coat the back of a spoon and have a silky consistency.
- Remove the saucepan from heat and whisk in 2 tablespoons butter and 1 teaspoon vanilla until melted and fully incorporated. The butter adds a glossy sheen, while the vanilla deepens the chocolate flavor. This step also cools the mixture slightly, preparing it for the yolks.
- Let the base cool to room temperature, then whisk in 4 large egg yolks one at a time, ensuring each yolk is fully blended before adding the next. The yolks enrich the mousse, giving it a velvety finish. Whisk vigorously to prevent curdling.
- Fold in 1 cup whipped topping until fully incorporated, then gently fold in the Oreo crumbs. The whipped topping should be folded in carefully to maintain its airy quality. This step creates the signature mousse texture.
- Spoon the mousse into serving glasses or a decorative dish, and chill for at least 2 hours, or overnight for best results. The mousse will set and become firm, but still remain creamy. Before serving, top with the reserved Oreo crumbs for an extra crunch.
- Optionally, drizzle with chocolate sauce for an extra glossy finish. The sauce adds a glossy sheen and a slight bitterness that balances the sweetness. Serve chilled, and enjoy the creamy, crunchy, chocolatey experience.
That's it — you did it. But hold on, I've got a few more tricks that'll take this to another level. The next section will reveal insider tips that will elevate the mousse from good to unforgettable.
Insider Tricks for Flawless Results
The Temperature Rule Nobody Follows
Maintaining the right temperature when adding egg yolks is crucial. If the custard is too hot, the yolks will scramble; if it’s too cold, they won’t blend properly. I always let the base cool to room temperature before whisking in the yolks, and I keep a thermometer handy to monitor the temperature. This simple step ensures a silky, smooth mousse every time.
Why Your Nose Knows Best
The aroma of the mousse is a reliable indicator of readiness. When the custard reaches the right thickness, it will emit a warm, buttery scent. If you’re unsure, give it a quick sniff; a subtle vanilla note means it’s ready. Trusting your senses can save you from overcooking or undercooking the mixture.
The 5-Minute Rest That Changes Everything
After folding in the whipped topping, let the mixture rest for five minutes before chilling. This pause allows the flavors to meld and the mousse to thicken slightly. I’ve found that skipping this step results in a mousse that feels a little thin. It’s a small, simple step that pays off big.
The Secret to a Smooth Texture
Use a fine-mesh sieve to strain the custard before adding the yolks. This removes any lumps and ensures a perfectly smooth mousse. A few cooks forget this step, resulting in a slightly gritty texture that can ruin the experience. Straining is quick and makes a noticeable difference.
The Power of Fresh Eggs
Fresh eggs give the mousse a richer flavor and a silkier texture. I always use eggs that are at least 10 days old to ensure they’re fresh but not too hard. If you’re concerned about raw eggs, use pasteurized eggs or cook the custard to 160°F to eliminate any risk.
The Final Touch of Vanilla
Adding vanilla at the right time is essential. I wait until the custard is off the heat before whisking in the vanilla, so the flavor doesn’t evaporate. A teaspoon of vanilla provides a subtle warmth that complements the chocolate. If you’re a vanilla lover, feel free to add a splash of vanilla extract.
Creative Twists and Variations
This recipe is a playground. Here are some of my favorite ways to switch things up:
Nutty Crunch
Add a handful of chopped toasted almonds or walnuts to the mousse for an extra crunch. The nutty flavor pairs wonderfully with the chocolate, creating a layered taste profile. This variation is perfect for those who love a bit of texture in their desserts.
Minty Delight
Stir in a teaspoon of peppermint extract for a refreshing minty twist. The mint complements the chocolatey base and adds a cool, invigorating finish. This version is ideal for summer gatherings.
Espresso Boost
Add a shot of espresso to the custard for a coffee‑infused mousse. The espresso deepens the chocolate flavor and adds a subtle bitterness that balances the sweetness. Coffee lovers will appreciate this extra kick.
Caramel Swirl
Swirl in a drizzle of caramel sauce before chilling for a sweet, buttery layer. The caramel adds a rich, buttery flavor that enhances the mousse’s depth. This version is perfect for special occasions.
Fruit Fusion
Fold in a handful of fresh raspberries or strawberries before chilling. The fruit adds a bright, tart contrast to the chocolatey base. It’s a refreshing twist that’s especially welcome in warmer weather.
Spicy Surprise
Add a pinch of cayenne pepper or a dash of chili powder for a subtle heat. The spice adds an exciting contrast to the sweetness, making the dessert more complex. This variation works well for adventurous palates.
Storing and Bringing It Back to Life
Fridge Storage
Store the mousse in an airtight container in the refrigerator for up to 48 hours. The mousse will firm up as it chills, but it remains creamy and delicious. Before serving, let it sit at room temperature for 10 minutes to soften slightly.
Freezer Friendly
Freeze the mousse in a freezer‑safe container for up to 2 weeks. When you’re ready to serve, thaw it overnight in the refrigerator. The texture should remain smooth, but allow it to sit at room temperature for a few minutes before serving.
Best Reheating Method
If you need to warm the mousse slightly, place the container in a bowl of warm water for 5 minutes. Add a tiny splash of milk or cream to restore moisture and steam it back to a silky consistency. This technique keeps the mousse from drying out.
Everything's prepped? Good. Let's get into the real action and start building that dreamy mousse. The final touch that sets this mousse apart is the optional chocolate drizzle that adds a glossy finish and a hint of bitterness. It’s a small detail that elevates the entire experience, making each bite feel like a decadent treat you’d find in a luxury dessert bar. But don’t worry—if you’re short on time, you can skip it and still enjoy a perfectly balanced mousse. The key is in the layers of flavor, from the buttery base to the crunchy cookie shards. You’ll be amazed at how simple ingredients can create such a luxurious dessert.
The mousse can also be served as a layered dessert by adding a layer of crushed cookies between the mousse layers. This adds texture and a delightful crunch. For a more dramatic presentation, top each serving with a dusting of cocoa powder or a drizzle of caramel. The possibilities are endless, and the result is always a showstopper.