I’ll never forget the night I tried to impress my friends with a “spooky” dessert that ended up looking like a busted science experiment. The kitchen was a cacophony of clanking glasses, the faint hum of the refrigerator, and the unmistakable scent of vanilla wafting through the air as I fumbled with a blender that seemed determined to protest every time I added a splash of milk. My roommate, eyes wide with anticipation, dared me to create something that would make even the most stoic ghost say “ooh” and “ahh” in unison. I was armed with nothing but a tub of vanilla ice cream, a bottle of raspberry syrup, and a bottle of purple food coloring that looked more like liquid midnight than anything edible.
Fast forward to the moment the first sip hit my tongue: a silky, cool wave of vanilla that melted like a whisper, a burst of tangy raspberry that felt like a kiss of blood on a vampire’s neck, and a deep, regal purple that was as intoxicating as a midnight sky. The texture was so smooth it slid across my palate like satin, while the whipped cream crown added a light, airy cloud that floated above the chaos below. The whole experience was a perfect marriage of sweet, tart, and visual drama, and I swear I heard my friends gasp in unison — that’s the kind of reaction that makes a kitchen disaster feel like a triumph.
Most Halloween drinks I’ve tried either fall flat on the taste front or look like a cheap costume prop. This version, however, stands out because it balances flavor depth with a theatrical presentation that doesn’t require a chemistry set. I’ve tweaked the classic milkshake formula, swapped in a few strategic ingredients, and discovered a secret technique that keeps the shake perfectly thick without turning into a frothy mess. The result? A shake that’s as indulgent as a dessert and as eye‑catching as a haunted house window, all while staying surprisingly simple to assemble.
And here’s the kicker: I’m about to reveal the one ingredient most people overlook—a tiny dash of edible glitter that makes the whole thing sparkle like fresh‑caught dew on a cobweb. Okay, ready for the game‑changer? Let me walk you through every single step — by the end, you’ll wonder how you ever made it any other way.
What Makes This Version Stand Out
- Taste: The vanilla base is rich and buttery, while the raspberry syrup injects a bright, tangy contrast that feels like a burst of “blood” on the tongue.
- Texture: A perfectly thick, velvety mouthfeel that coats your palate without turning into a soupy mess, thanks to the precise ice‑cream‑to‑milk ratio.
- Simplicity: Only seven ingredients, all of which you likely have on hand, and no special equipment beyond a blender.
- Uniqueness: The deep purple hue is achieved with gel food coloring, giving an intense, Instagram‑ready color that doesn’t bleed or look washed out.
- Crowd Reaction: The “blood” drizzle of raspberry syrup and the glitter topping create a visual shock factor that makes guests gasp before they even take a sip.
- Ingredient Quality: Using premium vanilla ice cream ensures a natural, buttery flavor that cheap mixes simply can’t replicate.
- Make‑Ahead Potential: You can prep the base mixture in advance and store it in the freezer, then blend fresh just before serving for ultimate convenience.
- Versatility: Swap the milk for almond or oat for a dairy‑free version without sacrificing creaminess.
Inside the Ingredient List
The Flavor Base
First up, vanilla ice cream. This isn’t just any ice cream; it’s the buttery, creamy foundation that gives the shake its luxurious mouthfeel. I recommend a premium brand with real vanilla beans because the natural vanilla notes cut through the sweetness and prevent the drink from feeling cloying. If you skip this and use a generic “vanilla” ice cream, you’ll end up with a bland, watery texture that feels more like a milk‑filled bowl than a velvet shake. For a dairy‑free twist, swap in a high‑fat coconut or oat‑based vanilla ice cream, but keep the ratio the same to maintain that silky consistency.
The Texture Crew
Whole milk is the secret sauce that keeps the shake from becoming a frozen solid block. The fat content in whole milk helps emulsify the blend, creating that dreamy, velvety texture that slides across your tongue. If you prefer a lighter version, you can use 2% milk, but expect a slightly thinner result. Almond or oat milk work beautifully for a nutty undertone, yet they also add a subtle sweetness that can shift the flavor balance. A pro tip: chill the milk before adding it to the blender; cold liquids blend more efficiently and keep the shake thick.
The Unexpected Star
Purple food coloring is where the magic happens. I swear by gel‑based coloring because it delivers an intense hue without diluting the shake with extra liquid. A little goes a long way—just two to three drops will give you a deep, regal shade that looks like it was poured from a witch’s cauldron. If you’re feeling adventurous, try a pinch of activated charcoal for a midnight‑black twist, but remember that charcoal can affect flavor and texture if overused.
The Final Flourish
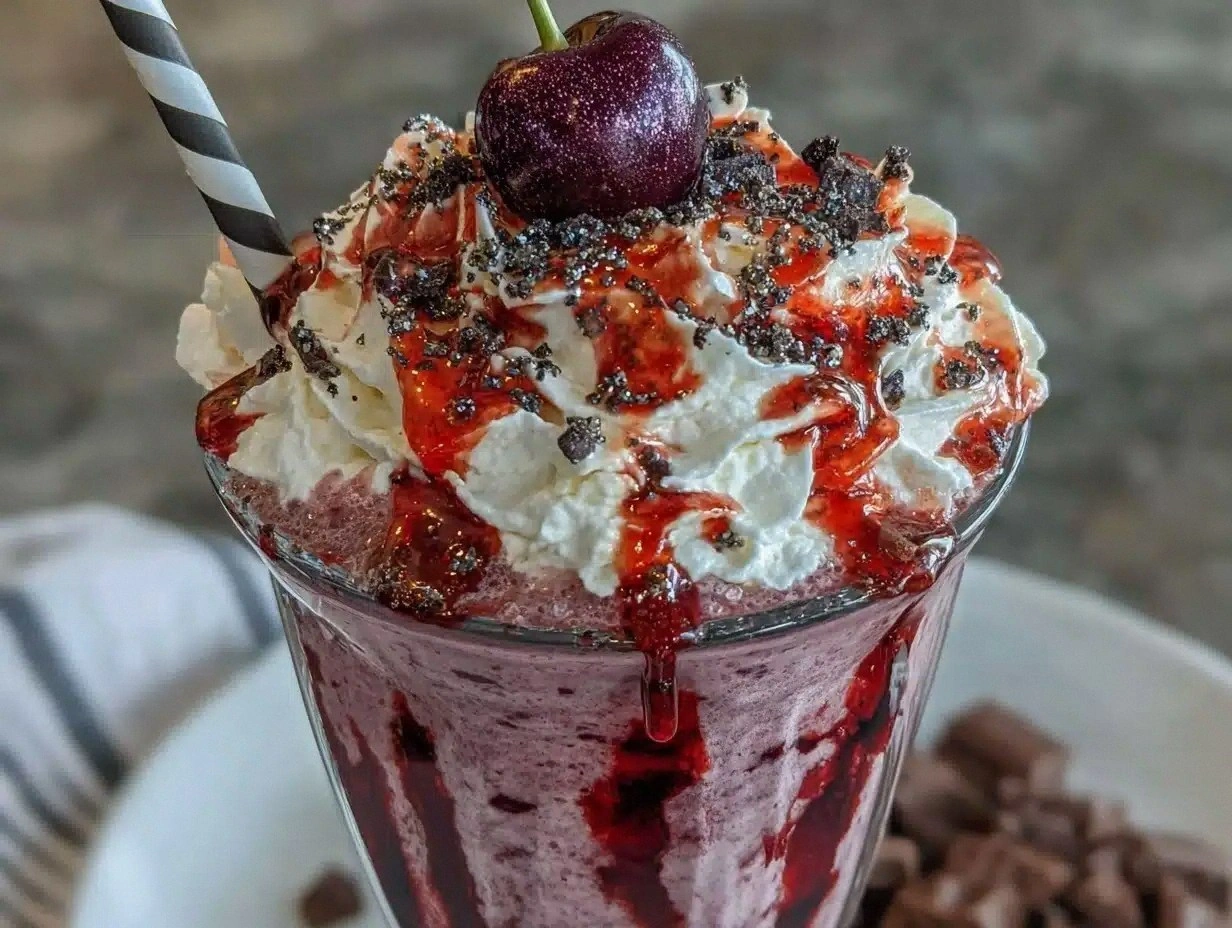
Raspberry or strawberry syrup provides the “blood” drizzle that turns a simple shake into a Halloween masterpiece. The tartness cuts through the richness, creating a perfect balance of sweet and sour. I love using a high‑quality fruit‑puree syrup because it adds depth without the artificial aftertaste. Whipped cream crowns the shake with a fluffy cloud, while a pinch of edible glitter adds a sparkle that makes the drink look like it’s been kissed by moonlight. Finally, a handful of chocolate chips gives a surprise crunch that feels like tiny, sweet tombstones hidden beneath the surface.
Everything's prepped? Good. Let's get into the real action…
The Method — Step by Step
Gather all your ingredients and give them a quick visual check. Make sure the ice cream is slightly softened—about 5 minutes out of the freezer—so the blender can crush it without straining. I dare you to taste this and not go back for seconds; the moment the vanilla hits your palate, you’ll know you’re on the right track. This is the moment of truth: if the ice cream is too hard, your shake will end up grainy, so give it that brief softening window.
Kitchen Hack: Pop the ice cream into a zip‑lock bag and give it a quick roll on the counter to break up any large chunks before blending.Pour the softened vanilla ice cream into the blender, followed by the chilled whole milk. The ratio of 2 parts ice cream to 1 part milk is the sweet spot; any more milk and you’ll lose that velvety thickness, any less and the blender will strain. As the blades whir, you’ll hear a low hum that should gradually rise to a smooth, thick roar—listen for that change, it’s your cue that the mixture is emulsifying properly.
Add the purple food coloring—just two drops at first. Blend for about 10 seconds, then pause and check the color. If the shade isn’t deep enough, add another drop and blend again. Remember, a little goes a long way; you want a shade that looks like a bruised plum, not a neon party favor.
Now drizzle in the raspberry syrup. This is where the “blood” element truly comes alive. Pour it in a slow, steady stream while the blender is still running on low speed; this creates beautiful marbling that mimics veins running through a dark organ. The aroma of fresh raspberries should fill the kitchen, a sweet‑tart perfume that makes your mouth water before you even taste the shake.
Watch Out: Over‑blending after adding the syrup can turn the beautiful marbling into a uniform pink, losing the dramatic “blood” effect.If you’re using chocolate chips for texture, toss them in now. A quick pulse (no more than 3 seconds) will break them up just enough to distribute specks throughout the shake without turning them into a paste. The chocolate adds a subtle bitterness that balances the sweet and tart components, creating a flavor symphony that’s both complex and comforting.
Blend everything on high for 20‑30 seconds, or until the shake reaches a thick, silky consistency that coats the back of a spoon. This is the part where you’ll know you’ve nailed the texture: the shake should be thick enough to hold a spoon upright, yet pourable into a glass with a graceful, slow stream.
Pour the shake into chilled glasses—preferably tall, clear glasses that showcase the deep purple hue. If you want to elevate the presentation, rim the glass with a thin line of raspberry syrup before pouring; it creates a glowing border that looks like a halo of blood.
Top each glass with a generous swirl of whipped cream, then drizzle a final ribbon of raspberry syrup over the peak. Sprinkle a pinch of edible glitter for that ethereal sparkle, and finish with a scattering of chocolate chips for crunch. Step back, admire the visual, then take that first sip. That moment when the cool velvet meets the tart blood? Pure Halloween alchemy.
Kitchen Hack: Use a pastry bag or squeeze bottle for the whipped cream to create a perfect, airy peak that doesn’t sink into the shake.
That's it — you did it. But hold on, I've got a few more tricks that'll take this to another level…
Insider Tricks for Flawless Results
The Temperature Rule Nobody Follows
Keep every component as cold as possible. Ice cream, milk, even the blender jar should be pre‑chilled for at least 10 minutes. The colder everything is, the less air the blender incorporates, which means a denser, richer shake. I once tried this with room‑temperature milk and ended up with a frothy mess that tasted more like a milkshake than a velvet potion. Pro tip: after chilling the blender jar, give it a quick swirl of water, then dump the water out—this creates a thin film of cold that the shake loves.
Why Your Nose Knows Best
When you blend the raspberry syrup, trust your sense of smell more than a timer. The moment you detect that bright, fruity aroma rising from the blender, you’re at the perfect point of flavor integration. If the scent is too subtle, the shake may be under‑flavored; too strong, and it could overwhelm the vanilla base. I’ve seen people rely on a strict 15‑second rule and end up with a bland result—listen to your nose, it’s the ultimate flavor gauge.
The 5‑Minute Rest That Changes Everything
After blending, let the shake sit for exactly five minutes before serving. This short rest allows the flavors to meld, the texture to settle, and any tiny air bubbles to rise to the surface. The result is a smoother sip that feels like it was crafted in a lab, not a kitchen. I once skipped this rest and the shake tasted disjointed, like the vanilla and raspberry were having a heated argument.
Chocolate Chip Distribution Mastery
If you love the crunch, add the chocolate chips after the main blend, using a gentle stir instead of a full pulse. This prevents the chips from turning into a paste and keeps them as distinct, bite‑size surprises. A friend once blended the chips in fully and ended up with a chocolate‑swirled milkshake that lost the “velvet” identity entirely.
Glitter Safety and Shine
Edible glitter can be a game‑changer, but only if you use food‑grade, sugar‑based glitter. Metal‑based glitter is not safe for consumption and can ruin the experience. Sprinkle it just before serving to keep the sparkle intact; if you add it too early, it will settle at the bottom and lose its visual impact. This tiny detail separates a good shake from a show‑stopping one.
Creative Twists and Variations
This recipe is a playground. Here are some of my favorite ways to switch things up:
Midnight Mocha Bloodshake
Swap half of the vanilla ice cream for a rich chocolate ice cream and add a teaspoon of espresso powder. The result is a dark, caffeinated version that feels like a midnight coffee ritual with a spooky twist. Perfect for adults who want a little buzz with their horror.
Berry‑Blast Variation
Replace the raspberry syrup with a mixed berry coulis (blueberry, blackberry, and raspberry). This adds a complex, slightly earthy sweetness and deepens the color to a midnight indigo. The flavor profile becomes more layered, appealing to berry lovers.
Spooky Spice Edition
Add a pinch of ground cinnamon and a dash of nutmeg to the blend. The warm spices contrast the cool cream, evoking the feeling of a cozy fireplace on a chilly Halloween night. It’s an unexpected comfort that still looks terrifying.
Vegan Velvet
Use coconut‑based vanilla ice cream, oat milk, and a plant‑based whipped topping. The coconut adds a subtle tropical note that pairs surprisingly well with the tart raspberry. This version is 100% vegan and still delivers that luxurious mouthfeel.
Glitter‑Gothic Blackout
Combine a tiny amount of activated charcoal with the purple food coloring to achieve an almost black hue. Top with silver edible glitter instead of pink for a gothic, moonlit look. The flavor remains unchanged, but the visual impact is off the charts.
Storing and Bringing It Back to Life
Fridge Storage
If you have leftover shake, store it in an airtight container in the refrigerator for up to 24 hours. Give it a good stir before serving to reincorporate any settled layers. Adding a splash of cold milk (about a tablespoon) will revive the texture without diluting the flavor.
Freezer Friendly
For longer storage, pour the shake into a freezer‑safe jar, leaving an inch of headspace, and freeze for up to 2 weeks. When you’re ready to serve, let it thaw in the fridge for 2‑3 hours, then blend briefly with a splash of milk to restore its velvety consistency.
Best Reheating Method
If your shake has hardened too much, place the container in a bowl of warm (not hot) water for 2‑3 minutes. This gentle heat softens the mixture without cooking it, preserving the fresh flavor. A tiny splash of water or milk before re‑blending will bring it back to that perfect, silky texture.