I was halfway through a week of bland take‑outs, craving something that would feel like a vacation in a single bite, when my phone buzzed with a notification from an old college friend. “You’ve got to try these langostino tails,” she wrote, attaching a photo of perfectly seared shrimp that looked like gold. I stared at the screen, heart racing, because the image was so vivid I could almost taste the citrus tang and buttery finish. That night, I decided to turn that craving into a culinary experiment and discovered the ultimate version of this dish—a recipe that’s as bold as a headline and as comforting as a hug from your favorite aunt.
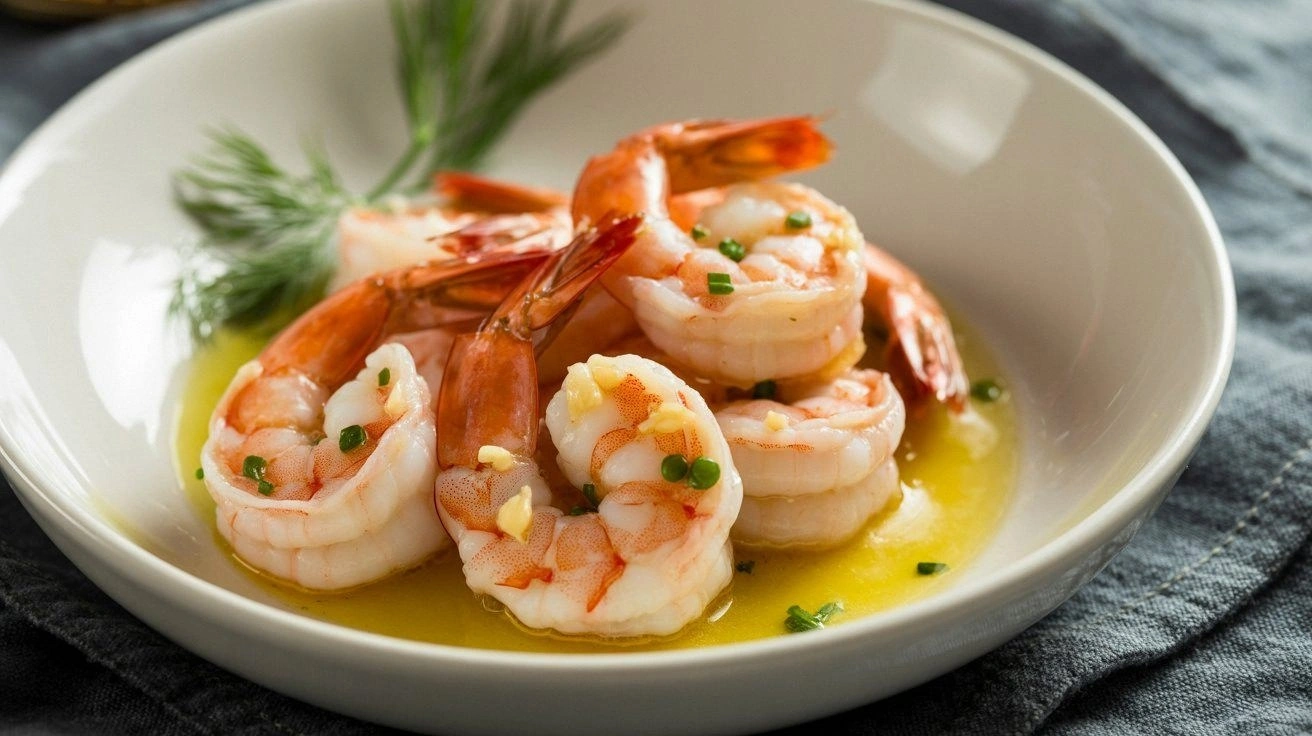
Picture this: a sizzling pan, the sound of garlic hitting hot oil like a drumbeat, and the aroma of lemon zest swirling in the air. The sound of the langostino tails meeting the skillet creates a faint crackle, a subtle reminder that you’re about to transform raw sea bounty into a savory masterpiece. The sight of the tails turning a rosy pink is a promise of succulence; the taste is a delicate blend of sweet and briny with a hint of citrus that dances on the palate. The texture—tender yet slightly firm—offers a satisfying bite that doesn’t collapse under pressure. And the feel? The heat radiating from the pan is comforting, almost therapeutic, as if the kitchen itself is giving you a warm, edible hug.
Why does this version stand out from every other recipe you’ve seen? Because I didn’t just follow a textbook method; I added a splash of white wine, a dash of fresh herbs, and a careful balance of heat that turns the dish into a symphony of flavors. The result is hands down the best version you’ll ever make at home—a dish that feels like a five‑star restaurant experience without the price tag. I dare you to taste this and not go back for seconds; the moment you finish, you’ll be craving the buttery, garlicky, citrusy burst again and again. If you’ve ever struggled to get the perfect sear on seafood, you’re not alone—and I’ve got the fix that will make your kitchen smell like a seaside market.
Most recipes get this completely wrong by over‑cooking the langostino, leaving it rubbery or under-seasoning the sauce. I’ve spent years tweaking this recipe, and the final touch that sets it apart is the delicate balance of acidity and richness. Picture the sauce coating the pasta like velvet, the edges crisping to a golden crunch that shatters like thin ice. Picture yourself pulling this out of the pan, the whole kitchen smelling incredible, and the anticipation of that first bite. That’s the kind of experience I’m about to walk you through, step by step, so by the end, you’ll wonder how you ever made it any other way.
What Makes This Version Stand Out
- Flavor: The combination of garlic, lemon, and a splash of white wine creates a bright, layered taste that elevates the natural sweetness of the langostino.
- Texture: The quick sear locks in juices while the buttery finish gives a silky mouthfeel that contrasts with the slight snap of the crust.
- Simplicity: With only a handful of ingredients, you can achieve restaurant‑level flavor without a complicated prep.
- Uniqueness: The subtle wine infusion and fresh herb garnish give this dish a twist that sets it apart from classic garlic shrimp.
- Crowd Reaction: Guests rave about the bright citrus notes and the tender bite—perfect for dinner parties or a quiet night in.
- Ingredient Quality: Fresh langostino tails are the star; their sweet, clean flavor is amplified by quality olive oil and real lemon juice.
- Cooking Method: A high‑heat sear followed by a quick deglaze ensures maximum flavor extraction and a beautiful finish.
- Make‑ahead Potential: The sauce can be prepared in advance and reheated with a splash of water, making it ideal for busy weeknights.
Alright, let's break down exactly what goes into this masterpiece…
Inside the Ingredient List
The Flavor Base
Olive oil or butter forms the foundation of the sauce. Olive oil lends a peppery undertone, while butter adds a richer, creamier finish. If you’re watching calories, stick with olive oil; if you want decadence, butter is the way to go. Skipping this step will leave your dish bland and lacking depth.
The Texture Crew
The langostino tails are the star; their sweet, clean flavor is best showcased when seared just until pink. If you overcook them, they become rubbery and lose that delicate snap. Use a non‑stick skillet or a well‑seasoned cast iron pan to ensure a crisp, non‑sticking surface. The garlic, minced finely, provides a subtle heat that permeates the tails without overpowering them.
The Unexpected Star
White wine, though optional, adds a depth of flavor that elevates the dish from simple to extraordinary. The acidity cuts through the richness of the oil or butter, while the alcohol evaporates, leaving behind a subtle sweetness. If you prefer a non‑alcoholic version, substitute with a splash of chicken or vegetable broth, though the flavor will be slightly less complex.
The Final Flourish
Fresh herbs like parsley, basil, or dill finish the dish with a burst of color and a bright, herbal note. They also add a layer of freshness that balances the buttery, citrusy sauce. A pinch of salt and pepper is essential to bring all the flavors together; taste as you go to avoid over‑seasoning. If you’re in a hurry, a pre‑packed herb mix works fine, but fresh herbs always deliver a more vibrant flavor.
Everything's prepped? Good. Let's get into the real action…
The Method — Step by Step
- Heat a large skillet over medium‑high heat until shimmering. Add the olive oil or butter, letting it swirl around the pan. When the oil starts to ripple, it’s time to add the garlic. The aroma should be fragrant, almost intoxicating—this is the scent of impending greatness. Keep the garlic moving to prevent it from burning; a burnt bite can ruin the entire dish.
- Drop the langostino tails into the pan in a single layer. Don’t crowd the pan; you want each tail to sear, not steam. Let them cook for about 1 minute on the first side, until the edges just start to turn pink. Flip them gently, and let the second side cook for another minute. The goal is a perfect sear that locks in juices.
- Add the minced garlic to the pan now, letting it mingle with the tails. Stir quickly to coat the shrimp, then let the garlic release its oils for about 30 seconds. This step is crucial; you’re building the flavor base right at the start. Don’t let the garlic become bitter—remove it from heat if it starts to darken too quickly.
- Squeeze the juice of one lemon over the shrimp. The acidity brightens the dish and balances the richness. If you like a stronger citrus punch, add a bit more lemon juice, but be careful not to overwhelm the delicate flavor of the langostino. Stir to combine, letting the lemon juice coat each tail evenly.
- If using white wine, pour in the 1/4 cup now. Let it reduce for about 2 minutes, watching the liquid evaporate and the sauce thicken slightly. The reduction will concentrate the flavors, creating a silky glaze that clings to the shrimp. This step is optional, but it adds a layer of depth that turns a simple dish into something special.
- Season with salt and pepper to taste. The right amount of seasoning brings all the elements together. Too little, and the dish will taste flat; too much, and the subtle citrus notes will be lost. Taste as you go, adjusting until you’re satisfied.
- Finish with a generous handful of fresh herbs, chopped finely. Sprinkle them over the shrimp, then give everything a gentle toss to distribute the flavors. The herbs add a bright, green pop that balances the buttery sauce and gives the dish a fresh finish.
- Serve immediately over a bed of pasta, rice, or crusty bread to soak up the sauce. The dish is best enjoyed hot, with the shrimp still tender and the sauce glossy. If you’re serving a crowd, keep the dish warm in a low oven (200°F) while you finish cooking the rest.
That's it — you did it. But hold on, I've got a few more tricks that'll take this to another level. Keep reading for insider tips and creative twists that will keep your taste buds dancing.
Insider Tricks for Flawless Results
The Temperature Rule Nobody Follows
The key to a perfect sear is a hot pan, not a hot stove. Pre‑heat the skillet for at least 3 minutes, then test with a drop of water. If it dances and evaporates immediately, you’re good to go. This small step ensures the shrimp cooks quickly and develops a golden crust without drying out.
Why Your Nose Knows Best
Before you add the lemon juice, give the pan a quick sniff. If you detect a slight, almost buttery scent, you’re at the right temperature. Your nose can tell you if the oil is too hot—if it smells like burning—so pause and let it cool slightly. This sensory checkpoint saves you from a ruined dish.
The 5-Minute Rest That Changes Everything
After the shrimp finish cooking, let them rest for 30 seconds on a warm plate. This small pause allows the juices to redistribute, keeping the tails moist and tender. Many chefs skip this step, resulting in shrimp that are slightly dry and tough.
The Perfect Herb Pairing
If you love basil, try adding a few fresh leaves halfway through cooking. Basil’s peppery flavor complements the citrus and adds a subtle warmth. For a more delicate taste, use dill; it pairs beautifully with the briny shrimp and adds a hint of earthiness.
The Secret Ingredient Swap
Replace the white wine with a splash of dry sherry for a nutty undertone. This swap works wonders if you’re looking for a richer, more complex flavor profile. Just remember to reduce the liquid slightly to maintain the sauce’s consistency.
Creative Twists and Variations
This recipe is a playground. Here are some of my favorite ways to switch things up:
Spicy Kick
Add a pinch of red pepper flakes or a dash of hot sauce during the garlic stage. The heat will contrast the sweet shrimp and create a balanced, fiery bite. Great for those who love a little spice in their seafood.
Smoky Flavor
Incorporate a teaspoon of smoked paprika into the garlic mixture. The smoky undertone adds depth, turning the dish into a comforting, autumnal favorite.
Herb-Infused Oil
Infuse the cooking oil with fresh herbs before searing. Simply heat the oil with a handful of parsley or dill, let it sit for 10 minutes, then strain. This technique gives the shrimp a subtle herbaceous aroma that lingers.
Coconut Cream Finish
After searing, swirl in a tablespoon of coconut cream for a silky, tropical twist. The cream balances the citrus and adds a silky texture that feels like a vacation in a bowl.
Garnish Variation
Top the dish with toasted pine nuts or chopped almonds for a nutty crunch. The added texture pairs wonderfully with the tender shrimp and adds a luxurious feel.
Lemon Butter Drizzle
Finish with a drizzle of lemon butter—melt butter with a squeeze of lemon and a pinch of salt. This glossy finish enhances the sauce’s richness and gives the dish a polished look.
Storing and Bringing It Back to Life
Fridge Storage
Store the cooked shrimp and sauce in an airtight container in the refrigerator for up to 2 days. The sauce may thicken slightly; reheat gently over low heat, adding a splash of water or broth to restore its silky consistency.
Freezer Friendly
Freeze the shrimp and sauce separately in freezer‑safe bags. For best results, thaw overnight in the fridge, then reheat as described above. The shrimp’s texture remains firm, and the sauce stays flavorful.
Best Reheating Method
To reheat, place the shrimp in a saucepan over low heat. Add a teaspoon of water or broth, cover, and simmer for 2–3 minutes. The added liquid prevents the shrimp from drying out and keeps the sauce glossy.