INTRODUCTION
Picture this: you’re in the middle of a movie marathon, the lights are dimmed, and the kitchen smells like burnt popcorn and burnt toast. The moment you realize the snack you’re craving—crispy, buttery potato wedges—has been ruined by an overcooked, soggy batch that looks like a rubbery potato soup. That night, I was determined to turn that disaster into a triumph. I dared myself to make the ultimate loaded potato wedges and, honestly, the result was so good that I ate half of the batch before anyone else even had a chance to taste it.
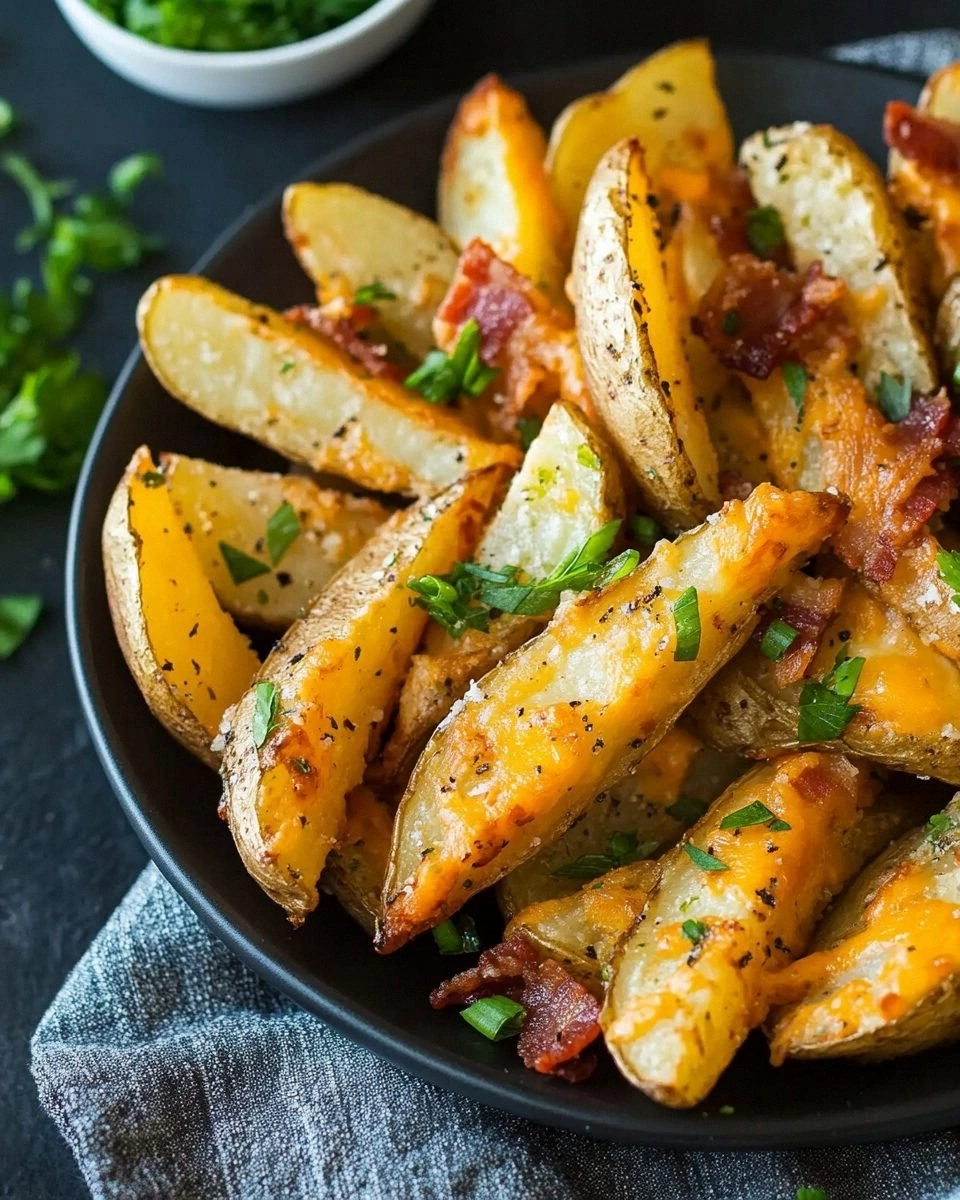
From the first glance, the golden edges of the wedges promise a crunch that shatters like thin ice. The scent that rises from the oven is a heady mix of roasted potatoes, melted cheddar, and smoky bacon, a combination that instantly makes your mouth water. The texture is a delightful contrast: a crisp exterior that gives way to a fluffy, buttery interior. And the flavor—oh, the flavor—has a depth that feels like a comforting hug after a long day. I dare you to taste this and not go back for seconds.
What sets this version apart from every other recipe you’ve seen is a secret layering technique that locks in moisture while ensuring that every bite is perfectly crisp. I’ve spent hours tweaking the balance of spices, the timing of the cheese melt, and the final touch of sour cream to create a dish that is hands down the best version you’ll ever make at home. And the best part? It’s so simple that even a kitchen rookie can master it.
There’s a twist you won’t expect: a subtle infusion of smoked paprika that adds a smoky undertone without overpowering the natural potato flavor. And the final flourish? A sprinkle of fresh chives that provides a bright, herbaceous contrast to the rich, savory base. Picture yourself pulling these out of the oven, the whole kitchen smelling incredible, and watching friends line up for a plate. Stay with me here—this is worth it.
Let me walk you through every single step—by the end, you’ll wonder how you ever made it any other way.
What Makes This Version Stand Out
- Crunch: The wedges achieve a blistered, caramelized crust that gives way to a fluffy interior, thanks to the right oven temperature and the pre‑soaking trick.
- Flavor: A balanced blend of garlic, smoked paprika, and a splash of cayenne delivers depth without overwhelming the potato’s natural sweetness.
- Cheese Melt: The cheddar is shredded finely and layered on top before the final bake, ensuring a gooey, golden coating that stays intact.
- Speed: From prep to plate, the whole process takes under an hour, making it perfect for last‑minute gatherings.
- Versatility: The recipe can be adapted for vegan, gluten‑free, or low‑fat versions with simple ingredient swaps.
- Make‑ahead Potential: You can bake the wedges ahead of time and reheat them with a quick blast in the oven or air fryer.
- Crowd Appeal: Whether it’s a game day, a dinner party, or a midnight snack, the wedges consistently get rave reviews.
Alright, let's break down exactly what goes into this masterpiece...
Inside the Ingredient List
The Flavor Base
The foundation of any great loaded potato wedge is the potato itself. I choose russet potatoes for their high starch content, which gives the wedges a fluffy interior. Each potato is cut into even wedges to ensure uniform cooking. If you skip the pre‑soaking step, the wedges can end up gummy and less crisp.
Olive oil is the medium that carries the spices into the potato flesh. A generous splash of extra‑virgin olive oil adds a subtle fruity note and helps the seasonings adhere. If you’re watching calories, you can substitute a light cooking spray, but you’ll sacrifice some of that silky finish.
The seasoning blend—kosher salt, freshly ground black pepper, garlic powder, smoked paprika, and a pinch of cayenne—creates a symphony of flavors. Salt is essential for bringing out the potato’s natural sweetness, while pepper adds a gentle heat. Garlic powder gives a mellow, savory depth, and smoked paprika introduces a subtle smokiness that pairs beautifully with bacon.
If you’re a fan of heat, you can add more cayenne or a dash of chipotle powder. For a milder version, simply reduce the cayenne to a quarter teaspoon. The key is balance; you don’t want any single spice to dominate the others.
For the final flourish, I add shredded sharp cheddar cheese and cooked bacon bits. Cheddar melts into a gooey, golden coating, while bacon adds a salty crunch that contrasts the softness of the potato. If you’re vegan, swap the cheddar for a plant‑based cheese that melts well and bacon for crispy, smoked tempeh.
The Texture Crew
To achieve that perfect crunch, I pre‑heat the oven to 425°F (220°C) and use a single, wide baking sheet. The heat is high enough to caramelize the exterior while the interior stays tender. If you spread the wedges too close together, they’ll steam instead of roast.
After the initial bake, I add the cheddar and bacon on top and return the wedges to the oven. This second bake is short—just five minutes—to melt the cheese without burning it. The result is a molten, golden layer that clings to every wedge.
When the wedges are done, I let them rest for a couple of minutes. This pause allows the cheese to set slightly, preventing it from sliding off when you serve. It also gives the interior a chance to firm up, ensuring that each bite is a balance of crunch and creaminess.
To finish, I dollop a spoonful of sour cream onto each wedge. Sour cream adds a tangy contrast that cuts through the richness of cheese and bacon. If you’re looking for a lighter option, try Greek yogurt or a cashew‑based sauce.
The Unexpected Star
Fresh chives are the final touch that elevates this dish. Their bright, mild onion flavor adds a pop of color and a fresh note that balances the savory components. If you’re in a pinch, chopped green onions or parsley will work as well.
Some people love to add a sprinkle of hot sauce or a dash of Worcestershire sauce for an extra kick. Just remember that these sauces can be overpowering if you’re not careful.
The Final Flourish
At this point, the wedges are ready to be plated. I arrange them in a single layer on a platter, allowing the steam to escape and the edges to stay crisp. A final drizzle of olive oil or a light sprinkle of sea salt can enhance the flavor profile.
Everything's prepped? Good. Let's get into the real action...
The Method — Step by Step
- Preheat your oven to 425°F (220°C). Line a large baking sheet with parchment paper or a silicone mat to prevent sticking. The high temperature is key to achieving that blistered, caramelized crust. Keep an eye on the wedges as they bake; you want golden edges without burning.
- Wash the russet potatoes thoroughly, then cut them into even wedges—about 1/2 inch thick. Uniform size ensures even cooking. Place the wedges in a large bowl and pour cold water over them. Let them soak for 10 minutes to remove excess starch, which helps with crispiness.
- Drain the wedges and pat them dry with a clean towel. In a separate bowl, whisk together 4 tablespoons of extra‑virgin olive oil, 1 teaspoon of kosher salt, 1 teaspoon of freshly ground black pepper, 1 teaspoon of garlic powder, 1 teaspoon of smoked paprika, and 1/4 teaspoon of cayenne pepper. Toss the dry wedges in the oil mixture until they’re evenly coated. The oil not only carries the spices but also creates a barrier that keeps the exterior crisp.
- Spread the seasoned wedges in a single layer on the prepared baking sheet. Avoid overcrowding; the wedges need room to roast rather than steam. Bake for 25 minutes, flipping them halfway through, until the edges are golden brown and the interior is tender.
- While the wedges are still hot, sprinkle 1 cup of shredded sharp cheddar cheese and 1 cup of cooked bacon bits evenly over the top. Return the sheet to the oven for an additional 5 minutes, or until the cheese is melted and bubbly. This step is critical—too long, and the cheese will burn; too short, and it won’t melt properly.
- Remove the wedges from the oven and let them rest for 2 minutes. This short rest allows the cheese to set slightly, preventing it from sliding off when you serve. While they rest, whisk 1 cup of sour cream with a pinch of salt and a squeeze of lemon juice to brighten the tang.
- Spoon a dollop of the tangy sour cream onto each wedge. Sprinkle freshly chopped chives over the top for a burst of color and freshness. A final drizzle of olive oil or a pinch of sea salt can elevate the flavor profile even further.
- Serve immediately while the wedges are still hot and crispy. Arrange them on a platter for a visually appealing presentation. Pair them with a side of ranch or blue cheese dressing for dipping, and you’ve got a complete meal that’s ready in under an hour.
That's it — you did it. But hold on, I've got a few more tricks that'll take this to another level...
Insider Tricks for Flawless Results
The Temperature Rule Nobody Follows
Many cooks bake their wedges at 400°F, but this temperature is too low to achieve that blistered crust. Baking at 425°F (or even 450°F for a more intense crunch) ensures the exterior caramelizes while the interior stays fluffy. If your oven runs hot, rotate the tray halfway through to avoid uneven browning.
Why Your Nose Knows Best
When you smell the wedges as they bake, you’ll notice a toasty aroma that signals the perfect moment to flip them. The scent is a reliable cue that the edges are crisping up. If you’re uncertain, use a timer, but trust your nose for the best results.
The 5-Minute Rest That Changes Everything
After removing the wedges from the oven, let them rest for exactly five minutes. This pause allows the cheese to set into a stable, gooey coating that won’t run off. Skipping this step can result in a greasy mess.
Keep It Moist, Not Wet
Some people soak the wedges in milk to make them extra tender, but this can make them soggy. Instead, keep them dry before coating with oil. The oil forms a protective layer that locks in moisture without creating steam.
Make-Ahead Magic
Cook the wedges up to the cheese melt stage, then cool them to room temperature. Store them in an airtight container in the fridge for up to two days. Reheat in a 350°F oven for 10 minutes, or use an air fryer at 400°F for 5 minutes, and they’ll regain their crispness.
Flavor Layering
For a smoky twist, add a tablespoon of chipotle in adobo sauce to the seasoning mix. The smoky heat pairs wonderfully with the cheddar and bacon. If you’re vegan, try a splash of nutritional yeast for a cheesy flavor boost.
Creative Twists and Variations
This recipe is a playground. Here are some of my favorite ways to switch things up:
BBQ Bacon Wedges
Swap the smoked paprika for a generous dusting of barbecue seasoning and replace the bacon bits with grilled chicken strips. The sweet, smoky flavor profile pairs perfectly with a tangy BBQ sauce.
Vegan Cheddar Delight
Use a plant‑based cheddar that melts well, and replace bacon with crispy, seasoned tempeh or smoked tofu cubes. Finish with a drizzle of vegan mayo and a sprinkle of nutritional yeast.
Spicy Mexican Twist
Introduce a handful of crushed tortilla chips, a sprinkle of cumin, and a splash of lime juice. Top with diced tomatoes, avocado slices, and a spoonful of salsa for a fresh, zesty finish.
Herb‑Infused Wedges
Replace the chives with fresh rosemary or thyme, and add a pinch of dried oregano. The aromatic herbs elevate the dish to a gourmet level.
Low‑Fat Light Version
Use a spray of cooking oil instead of the 4 tablespoons of olive oil, and replace the cheddar with a low‑fat cheese or a cheese alternative. Keep the bacon for crunch but use a reduced‑fat version.
Sweet Potato Crunch
Swap the russet potatoes for sweet potatoes for a naturally sweet flavor. Add a drizzle of maple syrup before baking for a caramelized finish, and sprinkle with toasted pecans for added crunch.
Storing and Bringing It Back to Life
Fridge Storage
Cool the wedges completely before placing them in an airtight container. Store in the refrigerator for up to 2 days. When ready to serve, reheat in a 350°F oven for 10 minutes to revive the crispness.
Freezer Friendly
After the initial bake (up to the cheese melt stage), let the wedges cool, then freeze them on a baking sheet until solid. Transfer to a freezer bag and store for up to 3 months. Reheat directly from frozen at 400°F for 12 minutes, or use an air fryer for a faster crisp.
Best Reheating Method
To avoid sogginess, add a splash of water to the bottom of the pan before reheating. The steam helps the wedges reheat evenly while preserving the crunch. Finish with a quick drizzle of olive oil and a pinch of sea salt.