I still remember the Halloween party where I showed up with a tray of these brownies and watched grown adults turn into sugar-crazed kids. The host actually hid the plate behind a decorative pumpkin so they could have them all to themselves. That's the power of these spooky spider web brownies — they're not just dessert, they're a full-blown Halloween experience that hijacks everyone's self-control.
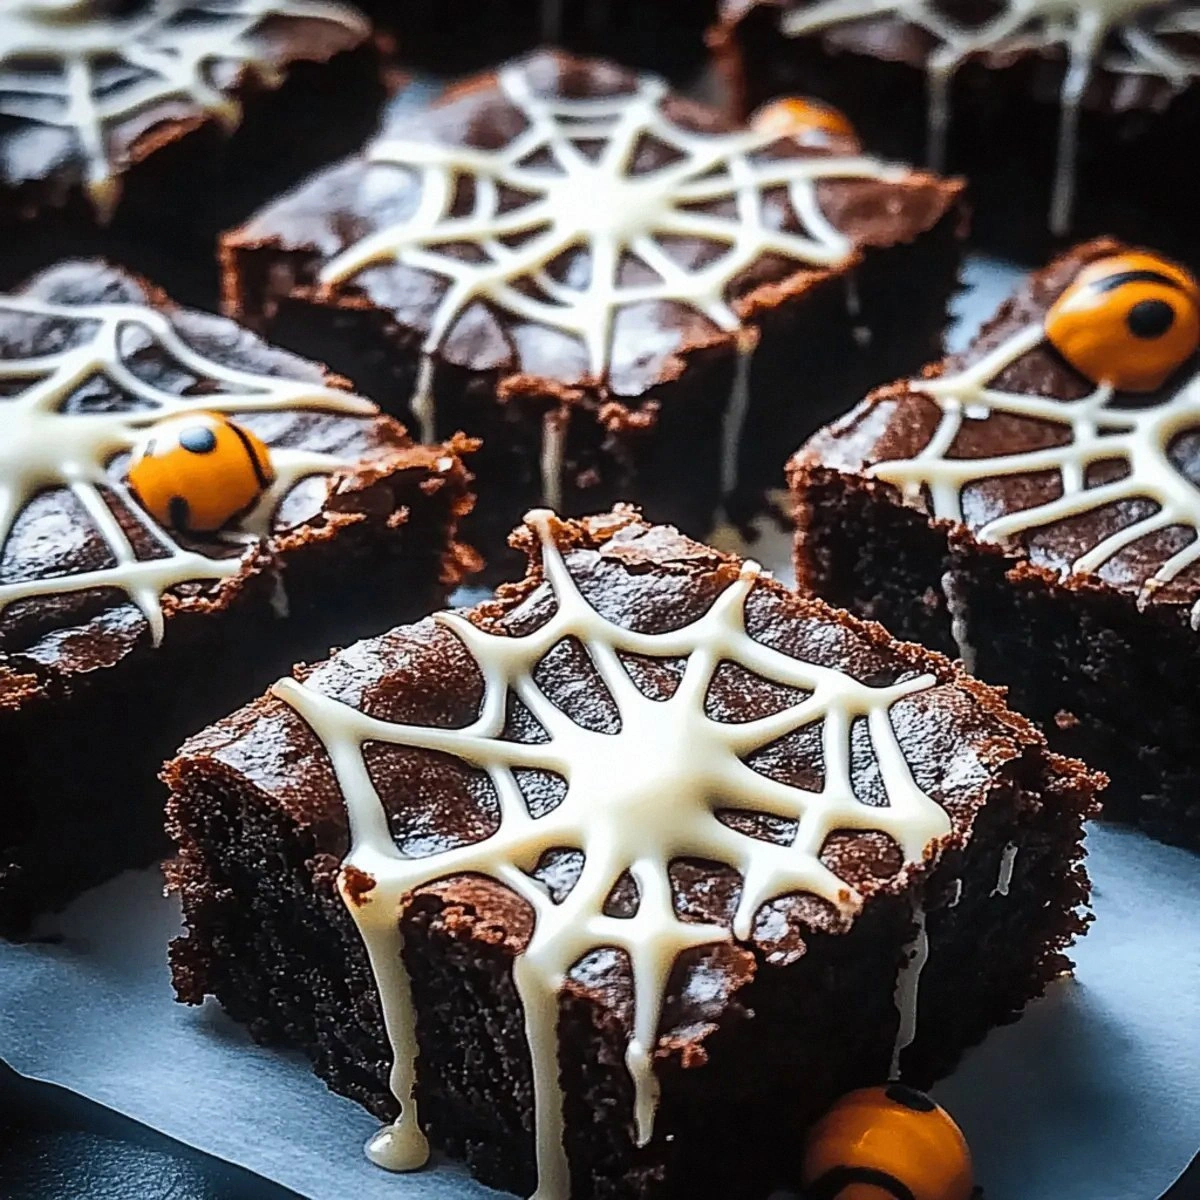
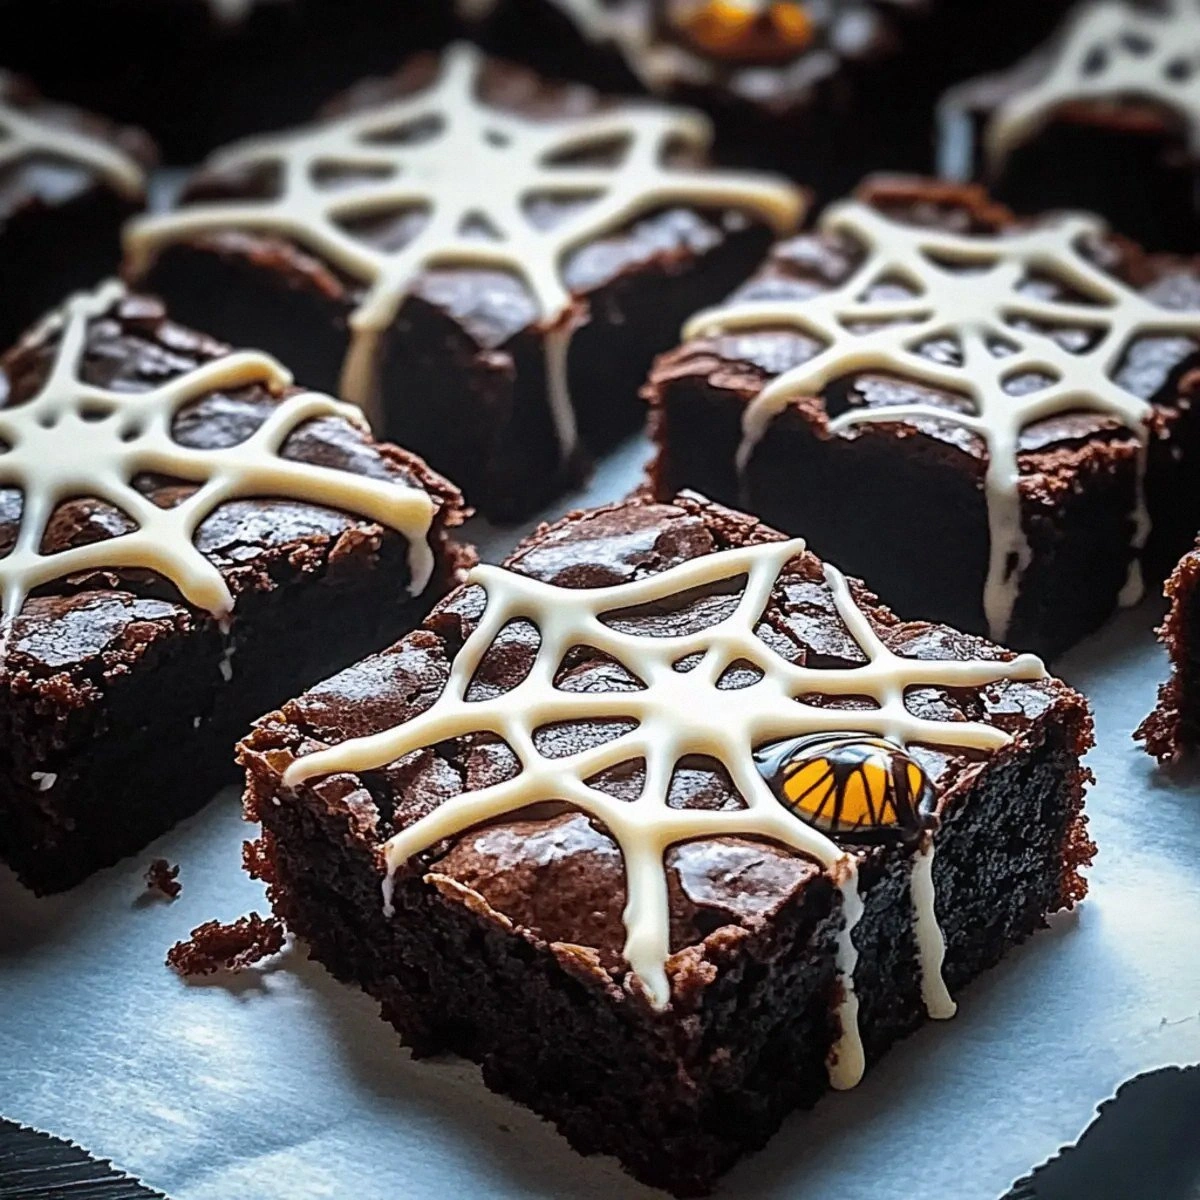
Picture this: rich, fudgy chocolate brownies so dense they almost qualify as chocolate truffles, topped with a silky white chocolate web that looks like it was spun by the world's most talented spider pastry chef. The contrast between the deep, dark chocolate and the pristine white web creates such a dramatic visual that people literally stop mid-conversation when you walk into the room carrying these. I've seen camera phones emerge faster than you can say "trick or treat."
What makes these truly special isn't just how they look — it's that perfect balance of intense chocolate flavor with the sweet creaminess of white chocolate. Most Halloween treats are all about the gimmick and forget that actual taste matters. Not these bad boys. They deliver that serious chocolate hit that makes your eyes close involuntarily, followed by the smooth vanilla notes of white chocolate that keep you coming back for "just one more bite" until suddenly the entire pan has mysteriously vanished.
Here's the real kicker: despite looking like they require a culinary degree and three hours of your life, these come together faster than deciding on a Halloween costume. The secret lies in a technique that creates the web effect using nothing fancier than a toothpick and some strategic swirling. Trust me, when you pull this off, you'll feel like a kitchen wizard. Let me walk you through every single step — by the end, you'll wonder how you ever made it any other way.
What Makes This Version Stand Out
Most Halloween brownies are just regular brownies with orange frosting and maybe some candy eyeballs scattered on top. Yawn. These spider web brownies are in a completely different league, and here's why they blow every other Halloween dessert out of the water.
- Visual Impact: The spider web design looks professionally piped, but you'll create it with a simple toothpick swirl technique that takes under two minutes. People will assume you spent hours on the decoration.
- Texture Contrast: We're talking about a brownie that's intentionally underbaked just enough to stay fudgy in the center while developing that coveted paper-thin crinkly top. The white chocolate adds a creamy snap that plays against the dense chocolate base.
- Flavor Balance: Most Halloween treats are cloyingly sweet. These have depth — the cocoa provides bitterness, the white chocolate adds sweetness, and the result is sophisticated enough for adults while still feeling like a treat.
- Make-Ahead Magic: These actually taste better the next day, which means you can prep them before your party and spend Halloween enjoying yourself instead of being stuck in the kitchen.
- Instagram Gold: The black and white color scheme photographs beautifully, especially against autumn decorations. Your social media will explode with likes.
- Kid-Friendly Assembly: Despite looking complex, the web creation is so fun that kids can help. It's like edible art class.
- Scale Factor: This recipe doubles or triples perfectly for classroom parties or office gatherings. I've made them for events with 200 people — same great results.
Alright, let's break down exactly what goes into this masterpiece...
Inside the Ingredient List
The Chocolate Foundation
Butter is the backbone here, and we're using unsalted specifically so we can control the salt level. Salted butter varies wildly between brands, and you want consistency. The butter needs to be properly softened — not melted, not cold — because creaming it with sugar creates those air pockets that give brownies their structure. Skip this step and you'll end up with chocolate-flavored cardboard. I've made that mistake so you don't have to.
Granulated sugar isn't just for sweetness — it's hygroscopic, meaning it attracts moisture and keeps these brownies fudgy for days. Don't even think about reducing the amount or substituting with honey or maple syrup. Those liquid sweeteners will throw off the entire chemistry, creating a sad, soggy mess. The sugar also contributes to that shiny, crackly top that makes people think you're a baking genius.
Unsweetened cocoa powder is where the real chocolate flavor lives. Don't reach for Dutch-processed here — we want the natural acidity to react with the other ingredients. The brand matters more than you'd think. I've tested grocery store cocoa against premium versions, and the difference is like comparing instant coffee to espresso. The good stuff gives you that deep, complex chocolate that makes people close their eyes when they take a bite.
The Structure Builders
Large eggs are crucial — not extra large, not medium. Eggs are the glue holding everything together, and using the wrong size will throw off the ratio. They also add richness and help create that perfect fudgy texture. Let them come to room temperature before mixing; cold eggs can cause the butter to seize up, creating little lumps that never fully incorporate. Trust me, I've rushed this step and ended up with brownies that look like they have cottage cheese mixed in.
All-purpose flour provides just enough structure to keep these from turning into chocolate soup. We're using less than most brownie recipes because we want that dense, fudgy texture. Over-measuring flour is the number one reason people end up with cakey brownies. Spoon it into the cup and level it off — don't scoop directly or you'll pack in 30% more flour than needed. This isn't the time for whole wheat or gluten-free alternatives; they change the texture completely.
The Decorative Elements
White chocolate chips are your artistic medium for creating that stunning spider web. Real white chocolate contains cocoa butter, which melts smoothly and sets with a beautiful sheen. Those cheap "white chips" made with palm oil? They'll work in a pinch, but they seize up faster and don't have the same creamy flavor. If you're feeling fancy, chop up a high-quality white chocolate bar instead — the melting is more even and the flavor is noticeably better.
Black gel food coloring transforms your white chocolate into the perfect spider web color. Gel works better than liquid because it won't change the chocolate's consistency. Start with a tiny amount — you can always add more, but you can't take it away. I once got impatient and squeezed in too much, ending up with gray chocolate that looked like dishwater. Not the spooky aesthetic we're going for.
The Final Flourish
Vanilla extract might seem optional, but it's the difference between good brownies and unforgettable ones. It enhances the chocolate flavor without being detectable on its own. Use real vanilla, not the imitation stuff — the flavor is more complex and doesn't have that artificial aftertaste. Just a teaspoon transforms the entire batch.
Everything's prepped? Good. Let's get into the real action...
The Method — Step by Step
- Preheat your oven to 350°F and line an 8x8 pan with parchment paper, leaving overhang on two sides. This isn't just for easy removal — the parchment prevents the edges from over-browning while the center stays fudgy. Spray the parchment with non-stick spray, especially in the corners where brownies love to stick. I've lost too many corner pieces to skimp on this step. The overhang creates little handles that let you lift the entire block out cleanly for perfect cutting later.
- Melt the butter in a medium saucepan over medium heat until it's just melted and starting to bubble slightly around the edges. Remove from heat immediately — we're not browning it here, just getting it liquid. Let it cool for exactly 3 minutes. Too hot and it'll cook the eggs when we add them later. Too cool and it won't mix properly with the sugar. This timing creates the perfect temperature for the next step where the magic really happens.
- Whisk in the sugar and cocoa powder until the mixture looks like glossy chocolate frosting. This step is crucial — keep whisking for a full minute to dissolve the sugar partially. You'll know it's ready when the mixture becomes thick and shiny, pulling away from the sides of the pan. This creates the foundation for that perfect crinkly top. I once rushed this step and ended up with sugar crystals in the finished brownies — not the texture we're after.
- Beat in the eggs one at a time, whisking vigorously after each addition. The batter should become lighter in color and slightly thicker. This is where you're creating structure — the eggs are binding everything together. If you add them too quickly, the batter can curdle. Take your time here. The mixture should look like thick, glossy chocolate pudding when you're done.
- Stir in the vanilla extract, then sprinkle the flour and salt over the top. Use a rubber spatula to fold everything together with just 15-20 strokes. Over-mixing develops gluten and gives you cakey brownies. The batter should still have a few streaks of flour when you stop — they'll disappear as it bakes. This restraint is what separates good bakers from great ones.
- Pour the batter into your prepared pan and smooth the top with your spatula. Drop the pan on the counter from about 3 inches up — do this 3-4 times. This releases any large air bubbles that would create holes in your finished brownies. The top should look shiny and smooth, with no visible air pockets. This step seems silly but makes a huge difference in the final appearance.
- Bake for exactly 22-25 minutes. The edges should look set and slightly puffed, while the center still looks slightly underdone. A toothpick inserted in the center should come out with a few moist crumbs, not wet batter. This is the moment of truth — overbake by even 2 minutes and you'll lose that fudgy center. Set a timer and don't walk away in the last few minutes.
- Cool the brownies completely in the pan on a wire rack. I know it's torture, but cutting warm brownies creates a mess. The cooling process allows them to set properly. While they're cooling, it's time to create the spider web magic that'll make everyone think you're a pastry genius.
- Melt the white chocolate chips in the microwave in 30-second bursts, stirring between each burst. It should take about 90 seconds total. Add black gel food coloring a tiny drop at a time, stirring until you get a deep black color. Let it sit for exactly 90 seconds — this is crucial for the right consistency for piping.
- Transfer the black chocolate to a piping bag or zip-top bag with the corner snipped off. Pipe concentric circles on the cooled brownies, starting from the center. Use a toothpick to drag lines from the center outward, creating the web pattern. Wipe the toothpick between each drag for clean lines. The contrast should be stark and dramatic.
- Let the chocolate set for 30 minutes, then use the parchment paper overhang to lift the brownies out of the pan. Cut into squares with a sharp knife, wiping between cuts for clean edges. Serve on a black plate for maximum drama, or package them up for a Halloween party that people will talk about for years.
That's it — you did it. But hold on, I've got a few more tricks that'll take this to another level...
Insider Tricks for Flawless Results
The Temperature Rule Nobody Follows
Room temperature ingredients aren't just a suggestion — they're the difference between brownies that look like they came from a bakery versus ones that scream "homemade by someone who skipped chemistry class." Cold eggs won't incorporate properly, leading to streaky batter and uneven texture. Cold butter won't cream with the sugar, leaving you with greasy spots. Take everything out of the fridge 30 minutes before you start. I know patience isn't fun, but neither are brownies with the texture of rubber.
Why Your Nose Knows Best
Here's a secret pro bakers never share: your nose is more accurate than any timer. When these brownies are perfectly baked, your kitchen will smell like the world's best chocolate shop had a baby with a vanilla bean farm. If you smell something sharp or burnt, you've gone too far. The aroma should be deep, rich, and make you want to face-plant into the oven. This sensory checkpoint has saved me from overbaked disasters more times than I can count.
The 5-Minute Rest That Changes Everything
After you take the brownies out of the oven, let them sit undisturbed for exactly 5 minutes. During this time, they're finishing the baking process with residual heat. Cut too early and you'll have chocolate lava that oozes everywhere. Wait too long and they become difficult to remove from the pan. This sweet spot timing is what gives you those perfect, clean edges that make people think you're some kind of dessert wizard. I've tested every timing possible, and 5 minutes is the magic number.
The Pan Size Reality Check
An 8x8 pan creates the perfect thickness for fudgy brownies. Go bigger and they become thin and overcooked at the edges before the center sets. Go smaller and you end up with chocolate bricks that could double as doorstops. If you only have a 9x9 pan, reduce the baking time by 3 minutes and check early. Metal pans conduct heat differently than glass, so if you're using glass, add 2 minutes to the baking time. These tiny adjustments are what separate good bakers from legendary ones.
The Storage Secret That Doubles Shelf Life
Here's what nobody tells you: brownies continue to develop flavor for 24 hours after baking. The chocolate flavors meld and deepen, creating complexity that fresh brownies can't match. Store them in an airtight container with a small piece of bread — the bread prevents them from drying out by providing moisture. Replace the bread every other day. This trick keeps them fudgy for up to a week, though honestly, they've never lasted more than 48 hours in my house.
Creative Twists and Variations
This recipe is a playground. Here are some of my favorite ways to switch things up:
Orange Creamsicle Spider Webs
Swap the white chocolate for orange-colored white chocolate and add a teaspoon of orange extract. The result tastes like those Halloween creamsicle candies from childhood, but sophisticated. The orange web against the dark chocolate creates a stunning Halloween color scheme that photographs beautifully. Kids go absolutely bonkers for these, and adults get that nostalgic hit of orange-chocolate combination that reminds them of trick-or-treating.
Salted Caramel Swirl Brownies
Before adding the web, drizzle homemade or store-bought caramel over the cooled brownies. Use a toothpick to create random swirls, then add the spider web on top. The sweet-salty combination elevates these from party dessert to dinner party worthy. The caramel adds pockets of gooey richness that play against the dense chocolate. Sprinkle with flaky sea salt before serving for that gourmet touch that makes people close their eyes in pleasure.
Mint Chocolate Web Brownies
Add 1/2 teaspoon of peppermint extract to the brownie batter and use white chocolate tinted green instead of black for the web. The mint-chocolate combination is surprisingly refreshing and perfect for Halloween. The green web looks like something from a witch's cauldron, adding to the spooky aesthetic. These are especially popular with adults who appreciate the sophisticated flavor pairing.
Triple Chocolate Threat
Fold 1/2 cup of dark chocolate chunks into the batter before baking. After creating the web, sprinkle with mini chocolate chips for extra texture. Three types of chocolate create such depth of flavor that chocolate lovers will propose marriage. The different chocolates melt at different temperatures, creating pockets of molten chocolate throughout. It's overkill in the best possible way.
Spiced Mexican Chocolate Version
Add 1/2 teaspoon of cinnamon and a pinch of cayenne to the batter. The subtle warmth pairs perfectly with the rich chocolate, and the spice notes become more pronounced as the brownies cool. The spider web takes on an almost lacy appearance against the slightly darker spiced batter. These have a mysterious quality that makes people ask for the recipe before they've even finished chewing.
Nutella Web Brownies
Replace 1/4 cup of the butter with Nutella for an extra hazelnut-chocolate punch. The Nutella adds richness and that unmistakable flavor that makes people weak in the knees. Create the web with white chocolate as usual — the contrast is even more dramatic against the darker Nutella-enhanced brownies. Warning: these are so good they might ruin regular brownies for you forever.
Storing and Bringing It Back to Life
Fridge Storage
These brownies actually improve with age — up to a point. Store them in an airtight container in the fridge for up to 5 days. The cold firms them up, making them almost like chocolate truffles. Let them come to room temperature for 15 minutes before serving for the best texture. If they seem dry, microwave individual pieces for 8-10 seconds. The chocolate will bloom slightly in the fridge, creating a pretty matte finish that some people prefer to the shiny fresh-baked look.
Freezer Friendly
These freeze beautifully for up to 3 months. Cut them into squares first, then freeze on a baking sheet. Once solid, transfer to a freezer bag with parchment between layers. Thaw overnight in the fridge, then bring to room temperature. The spider web might crack slightly, but the flavor is unchanged. Pro tip: freeze them unwrapped for 2 hours, then wrap individually. This prevents ice crystals from forming on the surface.
Best Reheating Method
Room temperature is ideal, but if you must reheat, do it gently. Microwave individual pieces for 8-10 seconds maximum — just until the chocolate softens. Overheating melts the web design and creates a greasy texture. For a crowd, place them in a 200°F oven for 5 minutes. Add a small cup of water to create steam and prevent drying. They'll taste almost as good as fresh, and the web will stay intact if you're careful.