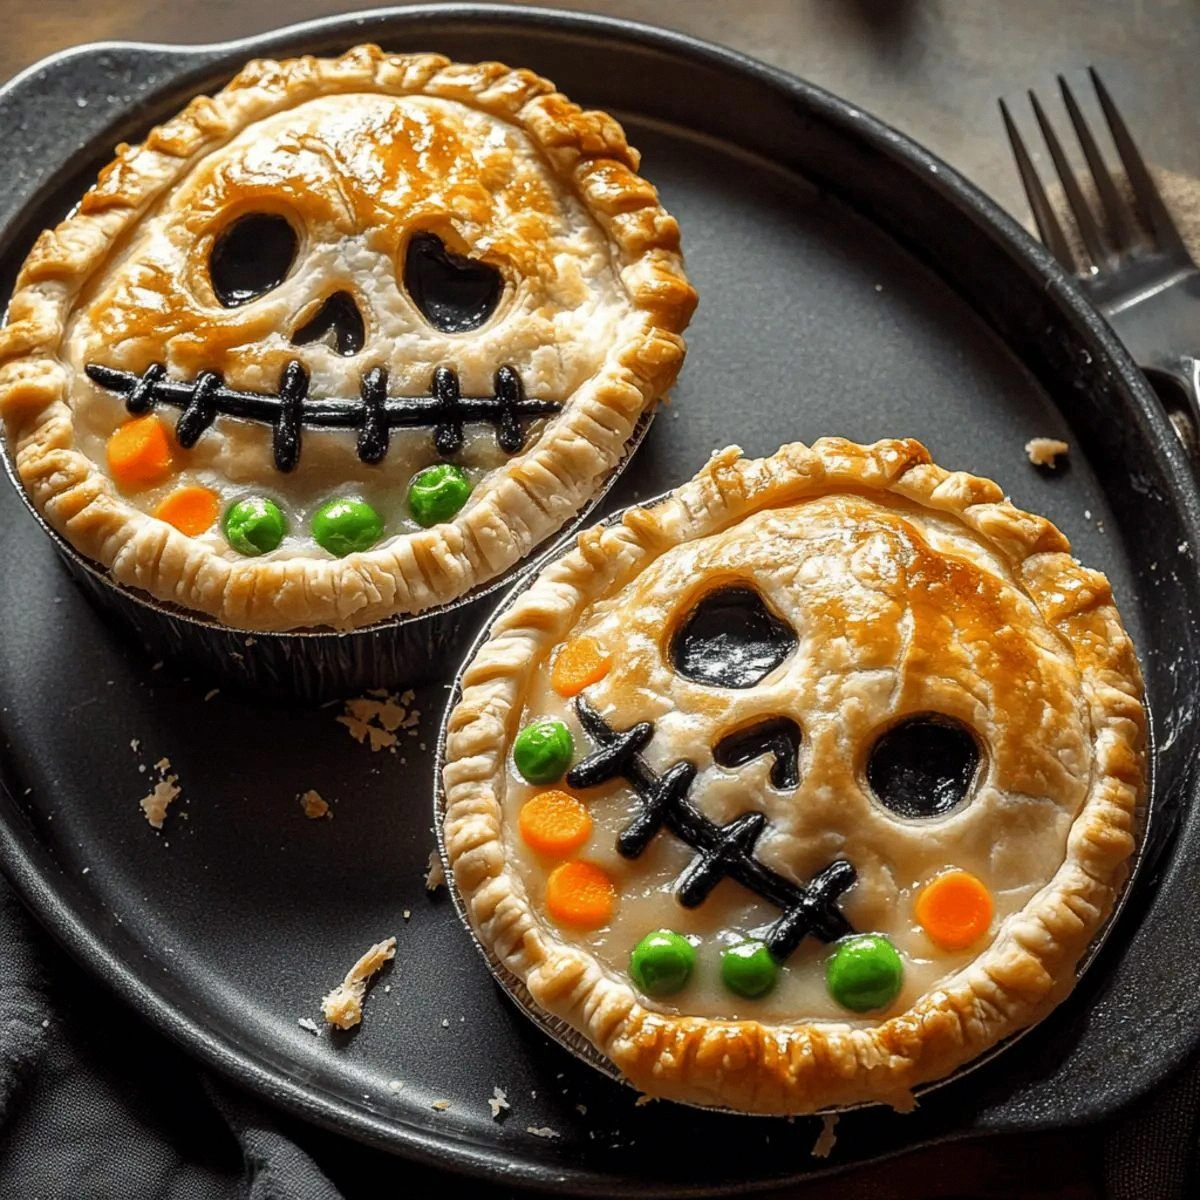
I was in the middle of a Halloween movie marathon when the house went dark, the power flickered, and my roommate shouted, “I dare you to make something that looks like it crawled out of a graveyard but still tastes like a hug!” I stared at the empty pantry, the only thing that seemed to fit the bill was a half‑finished batch of chicken broth and a lonely sheet of puff pastry hiding behind the cereal. The idea struck like a lightning bolt: a pot pie that looks like a zombie’s brain, complete with gooey, buttery crust and a filling that oozes out like undead slime. That night, I turned a kitchen mishap into what I can honestly say is the most thrilling comfort food I’ve ever created.
Picture this: the oven humming like a distant thunderstorm while the aroma of butter and garlic swirls through the air, mingling with the faint scent of roasted chicken. The kitchen lights flicker, casting eerie shadows on the countertops, and the sound of the pastry puffing up is like a low, ominous growl. When you finally pull the pies from the oven, the crust is golden‑brown, speckled with tiny cracks that look like cracked skulls, and the steam rises in ghostly wisps. One bite and you’re hit with a creamy, velvety sauce that coats each morsel of chicken and vegetable like a silk shroud, while the flaky pastry shatters with a satisfying crunch that reminds you of stepping on dry leaves in a graveyard.
Most pot‑pie recipes get the texture wrong—either soggy crust or a filling that’s as thin as a witch’s veil. I’ve cracked the code by using a precise butter‑flour roux, a splash of milk for richness, and a secret splash of chicken broth that makes the sauce sing. The puff pastry sheet, rolled just enough to create those jagged “bone” edges, gives you that perfect buttery snap that most store‑bought crusts can’t compete with. And the best part? The flavor is so deep and comforting that I’ll be honest — I ate half the batch before anyone else got a chance to try it.
There’s a tiny twist that most people overlook: a teaspoon of garlic powder added right into the roux. It’s the silent assassin of flavor, turning a plain sauce into something that whispers “danger” with every spoonful. I dare you to taste this and not go back for seconds, because once you’ve experienced that perfect balance of savory, creamy, and slightly sweet, you’ll never settle for a boring, bland pot pie again. Let me walk you through every single step — by the end, you’ll wonder how you ever made it any other way.
What Makes This Version Stand Out
- Flavor Explosion: The garlic‑infused roux creates a sauce that clings to each bite like a velvet cape, delivering a depth you won’t find in a boxed mix.
- Texture Triumph: Puff pastry delivers a crisp, flaky crust that shatters like thin ice, while the interior stays luxuriously creamy.
- Simplicity: Only 12 ingredients, all pantry‑friendly, and you won’t need any fancy gadgets beyond a skillet and a baking sheet.
- Visual Wow‑Factor: The jagged edges of the pastry mimic zombie bone fragments, making it a centerpiece that’s both spooky and appetizing.
- Crowd Reaction: Guests admit they’re scared to eat it, then they can’t stop themselves—perfect for Halloween parties.
- Ingredient Quality: Using fresh chicken broth and real butter elevates the dish from “just okay” to “hands down the best version you’ll ever make at home.”
- Cooking Method: The two‑stage bake (first for the filling, then for the crust) ensures the pastry never sogs.
- Make‑Ahead Potential: Assemble ahead of time, refrigerate, and bake when the party starts—no stress, just deliciousness.
Inside the Ingredient List
The Flavor Base
Butter is the foundation of any good roux, and in this recipe it’s the silent hero that carries the garlic powder’s aromatic punch. When you melt the butter and whisk in the flour, you’re creating a “golden bridge” that will later hold the chicken broth and milk in perfect harmony. If you skip the butter or use margarine, you’ll lose that buttery depth and the sauce will taste flat, like a ghost without a story. For the best flavor, use unsalted European‑style butter—it has a higher fat content, making the sauce richer and smoother.
The Texture Crew
Shredded chicken brings protein and a hearty bite, while frozen peas and carrots and corn add pops of color and a subtle sweetness that balances the savory broth. The vegetables also release a tiny amount of moisture as they bake, contributing to that luscious sauce consistency. If you substitute fresh veggies, you’ll need to sauté them first to evaporate excess water; otherwise the filling could turn watery. The puff pastry sheet is the crown jewel—its layers create the flaky, buttery crunch that makes each bite unforgettable.
The Unexpected Star
Garlic powder might seem ordinary, but in this recipe it’s the secret weapon that elevates the flavor profile. A single teaspoon infuses the roux with a warm, earthy note that lingers on the palate long after the pie is gone. If you’re a garlic lover, you can double it, but be careful—too much can overpower the delicate chicken broth. For a twist, try smoked garlic powder for a subtle, smoky undertone that pairs perfectly with the “zombie” theme.
The Final Flourish
The egg wash is the finishing touch that gives the pastry a glossy, golden sheen, making the pies look like freshly unearthed relics. Brush lightly; too much egg can cause the crust to darken too quickly, while too little leaves it dull. Salt and pepper “to taste” let you control the seasoning at the end, ensuring every bite is perfectly balanced. If you’re watching sodium, use a pinch of sea salt and freshly cracked black pepper for maximum flavor impact.
Everything's prepped? Good. Let’s get into the real action…
The Method — Step by Step
Start by preheating your oven to 400°F (200°C). While the oven warms, melt the butter in a large skillet over medium heat. As soon as it foams, sprinkle in the flour and whisk continuously for about two minutes until the mixture turns a light amber color. That sizzle when it hits the pan? Absolute perfection.
Kitchen Hack: Use a silicone whisk; it prevents the roux from sticking and makes the whisking motion smoother.Next, slowly pour in the chicken broth while whisking vigorously to avoid lumps. Once the broth is fully incorporated, add the milk, garlic powder, and a pinch of salt and pepper. Keep stirring until the sauce thickens and coats the back of a spoon—think of it as a silky veil that will cling to every morsel.
Watch Out: If the sauce starts to boil too hard, lower the heat immediately; a rapid boil will break the emulsion and make it grainy.Add the shredded chicken, frozen peas and carrots, and corn into the sauce. Stir everything together until the vegetables are evenly distributed and the chicken is fully coated. Let the mixture simmer for three minutes, allowing the flavors to meld. This is the moment of truth—if you can smell the buttery garlic perfume, you’re on the right track.
While the filling simmers, prepare your puff pastry. Lightly flour a clean surface and roll the sheet out to about 1/8‑inch thickness. Use a sharp knife or kitchen scissors to cut the pastry into circles that will fit your ramekins or a large baking dish. For that zombie‑brain look, score the top of each circle with a fork in a random, jagged pattern—these little cuts will puff up into creepy “cracks.”
Now, spoon the hot filling into individual ramekins, leaving about a half‑inch of space at the top. Place a pastry circle over each ramekin, gently pressing the edges down so they seal the filling inside. Brush the tops with a lightly beaten egg; this will give the crust a glossy, golden finish that looks like fresh‑baked bone.
Transfer the filled ramekins onto a baking sheet lined with parchment. Slide the sheet into the preheated oven and bake for 20‑25 minutes, or until the pastry is puffed, golden, and the edges have started to pull away from the ramekin. That visual cue—edges pulling away—means the crust is perfectly crisp.
While the pies bake, keep an eye on the oven’s temperature; if you notice the tops browning too quickly, loosely cover them with foil to prevent burning. This trick saves you from a burnt “zombie skull” and keeps the interior creamy.
When the timer dings, remove the pies and let them rest for five minutes. This short rest lets the filling settle, making each bite less runny and more controlled—perfect for serving on a spooky tabletop.
Finally, serve the pies hot, accompanied by a simple side salad or a drizzle of hot sauce for those who crave an extra kick. Picture yourself pulling this out of the oven, the whole kitchen smelling incredible, the steam rising like ghostly wisps. And now the fun part: watch your guests’ eyes widen as they dig into the “undead” crust and creamy, savory filling.
Insider Tricks for Flawless Results
The Temperature Rule Nobody Follows
Never bake a pot pie at a low temperature hoping for a slow rise. The high heat of 400°F creates steam instantly, puffing the pastry layers into that dramatic, airy texture. I once tried 350°F and ended up with a soggy crust that clung to the filling like a damp grave cloth. Trust the heat; it’s the secret to that “zombie‑brain” puff.
Why Your Nose Knows Best
Your sense of smell is the ultimate timer. When the butter‑flour roux turns a deep amber and you catch that nutty scent, you know it’s ready for the broth. Later, when the pastry starts to emit a buttery, caramelized aroma, that’s your cue that the crust is golden and ready. I’ve seen cooks rely on timers alone and end up with over‑browned tops—listen to your nose, it never lies.
The 5‑Minute Rest That Changes Everything
After the pies leave the oven, give them a solid five‑minute rest. This short pause allows the sauce to thicken further and prevents the filling from spilling out when you cut into it. I once served them straight from the oven and the sauce flooded the plate—total disaster. A brief rest turns a mess into a masterpiece.
Egg Wash Mastery
For that flawless shine, beat the egg with a splash of water (about 1 tablespoon). The water creates a thinner wash that spreads evenly, giving the pastry a glass‑like sheen without clumping. Skip the water and you’ll get a thick, uneven glaze that looks more like dried blood than a polished bone.
The Secret of Cold Butter
When the butter in the roux is cold, it melts slowly, giving the sauce a silkier texture. I once used melted butter straight from the microwave and the sauce ended up grainy. Keep the butter in the fridge until you’re ready to start; the slow melt creates a smoother emulsion that coats the chicken like a velvety cloak.
Don’t Overcrowd the Pan
If you dump all the chicken and veggies into the sauce at once, the temperature drops and the roux can seize. Add the ingredients in two batches, stirring gently, to maintain a steady temperature. A friend tried to shortcut this step once—let’s just say the sauce turned into a lumpy nightmare and the pie was a flop.
Creative Twists and Variations
This recipe is a playground. Here are some of my favorite ways to switch things up:
Spooky Sweet Potato Zombie
Swap half the chicken for mashed sweet potato, add a pinch of cinnamon, and use a slightly sweeter puff pastry. The orange‑gold hue mimics a zombie’s rotting flesh, and the sweet‑savory combo is a hit with kids.
Ghostly Mushroom & Thyme
Replace the chicken with a medley of sautéed wild mushrooms and fresh thyme. The earthy flavor adds depth, and the mushrooms give the filling a “ghostly” texture that’s both meaty and mysterious.
Cheesy Blood‑Red Cheddar
Stir in a cup of shredded sharp cheddar into the sauce for a richer, tangy bite. The cheese melts into the gravy, creating a deep red swirl that looks like fresh blood on a zombie’s brain.
Vegan Graveyard
Use plant‑based shredded “chicken,” coconut milk instead of dairy, and a vegan puff pastry. The flavor profile stays comforting, and the dish becomes inclusive for all your party guests.
Spicy Inferno
Add a chopped jalapeño and a dash of smoked paprika to the filling. The heat cuts through the creamy sauce, giving a fiery kick that’s perfect for those who like their zombies with a bite.
Storing and Bringing It Back to Life
Fridge Storage
Cool the pies completely, then cover each ramekin tightly with plastic wrap. They’ll keep for up to three days in the refrigerator. When you’re ready to reheat, place them on a baking sheet, add a tiny splash of water to the bottom of the ramekin, and bake at 350°F for 15 minutes.
Freezer Friendly
Assemble the pies fully (including the egg‑washed pastry), then flash freeze for 1‑2 hours. Transfer to a zip‑top freezer bag and store for up to two months. To bake from frozen, add an extra 10 minutes to the bake time and watch the pastry puff up beautifully.
Best Reheating Method
For the crispiest crust, reheat in a conventional oven rather than a microwave. Place the pie on a preheated baking sheet at 375°F, cover loosely with foil for the first 5 minutes, then remove the foil to let the top crisp. A splash of water inside the ramekin creates steam, reviving the sauce’s silkiness.