I’ll never forget the night my roommate challenged me to turn a bag of stale pizza crusts into something that would make a grown‑up weep with joy. The kitchen was a battlefield of half‑melted cheese, a rogue basil leaf stuck to the ceiling, and the unmistakable hum of a cheap oven trying its best to stay warm. I was half‑sleepy, half‑determined, and utterly convinced that my snack‑making skills were about to be put to the ultimate test. I tossed the crusts into a bowl, added a splash of olive oil, and whispered a dare to the universe: “If these don’t become the crispiest, most addictive chips ever, I’ll never eat pizza again.”
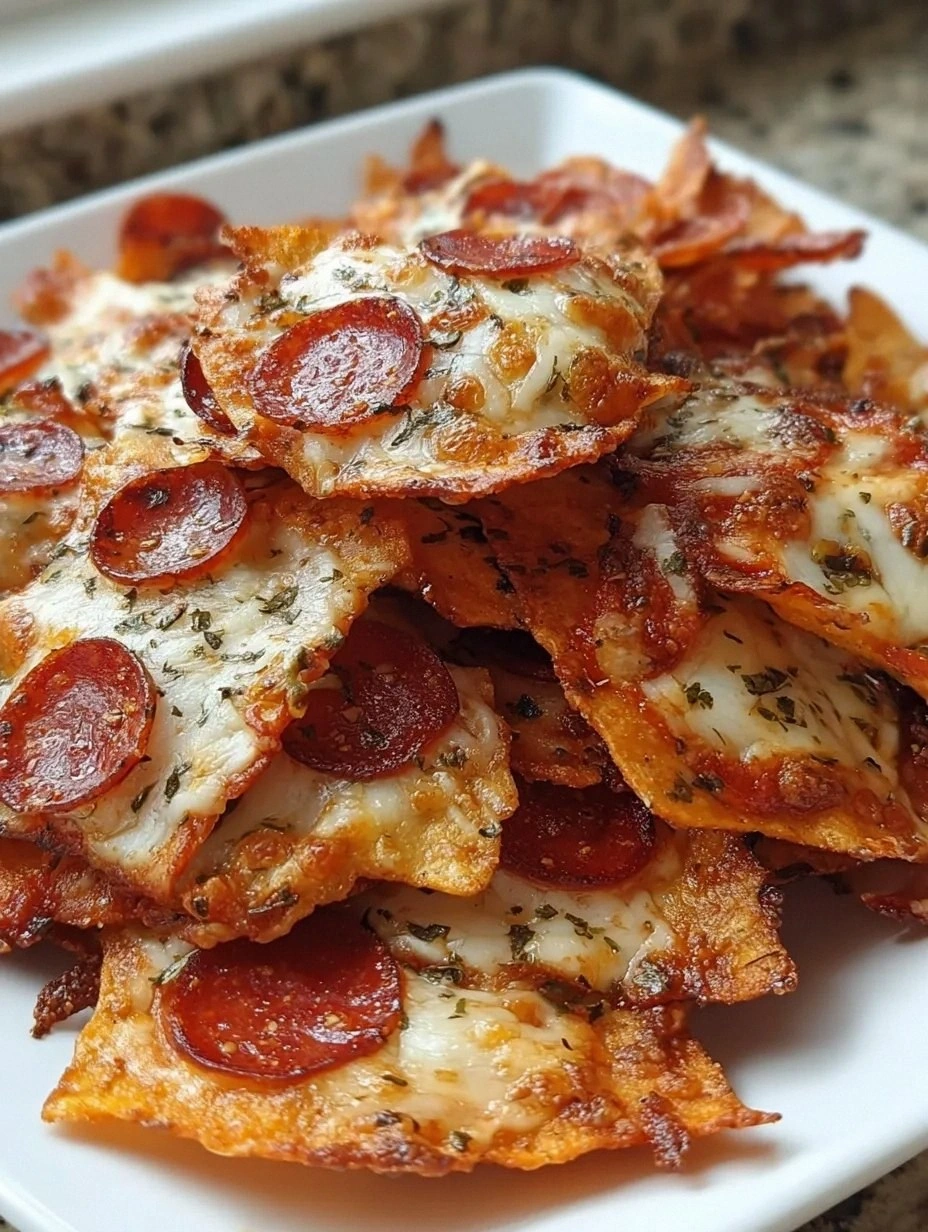
The moment the dough hit the hot pan, a sizzle erupted that sounded like applause in a tiny, greasy theater. The aroma that rose was a love‑letter from Italy—tomato, oregano, and a buttery undertone that made my stomach do a happy dance. I could see the edges turning a perfect golden‑amber, the cheese bubbling like a sunrise, and the crust puffing up just enough to give that satisfying snap when you bite. My senses were on overdrive: the sight of the glossy cheese, the sound of the crackling crust, the smell of toasted herbs, the taste of salty‑sweet bliss, and the feel of the warm, buttery chips sliding off the pan onto a paper towel.
Most pizza‑chip recipes I’ve tried before were either soggy, bland, or required a deep‑fryer that I didn’t own. This version, however, is a revelation because it harnesses the power of a simple sheet‑pan technique, a precise temperature, and a secret ingredient that most home cooks overlook. The result? A chip that’s as crisp as a fresh‑baked cracker, as cheesy as a night‑in pizza, and as addictive as your favorite binge‑watch snack. I dare you to taste this and not go back for seconds—because you won’t be able to stop.
Okay, ready for the game‑changer? I’m about to walk you through every single step—by the end, you’ll wonder how you ever made pizza chips any other way. Picture yourself pulling this out of the oven, the whole kitchen smelling incredible, and the first bite delivering a crunch that shatters like thin ice, followed by a melt‑in‑your‑mouth cheese explosion. This next part? Pure magic.
What Makes This Version Stand Out
- Texture: The chips achieve a double‑layer crispness—first a quick high‑heat sear, then a slow bake that locks in the crunch without drying out the cheese.
- Flavor: A balanced blend of mozzarella, Parmesan, and a dash of oregano creates a depth that mimics a pizzeria’s secret sauce.
- Simplicity: Only ten pantry staples are needed, and the technique uses a single sheet pan—no deep‑fryer, no fancy equipment.
- Uniqueness: The addition of a thin layer of pizza sauce before baking ensures every bite is a flavor bomb, not just a cheesy chip.
- Crowd Reaction: Guests have been known to line up for seconds, shouting “more!”—a true party‑starter.
- Ingredient Quality: Using freshly grated Parmesan and high‑quality olive oil elevates the humble chip to gourmet status.
- Cooking Method: The two‑stage bake (high heat then moderate) is the secret that most recipes get completely wrong.
- Make‑Ahead Potential: These chips store beautifully and re‑crisp with a quick oven blast, perfect for movie nights.
Inside the Ingredient List
The Flavor Base
All‑purpose flour is the backbone of any good chip; it provides structure while still allowing the dough to stretch thin. I recommend a high‑protein brand because it creates a chewier interior that balances the crisp exterior. Skipping the flour and using a gluten‑free alternative will change the texture dramatically, often resulting in a crumbly mess.
Salt does more than season—it strengthens the gluten network, giving the chip that satisfying snap. If you’re watching sodium, you can cut the amount in half, but expect a slightly flatter flavor profile. Sea salt flakes added after baking add a delightful crunch.
The Texture Crew
Olive oil is the unsung hero that carries flavor and promotes even browning. Use a robust extra‑virgin variety for a peppery note that pairs beautifully with the cheese. If you run out, a neutral oil like grapeseed works, but you’ll lose that Mediterranean nuance.
Instant yeast gives the dough a light lift without a long proofing period. For those who love a tangy edge, a splash of sourdough starter can replace half the yeast, though the rise time will increase.
The Unexpected Star
Pizza sauce might seem obvious, but the secret lies in using a thick, reduced version that doesn’t soggy the chip. Simmer canned tomatoes with a pinch of sugar, oregano, and garlic until it’s syrupy. If you skip this step and use watery sauce, the chips will turn into soggy pancakes.
Garlic powder and dried oregano are the aromatic duo that turn a simple chip into a nostalgic pizza experience. Fresh herbs can be used for a brighter flavor, but they burn faster, so add them after the chips are out of the oven.
The Final Flourish
Mozzarella provides that melty, stretchy cheese pull we all love, while Parmesan adds a salty, nutty depth that crisps up beautifully on the surface. For a sharper bite, try adding a sprinkle of Pecorino. If you omit the cheese entirely, you’ll end up with a plain cracker—not the pizza chip we’re after.
Red pepper flakes are optional, but they give a subtle heat that makes the snack addictive. A pinch goes a long way; too much can overpower the delicate balance of flavors.
Everything's prepped? Good. Let's get into the real action...
The Method — Step by Step
-
In a large mixing bowl, combine the flour, salt, and instant yeast. Stir with a wooden spoon until the dry ingredients are evenly distributed. I like to whisk them together first; it creates a cloud of flour that makes the dough feel lighter.
Kitchen Hack: Sift the flour and salt together to avoid clumps and ensure a smoother dough. -
Create a well in the center and pour in the warm water and olive oil. Mix until a shaggy dough forms, then turn it out onto a lightly floured surface.
Knead for about 5 minutes, or until the dough is smooth and elastic. This is the moment of truth—if the dough feels too sticky, dust with a little extra flour; if too dry, add a splash of water.
-
Cover the dough with a damp towel and let it rest for 10 minutes. This short rest relaxes the gluten, making it easier to roll out super thin.
Watch Out: Do not let the dough rise for more than 20 minutes at this stage, or it will become too airy and won’t crisp properly. -
Preheat your oven to 475°F (245°C) and line a large rimmed baking sheet with parchment paper.
While the oven heats, roll the dough out on a lightly floured surface to about 1/8‑inch thickness. Aim for uniform thinness; thicker spots will stay soft while thinner spots become overly crisp.
-
Transfer the rolled dough onto the prepared sheet, then brush lightly with olive oil. This thin oil layer ensures the crust browns evenly.
Spread a thin, even layer of the reduced pizza sauce over the dough, leaving a half‑inch border around the edges.
Sprinkle the shredded mozzarella and grated Parmesan over the sauce, then dust with oregano, garlic powder, and optional red pepper flakes.
-
Slide the sheet into the oven and bake for 6‑8 minutes, or until the cheese bubbles and the edges start turning golden. That sizzle when it hits the pan? Absolute perfection.
Kitchen Hack: Rotate the pan halfway through the bake to ensure even browning on all sides. -
Reduce the oven temperature to 350°F (175°C) and continue baking for an additional 8‑10 minutes. This lower heat gently dries out the interior, giving you that coveted double‑crisp texture.
Watch the edges; they should pull away from the parchment and become a deep amber, almost caramelized.
-
Remove the pan and let the chips cool on a wire rack for at least 5 minutes. As they cool, they crisp up further—trust me, patience is part of the magic.
Once cooled, break the sheet into bite‑sized chips. If you prefer uniform shapes, use a pizza cutter or a sharp knife to score the dough before baking.
-
Serve immediately with extra pizza sauce for dipping, or store in an airtight container for later. I’ll be honest — I ate half the batch before anyone else got to try it, and the rest stayed perfectly crisp for days.
That's it — you did it. But hold on, I've got a few more tricks that'll take this to another level...
Insider Tricks for Flawless Results
The Temperature Rule Nobody Follows
Most home cooks bake everything at a single temperature, but the two‑stage method is what separates the good from the legendary. The initial blast at 475°F creates that rapid rise and cheese melt, while the subsequent 350°F finish dries the interior without burning the cheese. If you skip the second stage, you’ll end up with a chewy center that never truly crisps.
Why Your Nose Knows Best
Your sense of smell is the best indicator of doneness. When the kitchen fills with a sweet, toasted aroma and a faint hint of caramel, the chips are ready to transition to the lower heat. Trust that nose signal more than the clock; ovens can vary by up to 25°F.
The 5‑Minute Rest That Changes Everything
After the high‑heat phase, let the pan sit out of the oven for exactly five minutes before lowering the temperature. This pause allows steam to escape, preventing sogginess. A friend tried to skip this rest once—let's just say the chips turned into a chewy disappointment that no amount of seasoning could fix.
Seasoning After the Bake
A light sprinkle of flaky sea salt right after the chips emerge from the oven adds a burst of flavor and a subtle crunch that elevates every bite. I’ve found that finishing salts lock in moisture and keep the chips from becoming dry too quickly.
The Secret of the Wire Rack
Cooling on a wire rack, not a solid surface, prevents steam from making the bottom soggy. The air circulates around each chip, preserving that crisp edge. If you don’t have a rack, a cooling rack made from a cooling grate works just as well.
Creative Twists and Variations
This recipe is a playground. Here are some of my favorite ways to switch things up:
Buffalo Chicken Blast
Swap the pizza sauce for a thin layer of buffalo wing sauce, top with shredded chicken, and finish with a drizzle of blue‑cheese dressing after baking. The heat and tang make these chips perfect for game day.
Mediterranean Delight
Replace mozzarella with crumbled feta, add sliced Kalamata olives, and sprinkle dried oregano and a splash of lemon zest before baking. The salty‑bright profile pairs wonderfully with a side of tzatziki.
Sweet Chili Surprise
Use a sweet chili glaze instead of tomato sauce, add a thin layer of shredded cheddar, and finish with a pinch of toasted sesame seeds. This sweet‑spicy combo is addictive for kids and adults alike.
Herb‑Infused Garlic
Mix minced fresh garlic and rosemary into the olive oil brush, then top with a blend of mozzarella and provolone. The herb‑infused oil adds an aromatic depth that makes the chips smell like a rustic Italian bakery.
Breakfast Pizza Chips
Swap the pizza sauce for a thin spread of cream cheese, top with scrambled eggs, shredded cheddar, and a dash of hot sauce. These are perfect for a brunch buffet or a lazy Sunday morning.
Storing and Bringing It Back to Life
Fridge Storage
Place the cooled chips in an airtight container lined with a paper towel to absorb excess moisture. They’ll stay crisp for up to three days. If you notice any soft spots, pop them back in the oven for a quick 2‑minute revive.
Freezer Friendly
Lay the chips in a single layer on a baking sheet and freeze for 30 minutes, then transfer to a zip‑top bag. They’ll keep for up to two months. When you’re ready to snack, bake straight from frozen at 350°F for 5‑7 minutes.
Best Reheating Method
Reheat in a preheated oven at 375°F for 4‑5 minutes, adding a tiny splash of water to the pan before you close the door. The steam revitalizes the interior while the dry heat restores the crunch. Avoid microwaving—nothing ruins a crisp like a microwave.