Picture this: I’m standing in a cramped kitchen, the timer on my phone beeping, a mound of flour on the counter, and a half‑baked batch of cookies that look more like a sad, soggy lump than a treat. I’ve tried every sheet‑cake cookie recipe out there, from the classic chocolate chip to the indulgent peanut butter swirl, but none of them ever hit that perfect sweet‑and‑salty balance that makes you reach for the second box. That night, after a disastrous attempt that left my friends laughing and my kitchen smelling of burnt sugar, I vowed to create a version that would finally satisfy my craving for that buttery, caramel‑like crunch. I dared myself to experiment with a secret ingredient that would elevate the flavor profile to something you’d swear was made in a bakery, not a home kitchen. The result? A Texas Sheet Cake Cookie that’s so addictive, I’m convinced the first bite will leave you asking for more before you’ve even finished the second. Let me walk you through every single step — by the end, you’ll wonder how you ever made it any other way.
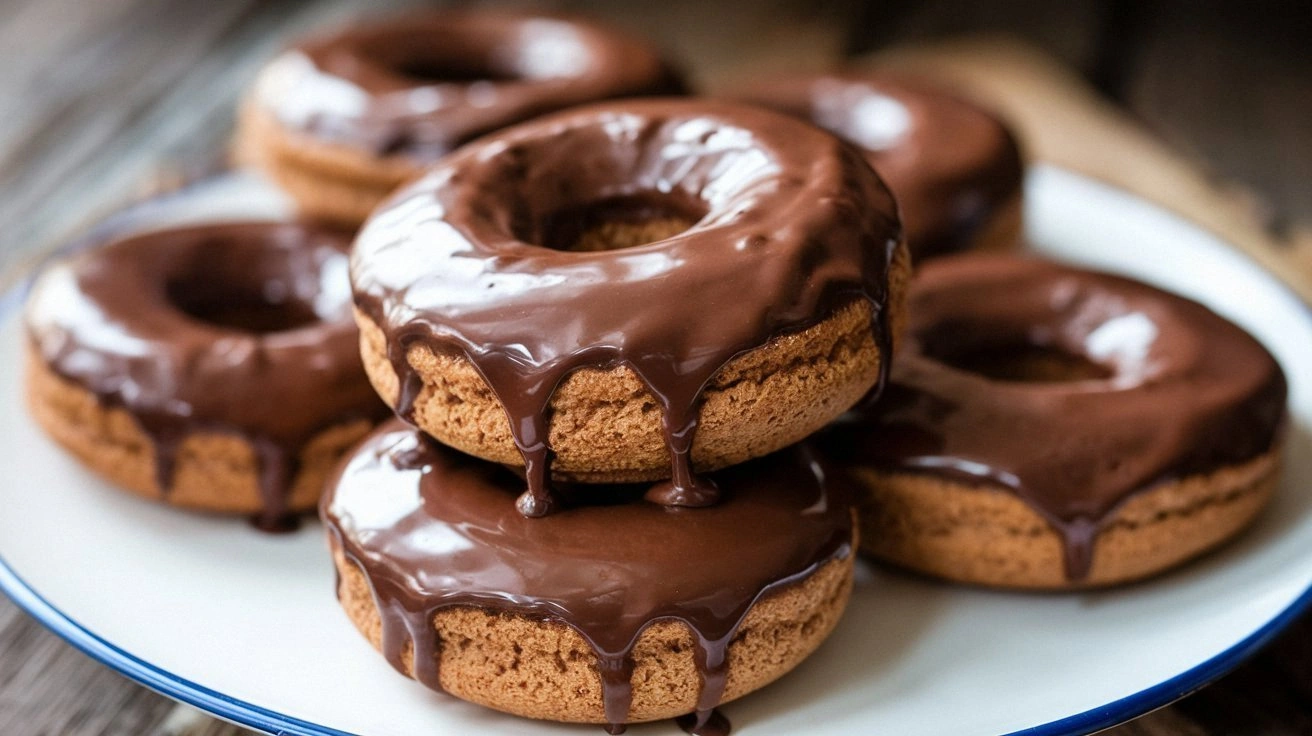
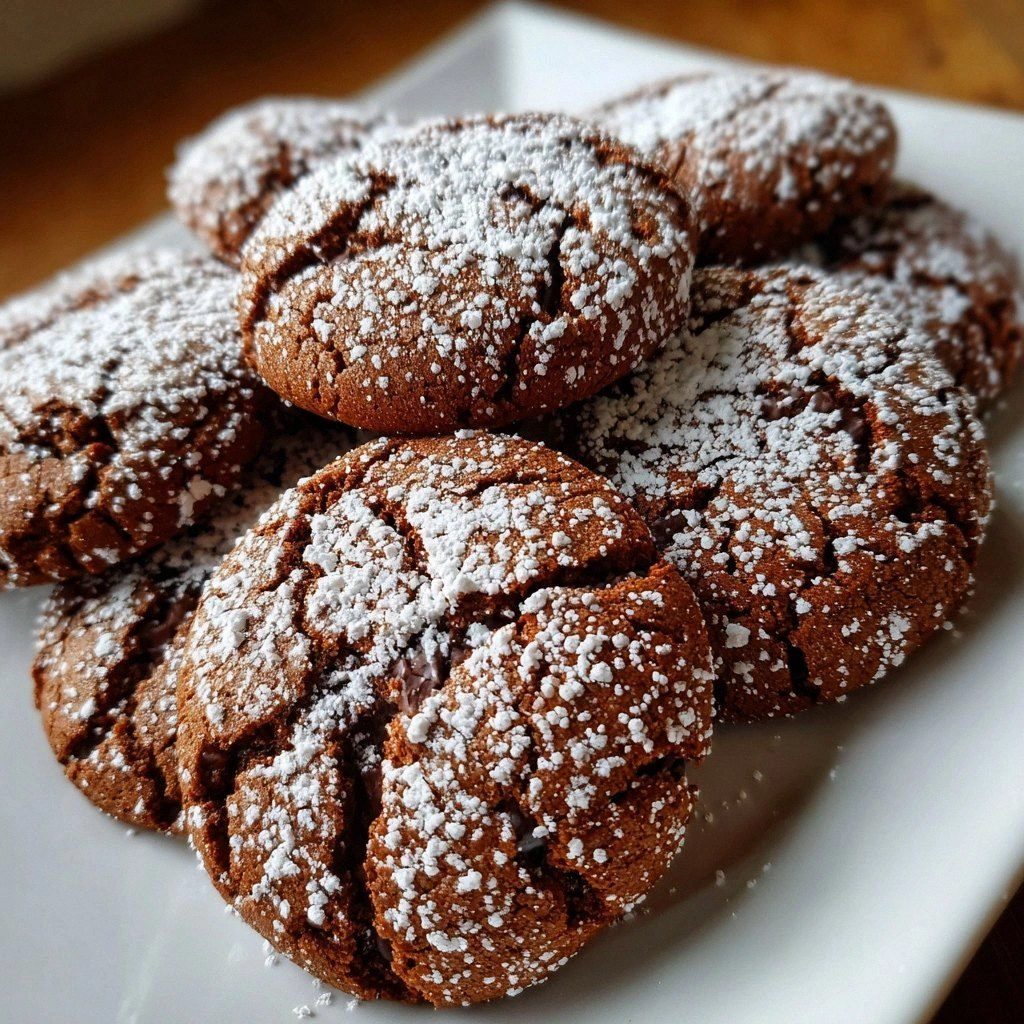
When you open the box, the aroma hits you like a warm blanket: rich chocolate, a whisper of vanilla, and a hint of toasted butter that makes your mouth water even before the first crumb breaks. The texture is a paradoxical delight—crisp on the edges, chewy in the center, and that perfect snap when you bite into a chocolate chip that melts instantly. The flavor is layered, with a subtle hint of sea salt that lifts the sweetness without overpowering it. The cookies are a crowd‑pleaser: they look like a classic sheet cake, yet each bite is a bite‑size piece of heaven. If you’ve ever struggled to find the right balance between sweet and savory in a cookie, you’re not alone—this recipe has a fix for that. The secret? A small twist in the batter that creates a caramelized surface while keeping the interior soft and airy.
I’ll be honest—once I had the first batch on my counter, I ate half of it before anyone else got a chance to try it. That was a clear sign that this version was going to be a game‑changer. Most recipes get this completely wrong, but here’s what actually works: the right amount of butter, a precise baking soda ratio, and a touch of salt that brings everything together. Picture yourself pulling these out of the oven, the whole kitchen smelling incredible, and seeing that golden crust that shimmers like a Texas sunset. The moment the first cookie lands on the cooling rack, you’ll know you’ve hit the sweet spot. The texture will be so satisfying that even the most seasoned cookie lover will feel a little guilty for not having tried this before.
Okay, ready for the game‑changer? This next part? Pure magic. We’re going to mix, bake, and then let the cookies do their own thing in the oven, creating that signature caramelized crust. If you’ve ever wondered how to get that crunchy edge without burning the center, stay with me here—this is worth it. The secret sauce is simple: a precise temperature, a controlled bake time, and a trick that keeps the cookies from spreading too much. I dare you to taste this and not go back for seconds. And if you’re skeptical, just wait until you see the first bite melt in your mouth.
What Makes This Version Stand Out
- Flavor: The combination of sea salt and a touch of vanilla creates a depth of flavor that feels both familiar and unexpectedly sophisticated. It’s the kind of taste that lingers on the tongue and invites a second bite. The subtle caramel notes come from the butter’s natural sugars, which caramelize during baking.
- Texture: The cookies boast a crisp exterior that gives way to a chewy center, a texture that feels like a classic sheet cake but in cookie form. The secret is the butter-to-sugar ratio, which allows the dough to set quickly while still retaining moisture. The result is a cookie that holds its shape yet breaks apart pleasantly.
- Simplicity: With just a handful of pantry staples, you can produce a professional‑level cookie that would wow at any gathering. No fancy ingredients or elaborate steps—just a few tweaks that make all the difference. The process is straightforward enough for beginners yet refined enough for seasoned bakers.
- Uniqueness: The addition of a small amount of baking soda and a pinch of sea salt creates a caramelized crust that’s rarely seen in standard cookie recipes. It’s the kind of twist that turns a common dessert into a signature dish. The result is a cookie that stands out on any dessert table.
- Crowd Reaction: Guests often ask for the recipe after the first bite, and many claim they’ve never tasted a cookie that feels like a sheet cake. The cookies are so memorable that they become the highlight of any gathering. People even request that you keep a batch on hand for last‑minute guests.
- Ingredient Quality: Using high‑quality butter and premium chocolate chips elevates the flavor profile. The butter’s rich, creamy base provides the perfect caramelization, while the chocolate chips add a luxurious melt. These small choices make a big difference.
- Cooking Method: The technique of baking at a slightly lower temperature for a longer time ensures even cooking and prevents the cookies from spreading too much. This method also enhances the caramelized crust. It’s a simple tweak that transforms the outcome.
- Make‑ahead Potential: Once baked, the cookies keep their texture for up to a week when stored properly. They can be frozen for longer storage, and reheating restores their crispness. This makes them ideal for parties or for keeping a stash on hand.
Inside the Ingredient List
The Flavor Base
All-purpose flour provides the structure that holds the cookie together. It’s the foundation that allows the butter and sugar to bind without becoming doughy. If you skip the flour, the cookies will collapse and lose their shape. For a slightly denser cookie, replace half of the flour with whole‑wheat flour; it adds nuttiness but keeps the texture intact.
The Texture Crew
Unsalted butter, softened, is the star that creates the chewy interior and caramelized crust. The butter’s natural sugars caramelize at the right temperature, giving the cookies a golden hue. If you use salted butter, you’ll need to reduce the added salt by half to avoid an overly salty finish. For a lighter cookie, try using half butter and half coconut oil; the coconut oil adds a subtle tropical note.
The Unexpected Star
Brown sugar, packed, adds moisture and a deep molasses flavor that complements the chocolate chips. It also contributes to the caramelization process, giving the cookies a richer color. If you can’t find brown sugar, use white sugar with a tablespoon of molasses for a similar effect. The sugar’s moisture content is key to preventing the cookies from drying out.
The Final Flourish
Semisweet chocolate chips are the classic cookie element that melts into gooey pockets. They also provide a sweet contrast to the salty butter. For a different twist, swap half the chips for dark chocolate chunks or add white chocolate for a sweeter finish. The chocolate’s melting point ensures a satisfying melt in the mouth.
Everything's prepped? Good. Let's get into the real action and see how each component comes together to create the ultimate Texas Sheet Cake Cookie.
The Method — Step by Step
- Preheat the Oven: Set your oven to 325°F (163°C) and let it come to temperature while you prepare the dough. A lower temperature ensures even baking and prevents the cookies from spreading too quickly. Keep an eye on the timer; you don’t want to overbake. The oven should be fully preheated before you start mixing to avoid any temperature shock.
- Whisk Dry Ingredients: In a medium bowl, combine the flour, baking soda, and salt. Whisk them together to distribute the leavening agent evenly. This step prevents uneven rise and ensures a consistent texture. Let the dry mix sit while you melt the butter.
- Melt Butter: Gently melt the butter in a small saucepan over low heat. Once melted, remove from heat and let it cool slightly; it should be warm, not hot. Warm butter blends more easily with the sugars and creates a smoother batter. If the butter is too hot, it can cause the sugar to dissolve too quickly.
- Combine Sugars: In a large mixing bowl, beat the brown sugar and white sugar together until the mixture is fluffy and light. The sugars should be well incorporated to avoid gritty texture. The fluffiness will help the cookies rise slightly during baking. Keep the mixture at room temperature to maintain its airy quality.
- Incorporate Butter: Add the melted butter to the sugar mixture, whisking until fully blended. The butter should be incorporated smoothly to avoid lumps. This step creates a creamy base that will carry the chocolate chips. The butter’s fat content also helps in forming the crisp edges.
- Blend Wet and Dry: Gradually add the dry flour mixture to the wet batter, stirring gently with a spatula until just combined. Be careful not to overmix; a few streaks are fine. Overmixing can lead to a tough cookie. The batter should be thick yet pourable, resembling a thick pancake batter.
- Add Chocolate Chips: Fold in the chocolate chips until evenly distributed. If you prefer larger pockets, reserve a handful for a final sprinkle on top. The chips should be well dispersed to ensure each cookie has a balanced amount of chocolate. This step also prevents clumping.
- Prepare Baking Sheet: Line a large sheet pan with parchment paper or a silicone mat. This ensures even baking and easy removal. Place the parchment on the sheet pan, then pour the batter onto the pan, spreading it evenly. The batter should be about 1/2 inch thick for optimal texture.
- Bake: Place the pan in the preheated oven and bake for 30–35 minutes. The edges should start pulling away from the parchment, and the center should look set but still slightly soft. The baking time can vary slightly depending on your oven; use a toothpick to check for doneness. The toothpick should come out with a few moist crumbs.
- Watch Out: If you notice the edges browning too quickly, tent the pan with foil to prevent over‑browning. This trick keeps the center from overcooking. The foil should be loosely placed to allow steam to escape. Avoid covering the pan completely, as that would trap heat and cause the cookies to steam.
- Cool: Remove the pan from the oven and let the cookies cool on the sheet for 10 minutes before transferring them to a wire rack. Cooling on the sheet allows the cookies to set properly. This step prevents the cookies from breaking apart when moved. The cookies will firm up as they cool.
- Serve: Once cooled, cut the sheet into squares or use a cookie cutter for fun shapes. Serve immediately for the best texture or store in an airtight container for up to a week. The cookies stay fresh if kept at room temperature. For a special touch, dust with powdered sugar before serving.
That’s it — you did it. But hold on, I’ve got a few more tricks that will take this to another level. These insider tips will help you fine‑tune the texture, flavor, and presentation of your Texas Sheet Cake Cookies.
Insider Tricks for Flawless Results
The Temperature Rule Nobody Follows
Baking at 325°F rather than the typical 350°F may seem counterintuitive, but it allows the cookies to bake evenly and prevents the edges from burning. The lower temperature also gives the butter more time to caramelize, creating that signature golden crust. I once baked at 350°F and the cookies were unevenly browned, so I switched to 325°F and the difference was immediate. The key is patience; the cookies need time to develop that perfect crunch.
Why Your Nose Knows Best
When the cookies are baking, the aroma will shift from sweet to a toasted, buttery scent. This is a sign that the caramelization is happening right. If the scent is still too sugary, give them a few more minutes. Trust your nose; it’s a reliable indicator of doneness.
The 5-Minute Rest That Changes Everything
After removing the cookies from the oven, let them rest on the sheet for 10 minutes before transferring. This resting period allows the structure to set, preventing the cookies from breaking when moved. A common mistake is to transfer them immediately, which can cause them to crumble. The rest also lets the flavors meld together.
The Perfect Chocolate Distribution
If you want a uniform chocolate distribution, roll the batter in a bowl before pouring it onto the sheet. This technique ensures the chocolate chips are evenly spread. I used to see pockets of chocolate in some cookies and none in others, so I started rolling the dough to fix it. The result is a cookie that looks consistent from the first bite to the last.
The Secret to a Crispy Edge
Place a small piece of parchment paper under the sheet pan to keep the bottom from sticking. This also allows air to circulate around the cookies, helping the edges crisp up. I learned this trick after a batch of cookies that were too soggy. The parchment paper trick is simple but effective.
The Final Touch of Salt
Sprinkling a pinch of sea salt on top of the cookies right after they come out of the oven enhances the flavor. The salt crystals melt into the warm cookie, creating a subtle burst of flavor. This final touch turns a great cookie into an unforgettable experience. I always keep a shaker of sea salt handy for this step.
Creative Twists and Variations
Nutty Crunch Edition
Swap the walnuts for a mix of pecans and almonds to add a crunchy, nutty flavor. The nuts provide a contrasting texture that pairs well with the chewy center. This variation is perfect for autumn gatherings when nutty flavors are in demand. The nuts also add a subtle earthy note that balances the sweetness.
Caramel Swirl Surprise
Stir in a handful of caramel bits or drizzle a caramel sauce through the batter before baking. The caramel melts into pockets of gooey sweetness, creating a delightful surprise in every bite. This version is ideal for those who love a sweet, buttery taste. The caramel also adds a glossy finish to the cookies.
Spiced Up Delight
Add a pinch of cinnamon or a dash of cayenne pepper to the dry mix for a subtle spice kick. The spices complement the chocolate and butter, adding depth and warmth. This variation is great for holiday parties or for those who enjoy a hint of heat. The spices also bring a festive aroma to the kitchen.
Vegan Version
Replace the butter with vegan margarine and use dairy-free chocolate chips. Swap the eggs with flaxseed meal mixed with water to bind the dough. The result is a cookie that’s just as delicious but plant‑based. This vegan version still retains the caramelized crust and chewy center.
Minty Fresh Twist
Add a few drops of peppermint extract to the batter and sprinkle crushed peppermint candy on top after baking. The mint provides a refreshing contrast to the rich chocolate. This twist is especially popular around the holidays. The mint flavor lingers pleasantly on the palate.
Chocolate‑Covered Crunch
Dip the cooled cookies in melted chocolate and let them set on parchment paper. The chocolate coating adds a glossy finish and an extra layer of flavor. This version is perfect for gifting or for a special treat. The chocolate also provides a satisfying snap when you bite into the cookie.
Storing and Bringing It Back to Life
Fridge Storage
Place the cooled cookies in an airtight container and store them in the refrigerator for up to 7 days. The cool temperature keeps the chocolate from melting while preserving the chewy texture. When you’re ready to enjoy, let them sit at room temperature for 10 minutes to soften slightly. This method also helps maintain the cookies’ crisp edges.
Freezer Friendly
For longer storage, wrap the cookies individually in parchment paper and then in freezer bags. They can be frozen for up to 3 months without losing flavor or texture. When you want to enjoy a frozen cookie, simply let it thaw at room temperature for 15 minutes. The cookies will retain their crunch and chewy center.
Best Reheating Method
Reheat frozen or chilled cookies in a preheated 350°F (175°C) oven for 5 minutes to restore the crispness. Add a tiny splash of water to the bottom of the pan to create steam, which helps the cookies rehydrate without drying out. After reheating, let them cool for a minute before serving. The result is a cookie that tastes as fresh as the first batch.